Dev:IT/2.5/Py/Scripts/Cookbook/Code snippets/Other data types
Altri tipi di dati
Testo
Questo programma aggiunge un testo alla viewport e imposta alcuni attributi.
Notare che il tipo di dato è TextCurve. Il tipo Text è per il testo nell'editor di testo.

#----------------------------------------------------------
# File text.py
#----------------------------------------------------------
import bpy
import math
from math import pi

def run(origin):
    # Create and name TextCurve object
    bpy.ops.object.text_add(
    location=origin,
    rotation=(pi/2,0,pi))
    ob = bpy.context.object
    ob.name = 'HelloWorldText'
    tcu = ob.data
    tcu.name = 'HelloWorldData'

    # TextCurve attributes
    tcu.body = "Hello, world"
    tcu.font = bpy.data.fonts[0]
    tcu.offset_x = -9
    tcu.offset_y = -0.25
    tcu.shear = 0.5
    tcu.size = 3
    tcu.space_character = 2
    tcu.space_word = 4

    # Inherited Curve attributes
    tcu.extrude = 0.2
    tcu.use_fill_back = True
    tcu.use_fill_deform = True
    tcu.use_fill_front = True

if __name__ == "__main__":
    run((0,0,0))
Layers
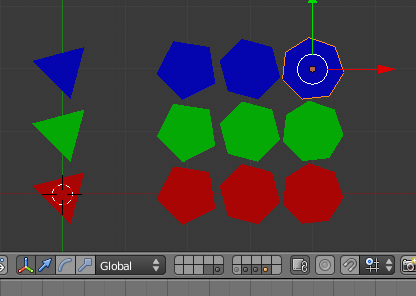
Questo programma mostra tre metodi per piazzare un oggetto su un nuovo livello:
- Crearlo sul livello corretto.
- Crearlo sul layer 1 e poi cambiare
Object.layer. - Crearlo sul layer 1 e usare un operatore per spostarlo.
Viene anche mostrato come cambiare il layer visibile.
#----------------------------------------------------------
# File layers.py
#----------------------------------------------------------
import bpy

def createOnLayer(mat):
    for n in range(3, 8):
        # Create a n-gon on layer n+11
        layers = 20*[False]
        layers[n+11] = True

        bpy.ops.mesh.primitive_circle_add(
            vertices=n,
            radius=0.5,
            fill=True,
            view_align=True,
            layers=layers,
            location=(n-3,0,0)
        )
        bpy.context.object.data.materials.append(mat)
    return

def changeLayerData(mat):
    for n in range(3, 8):
        # Create a n-gon on layer 1
        bpy.ops.mesh.primitive_circle_add(
            vertices=n,
            radius=0.5,
            fill=True,
            view_align=True,
            location=(n-3,1,0)
        )
        bpy.context.object.data.materials.append(mat)

        # Then move it to a new layer
        ob = bpy.context.object
        ob.layers[n+11] = True

        # Remove it from other layers.
        layers = 20*[False]
        layers[n+11] = True
        for m in range(20):
            ob.layers[m] = layers[m]
    return

def moveLayerOperator(mat):
    for n in range(3, 8):
        # Create a n-gon on layer 1
        bpy.ops.mesh.primitive_circle_add(
            vertices=n,
            radius=0.5,
            fill=True,
            view_align=True,
            location=(n-3,2,0)
        )
        bpy.context.object.data.materials.append(mat)

        # Then move it to a new layer
        layers = 20*[False]
        layers[n+11] = True
        bpy.ops.object.move_to_layer(layers=layers)

    return


def run():
    # Create some materials
    red = bpy.data.materials.new('Red')
    red.diffuse_color = (1,0,0)
    green = bpy.data.materials.new('Green')
    green.diffuse_color = (0,1,0)
    blue = bpy.data.materials.new('Blue')
    blue.diffuse_color = (0,0,1)

    # Three methods to move objects to new layer
    createOnLayer(red)
    changeLayerData(green)
    moveLayerOperator(blue)

    # Select layers 14 - 20
    scn = bpy.context.scene
    bpy.ops.object.select_all(action='SELECT')
    for n in range(13,19):
        scn.layers[n] = True

    # Deselect layers 1 - 13, but only afterwards.
    # Seems like at least one layer must be selected at all times.
    for n in range(0,13):
        scn.layers[n] = False

    # Deselect layer 16
    scn.layers[15] = False
    return


if __name__ == "__main__":
    run()
Gruppi
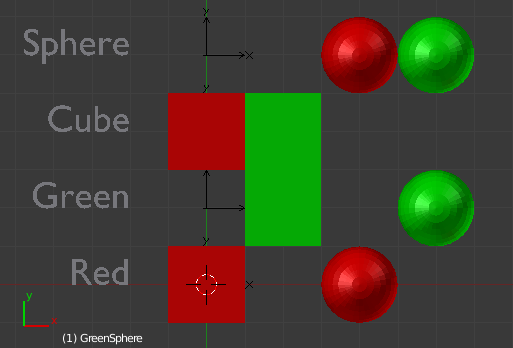
Questo programma mostra come creare gruppi, aggiungere oggetti a un gruppo e empty che duplicano i gruppi. Aggiungiamo quattro gruppi, quattro mesh assegnate a due gruppi e quattro testi assegnati a un gruppo singolo. Poi aggiungiamo quattro empties, con dupli-group ai quattro gruppi. Infine gli emptie sono mossi così che ogni riga contiene gli elementi di quel gruppo.
#----------------------------------------------------------
# File groups.py
# Create groups
#----------------------------------------------------------
import bpy
import mathutils
from mathutils import Vector

# Layers
Display = 5
Build = 6

def setObject(name, mat):
    ob = bpy.context.object
    ob.name = name
    ob.data.materials.append(mat)
    return ob

# Move object to given layer.
def moveToLayer(ob, layer):
    ob.layers[layer] = True
    for n in range(20):
        if n != layer:
            ob.layers[n] = False
    return

# Add a TextCurve object in layer 13
def addText(string, loc):
    tcu = bpy.data.curves.new(string+'Data', 'FONT')
    text = bpy.data.objects.new(string+'Text', tcu)
    tcu.body = string
    tcu.align = 'RIGHT'
    text.location = loc
    bpy.context.scene.objects.link(text)
    # Must change text.layers after text has been linked to scene,
    # otherwise the change may not stick.
    moveToLayer(text, Build)
    return text

def run():
    # Create two materials
    red = bpy.data.materials.new('RedMat')
    red.diffuse_color = (1,0,0)
    green = bpy.data.materials.new('GreenMat')
    green.diffuse_color = (0,1,0)

    # Locations
    origin = Vector((0,0,0))
    dx = Vector((2,0,0))
    dy = Vector((0,2,0))
    dz = Vector((0,0,2))

    # Put objects on the build layer
    layers = 20*[False]
    layers[Build] = True

    # Create objects
    bpy.ops.mesh.primitive_cube_add(location=dz, layers=layers)
    redCube = setObject('RedCube', red)
    bpy.ops.mesh.primitive_cube_add(location=dx+dz, layers=layers)
    greenCube = setObject('GreenCube', green)
    bpy.ops.mesh.primitive_uv_sphere_add(location=2*dx+dz, layers=layers)
    redSphere = setObject('RedSphere', red)
    bpy.ops.mesh.primitive_uv_sphere_add(location=3*dx+dz, layers=layers)
    greenSphere = setObject('GreenSphere', green)

    # Create texts
    redText = addText('Red', -dx)
    greenText = addText('Green', -dx)
    cubeText = addText('Cube', -dx)
    sphereText = addText('Sphere', -dx)

    # Create groups
    redGrp = bpy.data.groups.new('RedGroup')
    greenGrp = bpy.data.groups.new('GreenGroup')
    cubeGrp = bpy.data.groups.new('CubeGroup')
    sphereGrp = bpy.data.groups.new('SphereGroup')

    # Table of group members
    members = {
        redGrp : [redCube, redSphere, redText],
        greenGrp : [greenCube, greenSphere, greenText],
        cubeGrp : [redCube, greenCube, cubeText],
        sphereGrp : [redSphere, greenSphere, sphereText]
    }

    # Link objects to groups
    for group in members.keys():
        for ob in members[group]:
            group.objects.link(ob)

    # List of empties
    empties = [
        ('RedEmpty', origin, redGrp),
        ('GreenEmpty', dy, greenGrp),
        ('CubeEmpty', 2*dy, cubeGrp),
        ('SphereEmpty', 3*dy, sphereGrp)
    ]

    # Create Empties and put them on the display layer
    scn = bpy.context.scene
    for (name, loc, group) in empties:
        empty = bpy.data.objects.new(name, None)
        empty.location = loc
        empty.name = name
        empty.dupli_type = 'GROUP'
        empty.dupli_group = group
        scn.objects.link(empty)
        moveToLayer(empty, Display)


    # Make display layer into the active layer
    scn.layers[Display] = True
    for n in range(20):
        if n != Display:
            scn.layers[n] = False

    return

if __name__ == "__main__":
    run()
Lattice
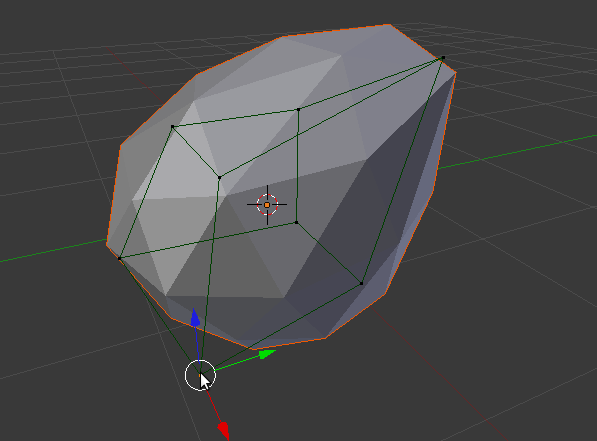
Questo programma aggiunge un'icosfera deformata da un lattice- Il modificatore lattice agisce solo sul vertex group della metà inferiore della sfera.
#----------------------------------------------------------
# File lattice.py
#----------------------------------------------------------
import bpy

def createIcoSphere(origin):
    # Create an icosphere
    bpy.ops.mesh.primitive_ico_sphere_add(location=origin)
    ob = bpy.context.object
    me = ob.data

    # Create vertex groups
    upper = ob.vertex_groups.new('Upper')
    lower = ob.vertex_groups.new('Lower')
    for v in me.vertices:
        if v.co[2] > 0.001:
            upper.add([v.index], 1.0, 'REPLACE')
        elif v.co[2] < -0.001:
            lower.add([v.index], 1.0, 'REPLACE')
        else:
            upper.add([v.index], 0.5, 'REPLACE')
            lower.add([v.index], 0.5, 'REPLACE')
    return ob

def createLattice(origin):
    # Create lattice and object
    lat = bpy.data.lattices.new('MyLattice')
    ob = bpy.data.objects.new('LatticeObject', lat)
    ob.location = origin
    ob.show_x_ray = True
    # Link object to scene
    scn = bpy.context.scene
    scn.objects.link(ob)
    scn.objects.active = ob
    scn.update()

    # Set lattice attributes
    lat.interpolation_type_u = 'KEY_LINEAR'
    lat.interpolation_type_v = 'KEY_CARDINAL'
    lat.interpolation_type_w = 'KEY_BSPLINE'
    lat.use_outside = False
    lat.points_u = 2
    lat.points_v = 2
    lat.points_w = 2

    # Set lattice points
    s = 1.0
    points = [
        (-s,-s,-s), (s,-s,-s), (-s,s,-s), (s,s,-s),
        (-s,-s,s), (s,-s,s), (-s,s,s), (s,s,s)
    ]
    for n,pt in enumerate(lat.points):
        for k in range(3):
            #pt.co[k] = points[n][k]
            pass
    return ob

def run(origin):
    sphere = createIcoSphere(origin)
    lat = createLattice(origin)
    # Create lattice modifier
    mod = sphere.modifiers.new('Lat', 'LATTICE')
    mod.object = lat
    mod.vertex_group = 'Upper'
    # Lattice in edit mode for easy deform
    bpy.context.scene.update()
    bpy.ops.object.mode_set(mode='EDIT')
    return

if __name__ == "__main__":
    run((0,0,0))
Curve
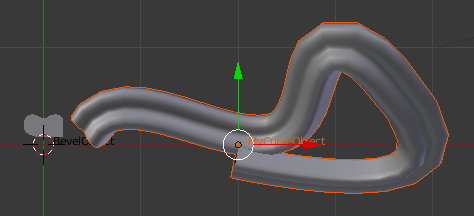
Questo programma aggiunge una curva Bezier. Aggiunge anche un cerchio Nurbs che è usato come oggetto bevel.
#----------------------------------------------------------
# File curve.py
#----------------------------------------------------------
import bpy

def createBevelObject():
    # Create Bevel curve and object
    cu = bpy.data.curves.new('BevelCurve', 'CURVE')
    ob = bpy.data.objects.new('BevelObject', cu)
    bpy.context.scene.objects.link(ob)

    # Set some attributes
    cu.dimensions = '2D'
    cu.resolution_u = 6
    cu.twist_mode = 'MINIMUM'
    ob.show_name = True

    # Control point coordinates
    coords = [
        (0.00,0.08,0.00,1.00),
        (-0.20,0.08,0.00,0.35),
        (-0.20,0.19,0.00,1.00),
        (-0.20,0.39,0.00,0.35),
        (0.00,0.26,0.00,1.00),
        (0.20,0.39,0.00,0.35),
        (0.20,0.19,0.00,1.00),
        (0.20,0.08,0.00,0.35)
    ]

    # Create spline and set control points
    spline = cu.splines.new('NURBS')
    nPointsU = len(coords)
    spline.points.add(nPointsU)
    for n in range(nPointsU):
        spline.points[n].co = coords[n]

    # Set spline attributes. Points probably need to exist here.
    spline.use_cyclic_u = True
    spline.resolution_u = 6
    spline.order_u = 3

    return ob


def createCurveObject(bevob):
    # Create curve and object
    cu = bpy.data.curves.new('MyCurve', 'CURVE')
    ob = bpy.data.objects.new('MyCurveObject', cu)
    bpy.context.scene.objects.link(ob)

    # Set some attributes
    cu.bevel_object = bevob
    cu.dimensions = '3D'
    cu.use_fill_back = True
    cu.use_fill_front = True
    ob.show_name = True

    # Bezier coordinates
    beziers = [
        ((-1.44,0.20,0.00), (-1.86,-0.51,-0.36), (-1.10,0.75,0.28)),
        ((0.42,0.13,-0.03), (-0.21,-0.04,-0.27), (1.05,0.29,0.21)),
        ((1.20,0.75,0.78), (0.52,1.36,1.19), (2.76,-0.63,-0.14))
    ]

    # Create spline and set Bezier control points
    spline = cu.splines.new('BEZIER')
    nPointsU = len(beziers)
    spline.bezier_points.add(nPointsU)
    for n in range(nPointsU):
        bpt = spline.bezier_points[n]
        (bpt.co, bpt.handle_left, bpt.handle_right) = beziers[n]
    return ob

def run(origin):
    bevob = createBevelObject()
    bevob.location = origin

    curveob = createCurveObject(bevob)
    curveob.location = origin
    bevob.select = False
    curveob.select = True
    bpy.ops.transform.translate(value=(2,0,0))
    return

if __name__ == "__main__":
    run((0,0,0))
Tipi di Curve
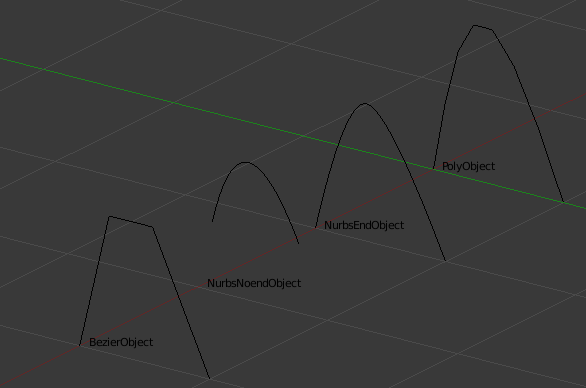
Questo programma mostra la differenza tra i tipi di curva: POLY, NURBS e BEZIER.
#----------------------------------------------------------
# File curve_types.py
#----------------------------------------------------------
import bpy
from math import sin, pi

# Poly and nurbs
def makePolySpline(cu):
    spline = cu.splines.new('POLY')
    cu.dimensions = '3D'
    addPoints(spline, 8)

def makeNurbsSpline(cu):
    spline = cu.splines.new('NURBS')
    cu.dimensions = '3D'
    addPoints(spline, 4)
    spline.order_u = 3
    return spline

def addPoints(spline, nPoints):
    spline.points.add(nPoints-1)
    delta = 1/(nPoints-1)
    for n in range(nPoints):
        spline.points[n].co = (0, n*delta, sin(n*pi*delta), 1)

# Bezier
def makeBezierSpline(cu):
    spline = cu.splines.new('BEZIER')
    cu.dimensions = '3D'
    order = 3
    addBezierPoints(spline, order+1)
    spline.order_u = order

def addBezierPoints(spline, nPoints):
    spline.bezier_points.add(nPoints-1)
    bzs = spline.bezier_points
    delta = 1/(nPoints-1)
    for n in range(nPoints):
        bzs[n].co = (0, n*delta, sin(n*pi*delta))
        print(bzs[n].co)
    for n in range(1, nPoints):
        bzs[n].handle_left = bzs[n-1].co
    for n in range(nPoints-1):
        bzs[n].handle_right = bzs[n+1].co
    return spline

# Create curve and object and link to scene
def makeCurve(name, origin, dx):
    cu = bpy.data.curves.new('%sCurve' % name, 'CURVE')
    ob = bpy.data.objects.new('%sObject' % name, cu)
    (x,y,z) = origin
    ob.location = (x+dx,y,z)
    ob.show_name = True
    bpy.context.scene.objects.link(ob)
    return cu

def run(origin):
    polyCurve = makeCurve("Poly", origin, 0)
    makePolySpline(polyCurve)
    nurbsCurve = makeCurve("NurbsEnd", origin, 1)
    spline = makeNurbsSpline(nurbsCurve)
    spline.use_endpoint_u = True
    nurbsCurve = makeCurve("NurbsNoend", origin, 2)
    spline = makeNurbsSpline(nurbsCurve)
    spline.use_endpoint_u = False
    bezierCurve = makeCurve("Bezier", origin, 3)
    makeBezierSpline(bezierCurve)
    return

if __name__ == "__main__":
    run((0,0,0))
Path
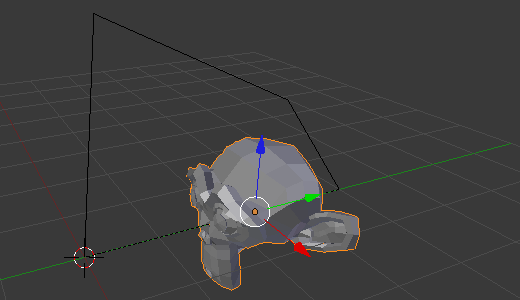
Questo programma aggiunge un path e una scimmia con un vincolo follow path.
#----------------------------------------------------------
# File path.py
#----------------------------------------------------------
import bpy

def run(origin):
    # Create path data and object
    path = bpy.data.curves.new('MyPath', 'CURVE')
    pathOb = bpy.data.objects.new('Path', path)
    pathOb.location = origin
    bpy.context.scene.objects.link(pathOb)

    # Set path data
    path.dimensions = '3D'
    path.use_path = True
    path.use_path_follow = True
    path.path_duration = 100

    # Animate path
    path.eval_time = 0
    path.keyframe_insert(data_path="eval_time", frame=0)
    path.eval_time = 100
    path.keyframe_insert(data_path="eval_time", frame=250)

    # Add a spline to path
    spline = path.splines.new('POLY')
    spline.use_cyclic_u = True
    spline.use_endpoint_u = False

    # Add points to spline
    pointTable = [(0,0,0,0), (1,0,3,0),
        (1,2,2,0), (0,4,0,0), (0,0,0,0)]
    nPoints = len(pointTable)
    spline.points.add(nPoints-1)
    for n in range(nPoints):
        spline.points[n].co = pointTable[n]

    # Add a monkey
    bpy.ops.mesh.primitive_monkey_add()
    monkey = bpy.context.object

    # Add follow path constraint to monkey
    cns = monkey.constraints.new('FOLLOW_PATH')
    cns.target = pathOb
    cns.use_curve_follow = True
    cns.use_curve_radius = True
    cns.use_fixed_location = False
    cns.forward_axis = 'FORWARD_Z'
    cns.up_axis = 'UP_Y'

    return

if __name__ == "__main__":
    run((0,0,0))
    bpy.ops.screen.animation_play(reverse=False, sync=False)
Camera e luci
Questo programma aggiunge una luce sun alla scena e una luce spot per ogni oggetto nella scena. Ogni spot ha a un vincolo TrackTo che lo fa puntare al proprio oggetto, Mentre la luce sun punta al centro di tutti gli oggetti della scena.
#----------------------------------------------------------
# File camera.py
# Adds one camera and several lights
#----------------------------------------------------------
import bpy, mathutils, math
from mathutils import Vector
from math import pi

def findMidPoint():
    sum = Vector((0,0,0))
    n = 0
    for ob in bpy.data.objects:
        if ob.type not in ['CAMERA', 'LAMP', 'EMPTY']:
            sum += ob.location
            n += 1
    if n == 0:
        return sum
    else:
        return sum/n

def addTrackToConstraint(ob, name, target):
    cns = ob.constraints.new('TRACK_TO')
    cns.name = name
    cns.target = target
    cns.track_axis = 'TRACK_NEGATIVE_Z'
    cns.up_axis = 'UP_Y'
    cns.owner_space = 'WORLD'
    cns.target_space = 'WORLD'
    return

def createLamp(name, lamptype, loc):
    bpy.ops.object.add(
        type='LAMP',
        location=loc)
    ob = bpy.context.object
    ob.name = name
    lamp = ob.data
    lamp.name = 'Lamp'+name
    lamp.type = lamptype
    return ob

def createLamps(origin, target):
    deg2rad = 2*pi/360

    sun = createLamp('sun', 'SUN', origin+Vector((0,20,50)))
    lamp = sun.data
    lamp.type = 'SUN'
    addTrackToConstraint(sun, 'TrackMiddle', target)

    for ob in bpy.context.scene.objects:
        if ob.type == 'MESH':
            spot = createLamp(ob.name+'Spot', 'SPOT', ob.location+Vector((0,2,1)))
            bpy.ops.transform.resize(value=(0.5,0.5,0.5))
            lamp = spot.data

            # Lamp
            lamp.type = 'SPOT'
            lamp.color = (0.5,0.5,0)
            lamp.energy = 0.9
            lamp.falloff_type = 'INVERSE_LINEAR'
            lamp.distance = 7.5

            # Spot shape
            lamp.spot_size = 30*deg2rad
            lamp.spot_blend = 0.3

            # Shadows
            lamp.shadow_method = 'BUFFER_SHADOW'
            lamp.use_shadow_layer = True
            lamp.shadow_buffer_type = 'REGULAR'
            lamp.shadow_color = (0,0,1)

            addTrackToConstraint(spot, 'Track'+ob.name, ob)
    return

def createCamera(origin, target):
    # Create object and camera
    bpy.ops.object.add(
        type='CAMERA',
        location=origin,
        rotation=(pi/2,0,pi))
    ob = bpy.context.object
    ob.name = 'MyCamOb'
    cam = ob.data
    cam.name = 'MyCam'
    addTrackToConstraint(ob, 'TrackMiddle', target)


    # Lens
    cam.type = 'PERSP'
    cam.lens = 75
    cam.lens_unit = 'MILLIMETERS'
    cam.shift_x = -0.05
    cam.shift_y = 0.1
    cam.clip_start = 10.0
    cam.clip_end = 250.0

    empty = bpy.data.objects.new('DofEmpty', None)
    empty.location = origin+Vector((0,10,0))
    cam.dof_object = empty

    # Display
    cam.show_title_safe = True
    cam.show_name = True

    # Make this the current camera
    scn = bpy.context.scene
    scn.camera = ob
    return ob

def run(origin):
    # Delete all old cameras and lamps
    scn = bpy.context.scene
    for ob in scn.objects:
        if ob.type == 'CAMERA' or ob.type == 'LAMP':
            scn.objects.unlink(ob)

    # Add an empty at the middle of all render objects
    midpoint = findMidPoint()
    bpy.ops.object.add(
        type='EMPTY',
        location=midpoint),
    target = bpy.context.object
    target.name = 'Target'

    createCamera(origin+Vector((50,90,50)), target)
    createLamps(origin, target)
    return

if __name__ == "__main__":
    run(Vector((0,0,0)))