Dev:Ref/Release Notes/2.64/Collada
Blender 2.64: Collada
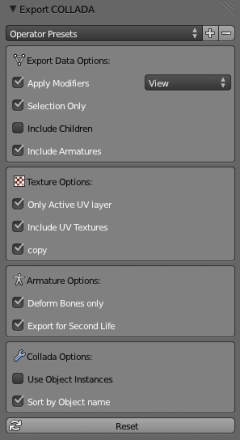
Most apparent is the exporter panel has been redesigned due to many new export options:
- Apply modifiers (selectable preview/render mode)
- Selection Only (since Blender 2.58)
- Include Children (of selected objects)
- Include Armatures (of selected objects)
- Only active UV layer
- Include UVTextures
- Deform Bones Only (exclude rig control bones from export)
We have also added a few options for influencing the way how data is exported:
- Make local copies of exported textures
- Use Object Instances (to avoid duplicate geometry difinitions)
- Sort by Object Name (to ensure always the same order of exported data)
- Export for Second Life (very special treatment for Second Life riggs) (since Blender 2.62)
Options
Apply Modifiers
All active Modifiers will be applied in a non destructive mode. That is, the modifiers will be applied to copies of the meshes. Thus you no longer need to apply your modifiers before exporting. That is now done automatically in the background.
Preview/Render mode
Some Modifiers provide a Preview mode and a Render mode with different mesh settings. We now suport both modes when applying the modifiers.
|
Shape keys
This option also includes the application of Shape keys! So now you can export your meshes with the current shape key configuration baked in.
|
Selection Only
When selection only is enabled, then only the selected objects will be exported. Otherwise the entire scene is exported with all visible and all invisible objects.
Include Children
When this option is enabled then all children of the selected objects will also be exported regardless of their selection state.
Example
You now can select only(!) an armature, then in the exporter enable “include children” then all rigged meshes attached to the armature will also be exported.
|
Include Armatures
When this option is enabled, then all armatures related to the selected objects will also be exported regardless of their selection state.
Example
You now can just select your objects, then in the exporter enable “include armatures” then the armature data is also exported.
|
Only Active UV layer
When your mesh contains multiple UV layers, then Blender exports all layers by default. This option allows you to only export the active UV layers.
Include UV Textures
Blender supports 2 ways to texturise your objects.
- By using material based image textures.
- By using directly assigned surface textures
While the material based image textures offer much more flexibility, using surface textures can be done very quickly without need to first render textures. Until now blender did only export material based image textures. The new option allows to directly export render results.
Texture export needs materials
For using surface textures, you will still have to create a material for each texture face. Then all you need to do is assign your images to the correct faces of your mesh. And finally when your object looks as you expect, just export it with “Include UV Textures”. See also the “Copy” option below.
|
Copy
When you export images either material based image textures or surface textures, then we create absolute file references in the export file.
But if the “Copy” option is enabled, we will create copies of the images instead and place the copies besides the export file. In that case the file references are made relative.
Deform Bones Only
When this option is enabled, then the exporter strips all non deformiung bones from the exported armatures. This option is useful when your armatures contain control bones which are not actually part of the charater skeleton. For example you can now export the Avastar rig with this option enabled. The resulting exported rig is compatible to Second life. But please note the restrictions further down.
Use Object Instances
In Blender you can reuse the same mesh for multiple Objects. This is named “object instanciation”. When you enable this option, then Blender will propagata object instantiation to the Collada file.
Sort by Object Name
The export order of data is bound to internal object order and it can not be influenced in a reliable way. this option ensures that the Geometry nodes and the Object nodes are both exported in alphabetical order.
Export for Second Life
This option is very special. In fact some issues with bone orientation are calculated differently when this option is enabled. This is only relevant for rigged meshes. I hope that this option will eventually be replaced by something more meaningful (and still compatible to Second Life) Hint: This option is only important when you want to export rigged meshes. For static meshes it just does nothing at all.
Other
- Improved importing instanced geometry consisting of multiple nodes for Collada importer. (r46133)
