「Doc:2.6/Manual/Modifiers/Deform/Shrinkwrap」の版間の差分
(→Options) |
細 (1版 をインポートしました) |
(相違点なし)
| |
2018年6月29日 (金) 04:41時点における最新版
Page status (reviewing guidelines)
Images
needs an example
|
Shrinkwrap Modifier
Mode: All modes
Panel: Modifiers
Description
The Shrinkwrap modifier allows an object to “shrink” to the surface of another object. It moves each vertex of the object being modified to the closest position on the surface of the given mesh (using one of the three methods available). It can be applied to meshes, lattices, curves, surfaces and texts.
Like most of the deform modifiers, the affected “vertices” are the “computed” one, i.e. the real geometry of the object at the time the modifier is calculated, and not the original vertices/control points.
Something of a view-independent retopo tool (in Blender 2.49), Shrinkwrap projects vertices along their normals or moved to the nearest surface point. But it doesn’t have accuracy problems like retopo did, since it works in object space instead of image space. Also it’s possible to “keep a distance” from the target position.
Note
For those who found the Shrinkwrap modifier pretty useful, but would like it to move empties or object's positions … have a look at the Shrinkwrap constraint!
|
Options
- Target
- Shrink target, the mesh to shrink/wrap around.
- Vertex Group
- The weight paint for this vertex group of the current modified mesh controls whether and how much each vertex is displaced to its target position. If a vertex is not a member of this group, it is not displaced (same as weight 0).
- Offset
- The distance that must be kept from the calculated target position, in Blender Units.
- Mode
- This drop-down list specifies the method to be used to determine the nearest point on the target’s surface for each vertex of the modified object. Some options will add some extra, specific controls to the panel.
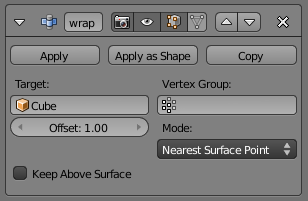
- Nearest Surface Point
- This will select the nearest point over the surface of the shrink target. It adds the extra option Above surface, which always keep the computed vertices above their "floor faces". This is only meaningful when Offset is not null.
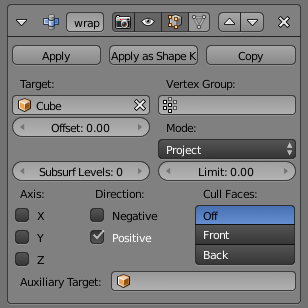
- Projection
- This will project vertices along a chosen axis until they touch the shrink target. Vertices that never touch the shrink target are left in their original position. This implies that, depending on the settings of this option and the relative positions of the two objects, the modified object might sometimes remain undeformed. This is not a bug; just “play” with the settings (especially the Negative/Positive ones), or move one of the objects around…
- This method is the hardest to master, as it might sometimes give unexpected results… It adds quite a few extra options:
- Subsurf Levels
- This applies a (temporary) Catmull-Clark subsurf to the modified object, before computing the wrap when using Projection mode.
- Subsurf Limit
- This is a distance limit between original vertex and surface. If the distance is larger than this limit vertex wouldn't be projected onto the surface,
- X, Y, Z
- Along which local axis of the modified object the projection is done. These options can be combined with each other, yielding a “median axis” of projection.
- Negative, Positive
- This allows you to select the allowed direction(s) of the shrink along the selected axis. With more than one Shrinkwrap modifier, negative and positive axes can be combined.
- Cull Faces
- This allows you to prevent any projection over the “front side” (respectively the “back side”) of the target’s faces. The “side” of a face is determined by its normal (front being the side “from where” the normal “originates”).
- Auxiliary Target
- An additional object to project over.
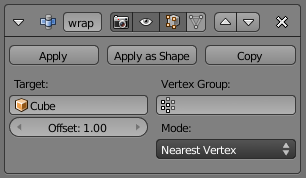
- Nearest Vertex
- This will select the nearest vertex of the shrink target. It adds no extra options.


