Doc:2.6/Manual/Rigging/Skinning/Objects
Page status (reviewing guidelines)
Partial page
|
目次
Linking Objects to Bones
First step skining an armature by geometry is its parenting to bones. There are some settings necessary for an armature to deform a mesh:
- The meshobject needs to be parented to the armatureobject.
- The bones of the armature have to be adjusted their influence on parts of the mesh.
Object parenting to armature
An object is parented to an armature by either:
- adding an Armature Modifier to the object and selecting the appropriate armature
- parenting the object to the armature (not as flexible but still working)
Object Parenting to Whole Armatures by Default Method
But before diving into this, let’s talk about the different ways to skin (parent) an object to a whole armature – as with object skinning, there is an “old parenting” method and a new, more flexible and powerful one, based on modifiers – which allows creation of very complex setups, with objects deformed by several armatures…
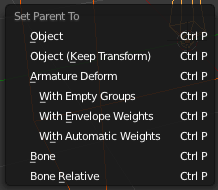
For meshes and lattices only, you can use the CtrlP parent shortcut in the 3D views (after having selected first the “skin” object, then the armature). The Make Parent To menu pops up, select the Armature entry. If the skinning object is a lattice, you're done; no more options are available. But with a child mesh, another Create Vertex Groups? menu appears, with the following options – all regarding the “vertex groups” skinning method:
- With Empty Groups
- will create, if they don’t already exist, empty groups, one for each bone in the skinned armature, with these bones’ names. Choose this option if you have already created (and weighted…) all the vertex groups the mesh requires.
- With Envelope Weights
- will create, as with Name Groups option, the needed vertex groups. However, it will also weight them according to the bones’ envelope settings (i.e. it will assign to each groups the vertices that are inside its bone’s influence area, weighted depending on their distance to this bone). This means that if you had defined vertex groups using same names as skinned bones, their content will be completely overridden! You’ll get the same behavior as if you used the envelopes skinning method, but with vertex groups…
- Automatic Weights
- Creates, as with Envelope Weights option, the needed vertex groups, with vertices assigned and weighted using the newer “bone heat” algorithm.
Tuning Bone Influences on Parts of Geometry
The adjustins transformations of the mesh by the changes of the armature bones can either be done by:
- using the bone envelopes.
- editing vertex groups for each bone.
The first option is default and should work automatically.
The second option has to be set for each bone and vertexgroup individually, even though those setting can be mirrored in symmertrical meshes. For the second option to work the vertexgroup must have the same name as the bone that controls it.
