Doc:2.6/Tutorials/Physics/Rigid Bodies
目次
Basic Physics Tutorial
Let's turn our famous Default Cube into something cool.
Once you work through this, you can head on over to the BGE Physics and get ideas for more simulation work.
Initial Run
Start the game engine by pressing P while your mouse is hovering over a 3D View. My guess is that you see a whole lot of nothing.

In actuality, the physics simulation is now running. But to make it do anything interesting we need to define our objects better. Hit Esc and we will get to work.
Changing Physics Type

The first step to take is to switch your "Engine" from "Blender Render" or "Cycles" to "Blender Game". Pay attention to what happens to the Properties Window (to the right) when you do this (and, don't worry -- your regular settings are preserved, just switch back to the other Engine and you can work with them again). If you select a Properties Window tab and then switch between "Blender Game" and "Blender Render", you will see changes in the layout for: Render, Scene, World, Materials, Particles, and, most importantly, Physics.
Notice that the Blender Render Physics tabs have various simulations, including the Soft Body physics. This is totally different from the Rigid Body physics we will see in the Blender Game Engine (BGE). Rigid bodies are non-deforming, while deforming is the whole point of Soft Bodies.
With the BGE selected, go in the Physics tab and look at the type of physics applied to our cube. It is the default, Static---an unmoving, unchanging object. Change it to be of type "Rigid Body".

Now press P, and say "Goodbye, cube!"
We have changed the Cube from being a static, unmoving object to one whose position is dynamically calculated according to the Gravity setting in the World Tab. If you change this value the Cube will fall at a different rate.
Object Interaction
A cube that does nothing but fall out of the frame will not exactly get you on the cover of Physics Today, so let's add more to the scene.
Start by moving the cube up to be flat on the grid plane with GZ1↵ Enter. Now add a plane with ⇧ ShiftA » Mesh » Plane. Now scale the mesh with S8↵ Enter.
If you hit P now, the cube will go back to simply sitting there. What is actually happening is the physics simulation is calculating the collision between the cube and the plane, and it knows that no motion should occur.
It may seem like we are spending plenty of time getting nowhere. So far -- you're right. And we have one more "getting nowhere" step to do: Turning our cube into a Domino.
Scale it with: SY/2↵ Enter and SX/8↵ Enter (this is to scale from an actual Domino set).
Now, if you want to go nuts, add a Subsurf with Ctrl2 and add in some edge loops with CtrlR in Edit mode to get that rounded Domino shape. Set Shading: Smooth and you're not looking bad.
If you want to go hog wild, you can fully model the pip marks and bar.
If you want to go lazy, you can download our Tutorials-Physics-RigidBodies-Domino.blend which already is set up to this point with the above domino ready to go.
After you have your domino how you like it, press P and see what happens.
What?? Not only are we not making progress -- now we have managed to screw up our simulation so it doesn't even look logical. We'll get there, I promise.
Collision Bounds
To fix our problem, we will turn on a very important part of the physics simulation debugging: Game » Show Physics Visualization. Now P again. You will see a bunch of colored lines, but the ones we are interested in right now are the (hard to see) white ones and the red ones around them. Go ahead and Esc then Z then P again, to see the visualization in wireframe mode.

See how the Domino's bounds (the white diamond-shape) are only a small box? It is actually only as big as our shortest dimension, from when we scaled the X-axis to 1/8th. Let's fix that.

Go into the Physics tab, find the Collision Bounds checkbox, and enable it. Press P to run again, and it should instantly be working better.
We have enabled "Box" bounds, which will work for now. Unless you wanted to simulate the very slight rounding of our domino's edges, or perhaps the pip marks, Box will suffice.
Now we are ready for the action.
Chain Reaction
Go into Top View with Numpad7 (this will give you a clear view, and it will also disable movement on the z-axis plus make rotation happen around the z-axis).
Select your domino, and start duplicating it with ⇧ ShiftD. Now would be a good time to use ⇧ ShiftR to create quick chains of perfectly-spaced dominos. Some of them you will want to rotate with R. You might want to only create a few for your first run, so you can get straight to the reaction.
When you have placed all your dominoes, view the side of the first domino with Numpad1. Give it a little rotation with R and move it into place with G (it doesn't have to be perfect, of course -- the simulator will take whatever you give it and run anyway).
And now, press P.

You can play around with your display settings, such as enabling/disabling Physics Visualization, wireframe/solid with Z and Textured with AltZ.
Going Further
One fun thing to do at this point is to enable Recording to Keyframes and then doing a full render.
Another idea is to make use of parenting the Domino to a Curve and enabling Duplicates: Frames to really get elaborate with your setup. Here's one we cooked up that you might recognize:


Efficiency and Low-poly Modeling
You might not be happy with the speed of what we created so far. Depending on how you did your domino, it might run very slowly indeed (the sample .blend has a Domino with 380 faces, and runs like molasses when you have 350+ of them). Now it is time to explore a classic gaming trick: Low-poly models.
The basic idea is that you create a copy of the object with a simpler shape, in our case we can do so with a 6-sided rectangular prism. Then you Bake the colors, normals, and whatever else you wish from the high-poly model onto the low-poly model.
To do this, here are the steps:
- Make a low-poly model (don't forget to set the Physics properties!)
- Unwrap the low-poly model onto a new image in the UV/Image Editor.
- Make the two models overlap.
- Now, select the high-poly mesh first (you might have to AltRMB
 to bring up the selection dialogue instead of randomly clicking), then select the low-poly mesh second. This makes the high-poly the "Selected" and the low the "Active" object.
 - Go to the bottom of the Render tab, the very last section: Bake. Set the following:
- Bake Mode: Normals
- Normal Space: Tangent
- Selected to Active
- Now press Bake while watching the UV/Image editor window. It should look like this: .
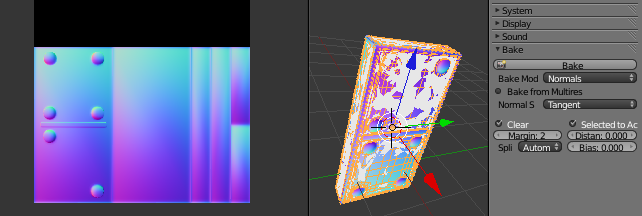 The Result of a Normals Bake
 - Create a new image and select Bake Mode: Textures
- Bake your second map, the "Texture Map" -- though perhaps a better name here would be "Diffuse Map" or "Color Map".
- Now, on the low-poly Textures tab, add 2 textures:
- Both will be type Image or Movie
- Both will be set to Mapping > Coordinates > UV, with Map = "UVMap".
- For the Normal Map texture, turn off Influence > Color and turn on "Normals".
- Find the "Image Sampling" > Normal Map > Tangent setting
- For the Texture (or Diffuse, or Color) Map, leave Influence > Color

It is good to test render with only one texture enabled to see what it looks like. You should, however, have a semi-realistic looking domino -- but whose geometry is entirely fake.

.
To replace your high-res dominoes, you could delete the old ones and set up new ones, or you could run a script like the following (which you will have to fix the names to match how you named your low-res domino and your high-res dominoes).
import bpy
copy_me = bpy.data.objects['LowResDomino']
for o in bpy.data.objects:
    if o.name[:6] == 'Domino':
        print("Converting %s" % o.name)
        bpy.ops.object.select_all(action='DESELECT')
        copy_me.select = True
        delta = o.location - copy_me.location
        rot = o.rotation_euler
        bpy.ops.object.duplicate_move(
            OBJECT_OT_duplicate={
                'linked':False,
                'mode':'TRANSLATION'},
            TRANSFORM_OT_translate={
                'value':delta}
            )
        bpy.context.selected_objects[0].rotation_euler = rot
The exciting part comes in running the simulation. Now it should be near-real-time.
Here is the hot-rodded .blend for you to play with: Tutorial-Physics-RigidBody-DominoSuzanne2.blend
Interactive Example
Once you've gotten the hang of the basic process of creating physics objects, you will soon want to add more control over the objects.
For a demo of a simple game, check out Frijoles.
It will show you:
- Use of the Logic Editor and BGE "Bricks" (if you switch the screen layout to "Game Logic" and select various objects to see their bricks)
- Control of characters through keyboard left/right
- Force application (the Beans jump continuously)
- Spawning new objects (the boulders appear continuously)
- Forcibly putting objects to sleep so that the physics engine has fewer calculations to consider.
- Switching Scenes
- ...etc.
Hints
- From the developers of the Bullet engine, when designing a simulation:
- Keep the masses for the dynamic object similar. If you put an object of 100kg resting on an object of 0.1kg, is not accurate and potentially unstable.
- Assign the right bounds type. For a cylinder, choose cylinder, even for non-moving objects (the same goes for boxes and other shapes). Convex Hull Polytope can approximate meshes for moving objects and static objects. Static triangle mesh is good for scenarios and terrain.
- Do not use high values for gravity
- Do not use too many vertices in objects with Convex Hull Polytope enabled.
- Do not use very large or very small objects (less than 0.1 units).
- Do not use degenerate triangles in the meshes (triangles where there is one or two very acute angles).
- Objects with higher mass do not fall faster, but require a larger force to be accelerated and stopped. Objects with higher mass only fall faster than lighter objects when there is air drag. You can emulate air drag by using Damp. To simulate water environment, use a very high value for damp.
- Always save before you are going to do Record Animation. First, because some bakes can take a long time, and may crash your computer while simulating. After you finished, save as to get two files. Second, for big simulations, the size of the files can be very different.