Dev:Py/Scripts/Cookbook/Code snippets/Interface
NOTE: This document uses Python global in a way which is bad practice, this document should be edited to remove misuse of globals --Ideasman42 12:48, 9 September 2013 (CEST).
Interface
Most scripts need to communicate with the user in some way. A script may be invoked from a menu or from a button in a panel, and it may take its input from sliders, checkboxes, drop-down menus or inputs boxes. User interface elements are implemented as Python classes. Two types of interface elements are discussed in these notes:
- A panel is a class derived from
bpy.types.Panel. It has properties and a draw function, which is called every time the panel is redrawn. - An operator is a class derived from
bpy.types.Operator. It has properties, an execute function, and optionally an invoke function. Operators can be registred to make them appear in menus. In particular, a button is an operator. When you press the button, its execute function is called.
Both panels and operators must be registered before they can be used. The simplest way to register everything in a file is to end it with a call to bpy.utils.register_module(__name__).
The interface part of the API is probably less stable than other parts, so the code in this section may break in future releases.
Panels and buttons
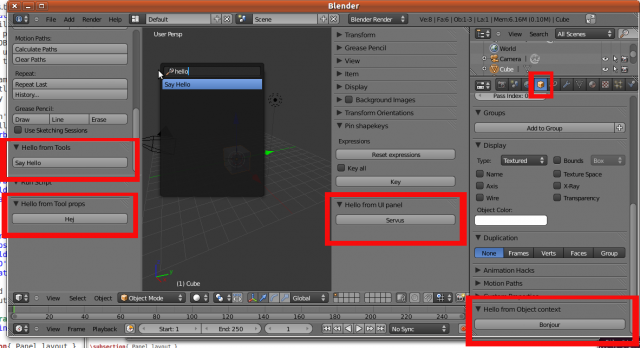
This program adds five different panels to the user interface in different places. Each panel has a name and a button. The same operator is used for all buttons, but the text on it is can be changed with the text argument. When you press the button, Blender prints a greeting in the terminal.
The button operator can be invoked without arguments, as in the first panel:
self.layout.operator("hello.hello")
Blender will then search for an operator with the bl_idname hello.hello and place it in the panel. The text on the button defaults to its bl_label, i.e. Say Hello. The OBJECT_OT_HelloButton class also has a custom string property called country. It can be used for passing arguments to the button. If the operator is invoked without argument, the country property defaults to the empty string.
A bl_idname must be a string containing only lowercase letters, digits and underscores, plus exactly one dot; hello.hello satisfies these criteria. Apart from that there are apparently no restrictions in the bl_idname.
The button's default appearance and behaviour can be modified. Let us invoke the button in the following way:
self.layout.operator("hello.hello", text='Hej').country = "Sweden"
The text on this button is Hej, and the value of the country property is "Sweden". When we press this button, Blender prints the following to the terminal window.
Hello world from Sweden!
At the end of the file, everything is registered with a call to
bpy.utils.register_module(__name__)
Our newly defined button operator can now be used as any other Blender operator. Here is a session from the Blender's python console:
>>> bpy.ops.hello.hello(country = "USA")
Hello world from USA!
{'FINISHED'}
Another way to invoke our new operator is to hit Space. A selector with all available operators pops up at the mouse location. Prune the selection by typing a substring of our operator's bl_label in the edit box. The operator with default parameters is executed and Hello world! is printed in the terminal window.
#----------------------------------------------------------
# File hello.py
#----------------------------------------------------------
import bpy

#
#    Menu in tools region
#
class ToolsPanel(bpy.types.Panel):
    bl_label = "Hello from Tools"
    bl_space_type = "VIEW_3D"
    bl_region_type = "TOOLS"

    def draw(self, context):
        self.layout.operator("hello.hello")

#
#    Menu in toolprops region
#
class ToolPropsPanel(bpy.types.Panel):
    bl_label = "Hello from Tool props"
    bl_space_type = "VIEW_3D"
    bl_region_type = "TOOL_PROPS"

    def draw(self, context):
        self.layout.operator("hello.hello", text='Hej').country = "Sweden"

#
#    Menu in UI region
#
class UIPanel(bpy.types.Panel):
    bl_label = "Hello from UI panel"
    bl_space_type = "VIEW_3D"
    bl_region_type = "UI"

    def draw(self, context):
        self.layout.operator("hello.hello", text='Servus')

#
#    Menu in window region, object context
#
class ObjectPanel(bpy.types.Panel):
    bl_label = "Hello from Object context"
    bl_space_type = "PROPERTIES"
    bl_region_type = "WINDOW"
    bl_context = "object"

    def draw(self, context):
        self.layout.operator("hello.hello", text='Bonjour').country = "France"

#
#    Menu in window region, material context
#
class MaterialPanel(bpy.types.Panel):
    bl_label = "Hello from Material context"
    bl_space_type = "PROPERTIES"
    bl_region_type = "WINDOW"
    bl_context = "material"

    def draw(self, context):
        self.layout.operator("hello.hello", text='Ciao').country = "Italy"

#
#    The Hello button prints a message in the console
#
class OBJECT_OT_HelloButton(bpy.types.Operator):
    bl_idname = "hello.hello"
    bl_label = "Say Hello"
    country = bpy.props.StringProperty()

    def execute(self, context):
        if self.country == '':
            print("Hello world!")
        else:
            print("Hello world from %s!" % self.country)
        return{'FINISHED'}

#
#	Registration
#   All panels and operators must be registered with Blender; otherwise
#   they do not show up. The simplest way to register everything in the
#   file is with a call to bpy.utils.register_module(__name__).
#

bpy.utils.register_module(__name__)
The Filebrowser space requires a CHANNELS bl_region_type:
import bpy

class FILEBROWSER_PT_hello(bpy.types.Panel):
    bl_label = "Hello World Filebrowser Panel"
    bl_space_type = "FILE_BROWSER"
    bl_region_type = "CHANNELS"

    def draw(self, context):
        layout = self.layout

        obj = context.object

        row = layout.row()
        row.label(text="Hello world!", icon='WORLD_DATA')

def register():
    bpy.utils.register_class(FILEBROWSER_PT_hello)


def unregister():
    bpy.utils.unregister_class(FILEBROWSER_PT_hello)

if __name__ == "__main__":  # only for live edit.
    bpy.utils.register_module(__name__)
Panel layout and several arguments
This program illustrates how to organize your panel layout. When the script is run, a panel is created in the tool props area, with buttons placed in a non-trivial fashion.
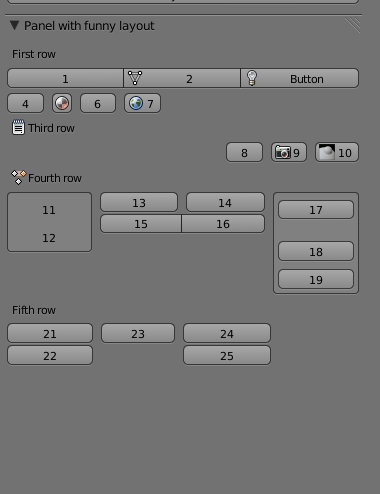
The script also shows one method to send several arguments to an operator. The OBJECT_OT_Button class has two properties, number and row, and prints the values of these properties to the terminal. Being integer properties, they both default to 0 if not set. Thus, if we press buttons 7, 8 and 23, the script prints
Row 0 button 7
Row 3 button 0
Row 0 button 0
But what if we want to set both the number and row properties, i.e. invoke the operator with two arguments? This can not be done directly, but we can create a third property loc, which is a string that is parsed by the operator if non zero. If we press button 13, the script prints
Row 4 button 13
This method can also be used to send more complicated data structures to an operator. Alternatively, we can use global variables for this purpose, ecf subsection A popup dialog
#----------------------------------------------------------
# File layout.py
#----------------------------------------------------------
import bpy

#   Layout panel
class LayoutPanel(bpy.types.Panel):
    bl_label = "Panel with funny layout"
    bl_space_type = "VIEW_3D"
    bl_region_type = "TOOL_PROPS"

    def draw(self, context):
        layout = self.layout

        layout.label("First row")
        row = layout.row(align=True)
        row.alignment = 'EXPAND'
        row.operator("my.button", text="1").number=1
        row.operator("my.button", text="2", icon='MESH_DATA').number=2
        row.operator("my.button", icon='LAMP_DATA').number=3

        row = layout.row(align=False)
        row.alignment = 'LEFT'
        row.operator("my.button", text="4").number=4
        row.operator("my.button", text="", icon='MATERIAL').number=5
        row.operator("my.button", text="6", icon='BLENDER').number=6
        row.operator("my.button", text="7", icon='WORLD').number=7

        layout.label("Third row", icon='TEXT')
        row = layout.row()
        row.alignment = 'RIGHT'
        row.operator("my.button", text="8").row=3
        row.operator("my.button", text="9", icon='SCENE').row=3
        row.operator("my.button", text="10", icon='BRUSH_INFLATE').row=3

        layout.label("Fourth row", icon='ACTION')
        row = layout.row()
        box = row.box()
        box.operator("my.button", text="11", emboss=False).loc="4 11"
        box.operator("my.button", text="12", emboss=False).loc="4 12"
        col = row.column()
        subrow = col.row()
        subrow.operator("my.button", text="13").loc="4 13"
        subrow.operator("my.button", text="14").loc="4 14"
        subrow = col.row(align=True)
        subrow.operator("my.button", text="15").loc="4 15"
        subrow.operator("my.button", text="16").loc="4 16"
        box = row.box()
        box.operator("my.button", text="17").number=17
        box.separator()
        box.operator("my.button", text="18")
        box.operator("my.button", text="19")

        layout.label("Fifth row")
        row = layout.row()
        split = row.split(percentage=0.25)
        col = split.column()
        col.operator("my.button", text="21").loc="5 21"
        col.operator("my.button", text="22")
        split = split.split(percentage=0.3)
        col = split.column()
        col.operator("my.button", text="23")
        split = split.split(percentage=0.5)
        col = split.column()
        col.operator("my.button", text="24")
        col.operator("my.button", text="25")

#   Button
class OBJECT_OT_Button(bpy.types.Operator):
    bl_idname = "my.button"
    bl_label = "Button"
    number = bpy.props.IntProperty()
    row = bpy.props.IntProperty()
    loc = bpy.props.StringProperty()

    def execute(self, context):
        if self.loc:
            words = self.loc.split()
            self.row = int(words[0])
            self.number = int(words[1])
        print("Row %d button %d" % (self.row, self.number))
        return{'FINISHED'}

#    Registration
bpy.utils.register_module(__name__)
Panel properties
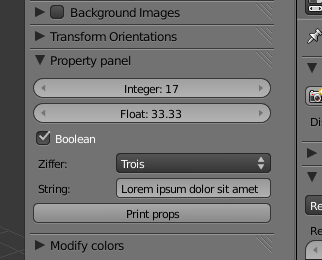
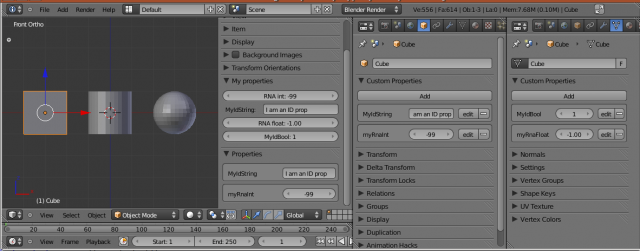
Properties were discussed in section Properties, but we did not explain how to display custom properties in a panel. This script does exactly that. An RNA property is displayed with the syntax
layout.prop(ob, 'myRnaInt')
An ID property is displayed with
layout.prop(ob, '["myRnaInt"]')
Note that the panel is registered explicitly with bpy.utils.register_class(MyPropPanel) instead of using register_module to register everything. Which method is used does not matter
in this example, because MyPropPanel is the only thing that needs to be registred.
#----------------------------------------------------------
# File panel_props.py
#----------------------------------------------------------
import bpy
from bpy.props import *

# Clean the scene and create some objects
bpy.ops.object.select_by_type(type='MESH')
bpy.ops.object.delete()
bpy.ops.mesh.primitive_cube_add(location=(-3,0,0))
cube = bpy.context.object
bpy.ops.mesh.primitive_cylinder_add(location=(0,0,0))
cyl = bpy.context.object
bpy.ops.mesh.primitive_uv_sphere_add(location=(3,0,0))
sphere = bpy.context.object

# Define an RNA prop for every object
bpy.types.Object.myRnaInt = IntProperty(
    name="RNA int",
    min = -100, max = 100,
    default = 33)

# Define an RNA prop for every mesh
bpy.types.Mesh.myRnaFloat = FloatProperty(
    name="RNA float",
    default = 12.345)

# Set the cube's RNA props
cube.myRnaInt = -99
cube.data.myRnaFloat = -1

# Create ID props by setting them.
cube["MyIdString"] = "I am an ID prop"
cube.data["MyIdBool"] = True

#    Property panel
class MyPropPanel(bpy.types.Panel):
    bl_label = "My properties"
    bl_space_type = "VIEW_3D"
    bl_region_type = "UI"

    def draw(self, context):
        ob = context.object
        if not ob:
            return
        layout = self.layout
        layout.prop(ob, 'myRnaInt')
        try:
            ob["MyIdString"]
            layout.prop(ob, '["MyIdString"]')
        except:
            pass
        if ob.type == 'MESH':
            me = ob.data
            layout.prop(me, 'myRnaFloat')
            try:
                me["MyIdBool"]
                layout.prop(me, '["MyIdBool"]')
            except:
                pass

# Registration
bpy.utils.register_class(MyPropPanel)
Using scene properties to store information
This program lets the user input various kind of information, which is then sent from the panel to the buttons. The mechanism is to use user-defined RNA properties, which can be set by the panel and read by the buttons. All kind of Blender data can have properties. Global properties which are not directly associated with any specific object can conveniently be stored in the current scene. Note however that they will be lost if you switch to a new scene.
#----------------------------------------------------------
# File scene_props.py
#----------------------------------------------------------
import bpy
from bpy.props import *

#
#    Store properties in the active scene
#
def initSceneProperties(scn):
    bpy.types.Scene.MyInt = IntProperty(
        name = "Integer",
        description = "Enter an integer")
    scn['MyInt'] = 17

    bpy.types.Scene.MyFloat = FloatProperty(
        name = "Float",
        description = "Enter a float",
        default = 33.33,
        min = -100,
        max = 100)

    bpy.types.Scene.MyBool = BoolProperty(
        name = "Boolean",
        description = "True or False?")
    scn['MyBool'] = True

    bpy.types.Scene.MyEnum = EnumProperty(
        items = [('Eine', 'Un', 'One'),
                 ('Zwei', 'Deux', 'Two'),
                 ('Drei', 'Trois', 'Three')],
        name = "Ziffer")
    scn['MyEnum'] = 2

    bpy.types.Scene.MyString = StringProperty(
        name = "String")
    scn['MyString'] = "Lorem ipsum dolor sit amet"
    return

initSceneProperties(bpy.context.scene)

#
#    Menu in UI region
#
class UIPanel(bpy.types.Panel):
    bl_label = "Property panel"
    bl_space_type = "VIEW_3D"
    bl_region_type = "UI"

    def draw(self, context):
        layout = self.layout
        scn = context.scene
        layout.prop(scn, 'MyInt', icon='BLENDER', toggle=True)
        layout.prop(scn, 'MyFloat')
        layout.prop(scn, 'MyBool')
        layout.prop(scn, 'MyEnum')
        layout.prop(scn, 'MyString')
        layout.operator("idname_must.be_all_lowercase_and_contain_one_dot")

#
#    The button prints the values of the properites in the console.
#

class OBJECT_OT_PrintPropsButton(bpy.types.Operator):
    bl_idname = "idname_must.be_all_lowercase_and_contain_one_dot"
    bl_label = "Print props"

    def execute(self, context):
        scn = context.scene
        printProp("Int:    ", 'MyInt', scn)
        printProp("Float:  ", 'MyFloat', scn)
        printProp("Bool:   ", 'MyBool', scn)
        printProp("Enum:   ", 'MyEnum', scn)
        printProp("String: ", 'MyString', scn)
        return{'FINISHED'}

def printProp(label, key, scn):
    try:
        val = scn[key]
    except:
        val = 'Undefined'
    print("%s %s" % (key, val))

#    Registration
bpy.utils.register_module(__name__)
Polling
A script often only works in some specific context, e.g. when an object of the right kind is active. E.g., a script that manipulates mesh vertices can not do anything meaningful if the active object is an armature.
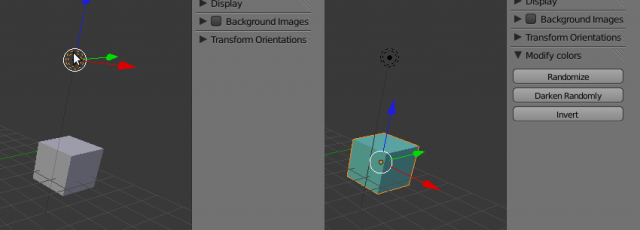
This program adds a panel which modifies the active object's material. The panel resides in the user interface section (open with N), but it is only visible if the active object is a mesh with at least one material. Checking how many materials the active object has is done by poll(). This is not a function but rather a class method, indicated by the command @classmethod above the definition. So what is the difference between a function and a class method? Don't ask me! All I know is that the code works with the @classmethod line in place, but not without.
#----------------------------------------------------------
# File poll.py
#----------------------------------------------------------
import bpy, random

#
#    Menu in UI region
#
class ColorPanel(bpy.types.Panel):
    bl_label = "Modify colors"
    bl_space_type = "VIEW_3D"
    bl_region_type = "UI"

    @classmethod
    def poll(self, context):
        if context.object and context.object.type == 'MESH':
            return len(context.object.data.materials)

    def draw(self, context):
        layout = self.layout
        scn = context.scene
        layout.operator("random.button")
        layout.operator("darken_random.button")
        layout.operator("invert.button")

#
#    The three buttons
#

class RandomButton(bpy.types.Operator):
    bl_idname = "random.button"
    bl_label = "Randomize"

    def execute(self, context):
        mat = context.object.data.materials[0]
        for i in range(3):
            mat.diffuse_color[i] = random.random()
        return{'FINISHED'}

class DarkenRandomButton(bpy.types.Operator):
    bl_idname = "darken_random.button"
    bl_label = "Darken Randomly"

    def execute(self, context):
        mat = context.object.data.materials[0]
        for i in range(3):
            mat.diffuse_color[i] *= random.random()
        return{'FINISHED'}

class InvertButton(bpy.types.Operator):
    bl_idname = "invert.button"
    bl_label = "Invert"

    def execute(self, context):
        mat = context.object.data.materials[0]
        for i in range(3):
            mat.diffuse_color[i] = 1 - mat.diffuse_color[i]
        return{'FINISHED'}

#    Registration
bpy.utils.register_module(__name__)
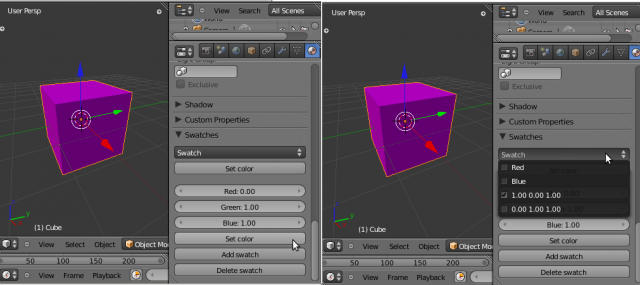
This program adds a panel with a drop-down menu to the User interface panel. In the beginning the menu contains three items: red, green and blue. There are two buttons labelled Set color. The upper one changes the color of the active object to the color selected in the drop-down menu, and the lower one sets it to the color specified by the three sliders. Colors can be added to and deleted from the drop-down menu.
Also note that polling works for buttons as well; the Set color button is greyed out unless the active object is a mesh with at least one material.
#----------------------------------------------------------
# File swatches.py
#----------------------------------------------------------
import bpy
from bpy.props import *

theSwatches = [
    ("1 0 0" , "Red" , "1 0 0"),
    ("0 1 0" , "Green" , "0 1 0"),
    ("0 0 1" , "Blue" , "0 0 1")]

def setSwatches():
    bpy.types.Object.my_swatch = EnumProperty(
        items = theSwatches,
        name = "Swatch")

setSwatches()

bpy.types.Object.my_red = FloatProperty(
    name = "Red", default = 0.5,
    min = 0, max = 1)

bpy.types.Object.my_green = FloatProperty(
    name = "Green", default = 0.5,
    min = 0, max = 1)

bpy.types.Object.my_blue = FloatProperty(
    name = "Blue", default = 0.5,
    min = 0, max = 1)

def findSwatch(key):
    for n,swatch in enumerate(theSwatches):
        (key1, name, colors) = swatch
        if key == key1:
            return n
    raise NameError("Unrecognized key %s" % key)

#    Swatch Panel
class SwatchPanel(bpy.types.Panel):
    bl_label = "Swatches"
    #bl_idname = "myPanelID"
    bl_space_type = "PROPERTIES"
    bl_region_type = "WINDOW"
    bl_context = "material"

    def draw(self , context):
        layout = self.layout
        ob = context.active_object
        layout.prop_menu_enum(ob, "my_swatch")
        layout.operator("swatches.set").swatch=True
        layout.separator()
        layout.prop(ob, "my_red")
        layout.prop(ob, "my_green")
        layout.prop(ob, "my_blue")
        layout.operator("swatches.set").swatch=False
        layout.operator("swatches.add")
        layout.operator("swatches.delete")

#    Set button
class OBJECT_OT_SetButton(bpy.types.Operator):
    bl_idname = "swatches.set"
    bl_label = "Set color"
    swatch = bpy.props.BoolProperty()

    @classmethod
    def poll(self, context):
        if context.object and context.object.type == 'MESH':
            return len(context.object.data.materials)

    def execute(self, context):
        ob = context.object
        if self.swatch:
            n = findSwatch(ob.my_swatch)
            (key, name, colors) = theSwatches[n]
            words = colors.split()
            color = (float(words[0]), float(words[1]), float(words[2]))
        else:
            color = (ob.my_red, ob.my_green, ob.my_blue)
        ob.data.materials[0].diffuse_color = color
        return{'FINISHED'}

#    Add button
class OBJECT_OT_AddButton(bpy.types.Operator):
    bl_idname = "swatches.add"
    bl_label = "Add swatch"

    def execute(self, context):
        ob = context.object
        colors = "%.2f %.2f %.2f" % (ob.my_red, ob.my_green, ob.my_blue)
        theSwatches.append((colors, colors, colors))
        setSwatches()
        return{'FINISHED'}

#    Delete button
class OBJECT_OT_DeleteButton(bpy.types.Operator):
    bl_idname = "swatches.delete"
    bl_label = "Delete swatch"

    def execute(self, context):
        n = findSwatch(context.object.my_swatch)
        theSwatches.pop(n)
        setSwatches()
        return{'FINISHED'}

#    Registration
bpy.utils.register_module(__name__)
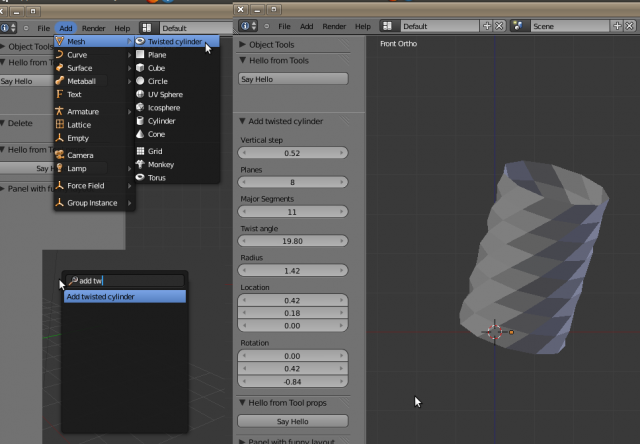
The only operators encountered so far were simple buttons. In this program we make a more complicated operator, which creates a twisted cylinder.
To invoke the operator, press Space and type in "Add twisted cylinder"; Blender suggests matching operator names while you type. The cylinder have several options, which appear in the Tool props area (below the Tools section) once the cylinder has been created. These can be modified interactively and the result is immediately displayed in the viewport.
The last part of the script registers the script. Instead of pressing Space, you can now invoke the script more conveniently from the Add » Mesh submenu. If we had used append instead of prepend in register(), the entry had appeared at the bottom instead of at the top of the menu.
#----------------------------------------------------------
# File twisted.py
#----------------------------------------------------------
import bpy, math

def addTwistedCylinder(context, r, nseg, vstep, nplanes, twist):
    verts = []
    faces = []
    w = 2*math.pi/nseg
    a = 0
    da = twist*math.pi/180
    for j in range(nplanes+1):
        z = j*vstep
        a += da
        for i in range(nseg):
            verts.append((r*math.cos(w*i+a), r*math.sin(w*i+a), z))
            if j > 0:
                i0 = (j-1)*nseg
                i1 = j*nseg
                for i in range(1, nseg):
                    faces.append((i0+i-1, i0+i, i1+i, i1+i-1))
                faces.append((i0+nseg-1, i0, i1, i1+nseg-1))

    me = bpy.data.meshes.new("TwistedCylinder")
    me.from_pydata(verts, [], faces)
    ob = bpy.data.objects.new("TwistedCylinder", me)
    context.scene.objects.link(ob)
    context.scene.objects.active = ob
    return ob

#
#    User interface
#

from bpy.props import *

class MESH_OT_primitive_twisted_cylinder_add(bpy.types.Operator):
    '''Add a twisted cylinder'''
    bl_idname = "mesh.primitive_twisted_cylinder_add"
    bl_label = "Add twisted cylinder"
    bl_options = {'REGISTER', 'UNDO'}

    radius = FloatProperty(name="Radius",
            default=1.0, min=0.01, max=100.0)
    nseg = IntProperty(name="Major Segments",
            description="Number of segments for one layer",
            default=12, min=3, max=256)
    vstep = FloatProperty(name="Vertical step",
            description="Distance between subsequent planes",
            default=1.0, min=0.01, max=100.0)
    nplanes = IntProperty(name="Planes",
            description="Number of vertical planes",
            default=4, min=2, max=256)
    twist = FloatProperty(name="Twist angle",
            description="Angle between subsequent planes (degrees)",
            default=15, min=0, max=90)

    location = FloatVectorProperty(name="Location")
    rotation = FloatVectorProperty(name="Rotation")
    # Note: rotation in radians!

    def execute(self, context):
        ob = addTwistedCylinder(context,
            self.radius, self.nseg, self.vstep, self.nplanes, self.twist)
        ob.location = self.location
        ob.rotation_euler = self.rotation
        #context.scene.objects.link(ob)
        #context.scene.objects.active = ob
        return {'FINISHED'}

#
#    Registration
#    Makes it possible to access the script from the Add > Mesh menu
#

def menu_func(self, context):
    self.layout.operator("mesh.primitive_twisted_cylinder_add",
        text="Twisted cylinder",
        icon='MESH_TORUS')

def register():
   bpy.utils.register_module(__name__)
   bpy.types.INFO_MT_mesh_add.prepend(menu_func)

def unregister():
    bpy.utils.unregister_module(__name__)
    bpy.types.INFO_MT_mesh_add.remove(menu_func)

if __name__ == "__main__":
    register()
A modal operator
The following example is taken directly from the API documentation, as are the next few examples.
A modal operator defines a Operator.modal function which running, handling events until it returns {'FINISHED'} or {'CANCELLED'}. Grab, Rotate, Scale and Fly-Mode are examples of modal operators. They are especially useful for interactive tools, your operator can have its own state where keys toggle options as the operator runs.
When the operator in this example is invoked, it adds a modal handler to itself with the call context.window_manager.modal_handler_add(self). After that, the active object keeps moving in the XY-plane as long as we move the mouse. To quit, press either mouse button or the Esc key.
The modal method triggers on three kinds of events:
- A mouse move moves the active object.
- Press the LMB
 to confirm and exit to normal mode. The object is left at its new position.
 - Press the RMB
 or the Esc key to cancel and exit to normal mode. The object reverts to its original position.
It is important that there is some way to exit to normal mode. If the modal() function always returns 'RUNNING_MODAL', the script will be stuck in an infinite loop and you have to restart Blender.
A modal operator defines two special methods called __init__() and __del__(), which are called when modal operation starts and stops, respectively.
Run the script. The active object moves in the XY-plane when you move the mouse. The script also create a panel with a button, from which you can also invoke the modal operator.
#----------------------------------------------------------
# File modal.py
# from API documentation
#----------------------------------------------------------
import bpy

class MyModalOperator(bpy.types.Operator):
    bl_idname = "mine.modal_op"
    bl_label = "Move in XY plane"

    def __init__(self):
        print("Start moving")

    def __del__(self):
        print("Moved from (%d %d) to (%d %d)" %
            (self.init_x, self.init_y, self.x, self.y))

    def execute(self, context):
        context.object.location.x = self.x / 100.0
        context.object.location.y = self.y / 100.0

    def modal(self, context, event):
        if event.type == 'MOUSEMOVE':  # Apply
            self.x = event.mouse_x
            self.y = event.mouse_y
            self.execute(context)
        elif event.type == 'LEFTMOUSE':  # Confirm
            return {'FINISHED'}
        elif event.type in ('RIGHTMOUSE', 'ESC'):  # Cancel
            return {'CANCELLED'}

        return {'RUNNING_MODAL'}

    def invoke(self, context, event):
        self.x = event.mouse_x
        self.y = event.mouse_y
        self.init_x = self.x
        self.init_y = self.y
        self.execute(context)

        print(context.window_manager.modal_handler_add(self))
        return {'RUNNING_MODAL'}

#
#    Panel in tools region
#
class MyModalPanel(bpy.types.Panel):
    bl_label = "My modal operator"
    bl_space_type = "VIEW_3D"
    bl_region_type = "TOOLS"

    def draw(self, context):
        self.layout.operator("mine.modal_op")

#	Registration
bpy.utils.register_module(__name__)

# Automatically move active object on startup
bpy.ops.mine.modal_op('INVOKE_DEFAULT')
Invoke versus execute
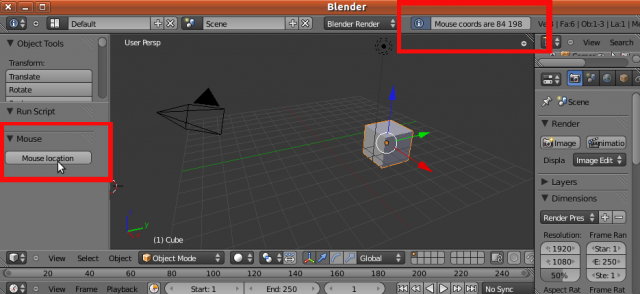
This script illustrates the difference between invoke and execute. The invoking event is an argument of the Operator.invoke function, which sets the two integer properties x and y to the mouse location and calls the Operator.execute function. Alternatively, we can execture the operator and explicitly set x and y: bpy.ops.wm.mouse_position(’EXEC_DEFAULT’, x=20, y=66)
Instead of printing the mouse coordinates in the terminal window, the information is sent to the info panel in the upper right corner. This is a good place to display short notification, because the user does not have to look in another window, especially since the terminal/DOS window is not visible in all versions of Blender. However, long messages are difficult to fit into the limited space of the info panel.
#----------------------------------------------------------
# File invoke.py
# from API documentation
#----------------------------------------------------------

import bpy

class SimpleMouseOperator(bpy.types.Operator):
    """ This operator shows the mouse location,
        this string is used for the tooltip and API docs
    """
    bl_idname = "wm.mouse_position"
    bl_label = "Mouse location"

    x = bpy.props.IntProperty()
    y = bpy.props.IntProperty()

    def execute(self, context):
        # rather then printing, use the report function,
        # this way the message appears in the header,
        self.report({'INFO'}, "Mouse coords are %d %d" % (self.x, self.y))
        return {'FINISHED'}

    def invoke(self, context, event):
        self.x = event.mouse_x
        self.y = event.mouse_y
        return self.execute(context)

#
#    Panel in tools region
#
class MousePanel(bpy.types.Panel):
    bl_label = "Mouse"
    bl_space_type = "VIEW_3D"
    bl_region_type = "TOOL_PROPS"

    def draw(self, context):
        self.layout.operator("wm.mouse_position")

#
#	Registration
#   Not really necessary to register the class, because this happens
#   automatically when the module is registered. OTOH, it does not hurt either.
bpy.utils.register_class(SimpleMouseOperator)
bpy.utils.register_module(__name__)

# Automatically display mouse position on startup
bpy.ops.wm.mouse_position('INVOKE_DEFAULT')

# Another test call, this time call execute() directly with pre-defined settings.
#bpy.ops.wm.mouse_position('EXEC_DEFAULT', x=20, y=66)
A popup dialog
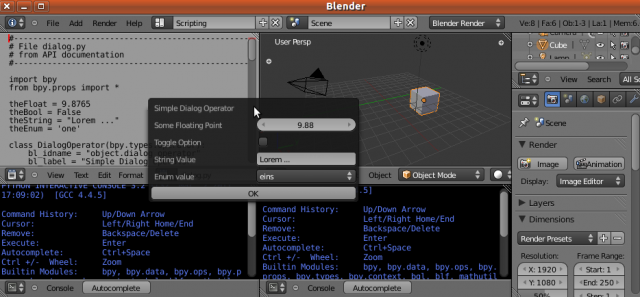
When this script is run a popup window appears, where you can set some properties. After you quit the popup window by moving the mouse outside of it, the properties are written both to the info window and to the console.
In subsection Panel layout and several arguments we used a single string to send several arguments to an operator. Here we use global variables for the same purpose.
#----------------------------------------------------------
# File popup.py
# from API documentation
#----------------------------------------------------------

import bpy
from bpy.props import *

theFloat = 9.8765
theBool = False
theString = "Lorem ..."
theEnum = 'one'

class DialogOperator(bpy.types.Operator):
    bl_idname = "object.dialog_operator"
    bl_label = "Simple Dialog Operator"

    my_float = FloatProperty(name="Some Floating Point",
        min=0.0, max=100.0)
    my_bool = BoolProperty(name="Toggle Option")
    my_string = StringProperty(name="String Value")
    my_enum = EnumProperty(name="Enum value",
        items = [('one', 'eins', 'un'),
                 ('two', 'zwei', 'deux'),
                 ('three', 'drei', 'trois')])

    def execute(self, context):
        message = "%.3f, %d, '%s' %s" % (self.my_float,
            self.my_bool, self.my_string, self.my_enum)
        self.report({'INFO'}, message)
        print(message)
        return {'FINISHED'}

    def invoke(self, context, event):
        global theFloat, theBool, theString, theEnum
        self.my_float = theFloat
        self.my_bool = theBool
        self.my_string = theString
        self.my_enum = theEnum
        return context.window_manager.invoke_props_dialog(self)


bpy.utils.register_class(DialogOperator)

# Invoke the dialog when loading
bpy.ops.object.dialog_operator('INVOKE_DEFAULT')

#
#    Panel in tools region
#
class DialogPanel(bpy.types.Panel):
    bl_label = "Dialog"
    bl_space_type = "VIEW_3D"
    bl_region_type = "UI"

    def draw(self, context):
        global theFloat, theBool, theString, theEnum
        theFloat = 12.345
        theBool = True
        theString = "Code snippets"
        theEnum = 'two'
        self.layout.operator("object.dialog_operator")

#
#	Registration
bpy.utils.register_module(__name__)
An error dialog
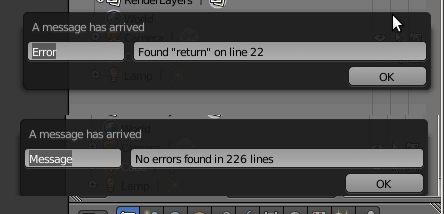
As far as I know, Blender does not have any elegant means to notify the user if something has gone wrong. One can print a message in the terminal window or info panel, and then raise an exception. Most modern application would instead open a message box and display the error message. The following script uses the Blender API to create a popup dialog to notify the user.
The script scans a file. If the word return is found, the script opens a popup window to tell the user that an error has occurred and on which line. If there no such word in the entire file, a popup window displays the number of scanned lines.
At the time of writing, this script causes a memory leak which makes Blender unstable. This bug will hopefully be fixed soon.
#----------------------------------------------------------
# File error.py
# Simple error dialog
#----------------------------------------------------------

import bpy
from bpy.props import *

#
#   The error message operator. When invoked, pops up a dialog
#   window with the given message.
#
class MessageOperator(bpy.types.Operator):
    bl_idname = "error.message"
    bl_label = "Message"
    type = StringProperty()
    message = StringProperty()

    def execute(self, context):
        self.report({'INFO'}, self.message)
        print(self.message)
        return {'FINISHED'}

    def invoke(self, context, event):
        wm = context.window_manager
        return wm.invoke_popup(self, width=400, height=200)

    def draw(self, context):
        self.layout.label("A message has arrived")
        row = self.layout.split(0.25)
        row.prop(self, "type")
        row.prop(self, "message")
        row = self.layout.split(0.80)
        row.label("")
        row.operator("error.ok")

#
#   The OK button in the error dialog
#
class OkOperator(bpy.types.Operator):
    bl_idname = "error.ok"
    bl_label = "OK"
    def execute(self, context):
        return {'FINISHED'}

#
#   Opens a file select dialog and starts scanning the selected file.
#
class ScanFileOperator(bpy.types.Operator):
    bl_idname = "error.scan_file"
    bl_label = "Scan file for return"
    filepath = bpy.props.StringProperty(subtype="FILE_PATH")

    def execute(self, context):
        scanFile(self.filepath)
        return {'FINISHED'}

    def invoke(self, context, event):
        context.window_manager.fileselect_add(self)
        return {'RUNNING_MODAL'}

#
#   Scan the file. If a line contains the word "return", invoke error
#   dialog and quit. If reached end of file, display another message.
#
def scanFile(filepath):
    fp = open(filepath, "rU")
    n = 1
    for line in fp:
        words = line.split()
        if "return" in words:
            bpy.ops.error.message('INVOKE_DEFAULT',
                type = "Error",
                message = 'Found "return" on line %d' % n)
            return
        n += 1
    fp.close()
    bpy.ops.error.message('INVOKE_DEFAULT',
        type = "Message",
        message = "No errors found in %d lines" % n)
    return

# Register classes and start scan automatically
bpy.utils.register_class(OkOperator)
bpy.utils.register_class(MessageOperator)
bpy.utils.register_class(ScanFileOperator)
bpy.ops.error.scan_file('INVOKE_DEFAULT')
目次
[非表示]- 1 Interface
- 1.1 Panels and buttons
- 1.2 Panel layout and several arguments
- 1.3 Panel properties
- 1.4 Using scene properties to store information
- 1.5 Polling
- 1.6 Dynamic drop-down menus
- 1.7 Adding an operator and appending it to a menu
- 1.8 A modal operator
- 1.9 Invoke versus execute
- 1.10 A popup dialog
- 1.11 An error dialog
