Dev:2.4/Source/Extensions/Verse/Integration in Blender Documentation
User Documentation for Verse integration to Blender
Blender containing integration to verse isn't that different from the normal Blender. The user can work as usual, but he or she can also share or easily exchange data with other users. Other users can be running different clients (like Maya, 3DS Max, etc). Keep in mind, that client has to have some support for verse (usualy a plugin) to be able to share/exchange data with Blender. When no verse plugin exists for your favorite 3d app, it will not be able to share data with your friends running cool Blender! ;-)
Testing builds
All testing builds contain the blender binary as well the verse server. Both the blender binary and the verse server print some debug information to stdout. When you work with large amounts of data, it is recommended to run both binaries with redirection of stdout:
./blender > /dev/null
./verse > /dev/null
Note: _Linux testing builds and source codes are updated every day at night (GMT). Mac OS X build is created occasionaly by Timothy and may not be up to date! Windows build is created by Chris and needn't be up to date either._
- Linux build:
http://e-learning.vslib.cz/~hnidek/verse/vb.tar.gz (3.4MB) (currently down--use cvs) - Linux build with debug info for gdb:
http://e-learning.vslib.cz/~hnidek/verse/vb-debug.tar.gz (3.4MB) (currently down) - mac OS X build (Timothy):
http://www.elysiun.com/~timothy/blenderOSX/soc-jiri.zip (3.8MB) (currently down) - Windows build (Chris):
http://bebop.cns.ualberta.ca/~cwant/blender-verse-win-2005-08-31.zip (3.9MB) (works)
- source code:
http://e-learning.vslib.cz/~hnidek/verse/src.tar.gz (8.5MB) (currently down use cvs)
- Some of these downloads may be found on http://www.blender.org/cms/Verse-Blender.verse_blender.0.html.
Starting of verse server
Starting the Verse server is very simple. Just type the following command in the unix console:
./verse
windows users will have to type the following command:
verse.exe
There is no need to run verse server as root or admin user. Be aware of too restrictive firewalls and NAT. Verse server runs at port 4950.
Connecting to Verse server
Blender containing the integration with verse has a new item in the main File menu:

When you are running the verse server on your system (at localhost), you can select "Connect to localhost". When the verse server is running on some other connected computer, then you select "Connect ...". When you choose the latter, you will be prompted to enter the name of the machine running the verse server. You can specify machine with either the IP number or domain name:
After clicking "Connect to localhost" or pressing Ok button depending on the setup, Blender will try to connect to verse server. It can take several seconds (depends on your system ... Blender will be generating a secure key). If the connection isn't accepted (because the server isn't running, your network setting is wrong, etc.), then the following error messages will appear:
It is recommended to exit Blender and start Blender again, because Blender doesn't handle verse sessions perfectly yet.
When you are successfully connected to verse server you will see the corresponding item in Outliner:
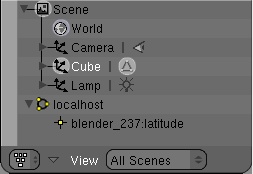
Outliner is useful and powerfull tool when you want to share data at verse server. Work with Outliner will be mentioned later.
Pushing mesh object to Verse server
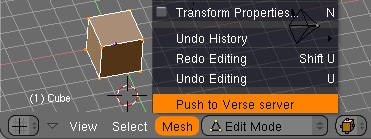
It is possible to push mesh object to the verse server, when you are connected. The mesh object must be in edit mode. Enter edit mode and click on the Mesh item in the header of 3dview:
Select 'Push to Verse server'. Blender will send all neccessary data to the Verse server.
Dev verse note: _Blender will create both object and geometry node on the verse server. These nodes will be linked together with "VerseLink" called 'geometry'. Names of nodes will be created depending to blender names (ob->id.name and mesh->id.name). The geometry node will contain two layers (vertex layer and polygon layer). Blender will automaticaly subscribe to changes in both layers and changes in the transformation matrix of object node._
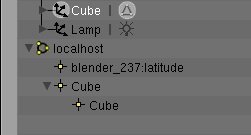
When an object is pushed to the verse server you will see two new items in Outliner (other verse clients connected to the verse server will see these nodes too).
You can see that there is one item called Cube and a second "subordinated" item called Cube too. First item represents the object node and it is equivalent to a Blender Object. The second "subordinated" item represents the geometry node and it is equivalent to Mesh data.
Subscribing to "foreign" data
After some data has been pushed to the verse server, we can test that we are able to subscribe to "foreign" data. We will start a new blender session (at another computer or the same one ... it doesn't matter). Don't forget to connect to the right verse server ;-) . When we are connected to the verse server then we can see some well known items in Outliner:
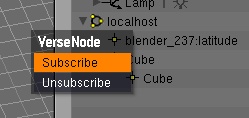
We can click with RMB at object node (not the subordinated geometry node) and select 'Subscribe'. Blender will now create a new mesh object node and new mesh. The object will be in edit mode. We can then exit edit mode and try to move, rotate and/or scale the Object. The Object should be moved in the first blender session too :-) . This means that we are subcribed to all changes (again).
Sending changes of geometry to verse server
Most of the edit mesh tools work without problem now. I noticed some problems with _Bevel_ and _Merge_. Other tools should work correctly. If you find any buggy tool, then feel free and send me email (address can be found on my personal page).
Note: _Undo and redo work quite good, but keep in mind, that support of unod/redo experimental in edit mode._
Receiving changes of geometry from other verse clients
Blender can receive in theory all changes from other verse clients. Changes are visualised in edit mode as well in object mode.
Outliner
Outliner is used for the visualisation of all verse sessions (you can be connected at the same time to several verse servers), all object and geometry nodes and all avatars (avatar is a "special" verse object node representing verse client). When you click with RMB on the verse session, you can disconnect from the verse server. When you click with RMB on the verse object node, you can subscribe or unsubscribe from the verse node. When somebody is connected to verse server you will see the coresponding avatar node.
Avatar
You can see an object node called blender_237:latitude on several screenshots. =blender_237= is the name of the verse client and =latitude= is my hostname (exported system variable =$HOSTNAME=). If you want to see your hostname in outliner too, then you will have to execute the following command (UNIX only):
export HOSTNAME="name_of_my_computer"
users using _csh_ or _tcsh_ have to type the following command:
setenv HOSTNAME "name_of_my_computer"
You can also add these commands to your =~/.bashrc= or =~/.tcshrc= configuration files.
Renaming of verse node/session
Renaming of verse nodes or the verse session doesn't work in the Outliner. You can rename object node in button window or in Transform Propertis panel in 3dview.
TODO
I would like to visualise verse layers too in the future.
Disconnecting
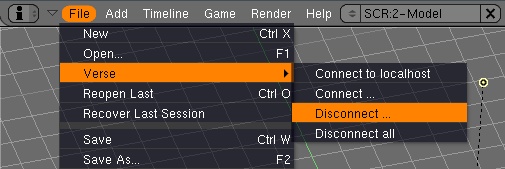
When user is connected at least to one verse server, then he or she can disconnect from all verse servers or can disconnect from each verse server separately:
You can end the verse sersion in the Outliner too.
Warning: _reconnecting to same verse server will not work properly. It is recommended to restart Blender (and wait few seconds)._
When the user is connected to several servers, the user will be prompted which session he or she would like to end:
Conclusion
I hope everything is clear now. Feel free to add any comments or correct my terrible grammatical mistakes.
Links
[1] http://wiki.blender.org/bin/view.pl//VerseIntegrationToBlender
[2] http://verse.blender.org
[3] http://purple.blender.org
[4] http://www.uni-verse.org
[5] http://www.quelsolaar.com
[6] http://www.blender.org/modules/verse/
Jiří|Hnídek 31 Jul 2005


