Doc:2.6/Manual/Lighting/Lamps/Spot/Buffered Shadows
Page status (reviewing guidelines)
Text
simplify?
|
Spot Buffered Shadows
Spotlights can use either Raytraced Shadows or buffered shadows. Either of the two can provide various extra options.
Raytraced shadows are generally more accurate, with extra capabilities such as transparent shadows, although they are quite slower to render.
Buffered shadows are more complex to set up and involve more faking, but the speed of rendering is a definite advantage. Nevertheless, it shares with other lamp types common shadows options described in Shadows Properties.
Shadow Buffer Types
- When the Buffer Shadow button is activated, the currently selected Spot light generates shadows, using a “shadow buffer” rather than using raytracing, and various extra options and buttons appear in the Shadow panel.
- Buffer Type
- There more than one way to generate buffered shadows. The shadow buffer generation type controls which generator to use.
There are four shadow generation types, those being:
- Classical
- Classic-Halfway
- Irregular
- Deep
For more information on the different shadow generation methods see these links:
- Development Release Logs 2.43: Irregular Shadow Buffer
- Blender Nation: Blender Gets Irregular Shadow Buffers
- Development Release Logs 2.43: Shadow Buffer Halfway Average
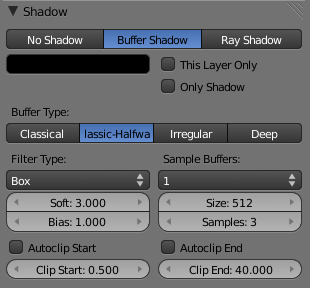
“Classical” and “Classic-Halfway”
- Classical
- A shadow generation which used to be the Blender default and unique method for generation of buffered shadows. It used an older way of generating buffered shadows, but it could have some problems with accuracy of the generated shadows and can be very sensitive to the resolution of the shadow buffer (Shadow Buffer→Size), different Bias values, and all the self-shadowing issues that brings up.
- The Classical method of generating shadows is obsolete and is really only still present to allow for backward compatibility with older versions of Blender. In most other cases you will want to use Classic-Halfway instead.
- Classic-Halfway
- This shadow buffer type is an improved shadow buffering method and is the default option selected in Blender. It works by taking an averaged reading of the first and second nearest Z depth values allowing the Bias value to be lowered and yet not suffer as much from self-shadowing issues.
- Not having to increase Bias values helps with shadow accuracy, because large Bias values can mean small faces can lose their shadows, as well as preventing shadows being overly offset from the larger Bias value.
- Classic-Halfway doesn’t work very well when faces overlap, and biasing problems can happen.
Here are now the options specific to these generation methods:
- Size
- The Size numeric field can have a value from 512 to 10240. Size represents the resolution used to create a shadow map. This shadow map is then used to determine where shadows lay within a scene.
- As an example, if you have a Size with a value of 1024, you are indicating that the shadow data will be written to a buffer which will have a square resolution of 1024×1024 pixels/samples from the selected spotlight.
- The higher the value of Size, the higher resolution and accuracy of the resultant shadows, assuming all other properties of the light and scene are the same, although more memory and processing time would be used. The reverse is also true – if the Size value is lowered, the resultant shadows can be of lower quality, but would use less memory and take less processing time to calculate.
- As well as the Size value affecting the quality of generated shadows, another property of Spot lamps that affects the quality of their buffered shadows is the angle of the spotlights lighted area (given in the Spot Shape panel's Size field).
- As the spot shape Size value is increased, the quality of the cast shadows degrades. This happens because when the Spot lighted area is made larger (by increasing spot shape Size), the shadow buffer area has to be stretched and scaled to fit the size of the new lighted area.
- The Size resolution is not altered to compensate for the change in size of the spotlight, so the quality of the shadows degrades. If you want to keep the generated shadows the same quality, as you increase the spot shape Size value, you also need to increase the buffer Size value.
The above basically boils down to
If you have a spotlight that is large you will need to have a larger buffer Size to keep the shadows good quality. The reverse is true also – the quality of the generated shadows will usually improve (up to a point) as the Spot lamp covers a smaller area.
|
- Filter Type
- The Box, Tent, and Gauss filter types control what filtering algorithm to use to anti-alias the buffered shadows.
- They are closely related to the Samples numeric field, as when this setting is set to 1, shadow filtering is disabled, so none of these buttons will have any effect what soever.
- Box
- The buffered shadows will be anti-aliased using the “box” filtering method.
- This is the original filter used in Blender. It is relatively low quality and is used for low resolution renders, as it produces very sharp anti-aliasing. When this filter is used, it only takes into account oversampling data which falls within a single pixel, and doesn’t take into account surrounding pixel samples. It is often useful for images which have sharply angled elements and horizontal/vertical lines.
- Tent
- The buffered shadows will be anti-aliased using the “tent” filtering method.
- It is a simple filter that gives sharp results, an excellent general purpose filtering method. This filter also takes into account the sample values of neighboring pixels when calculating its final filtering value.
- Gauss
- The buffered shadows will be anti-aliased using the “Gaussian” filtering method.
- It produces a very soft/blurry anti-aliasing. As result, this filter is excellent with high resolution renders.
- The Anti-Aliasing page in the Render chapter will give more information on the various filtering/distribution methods and their uses.
- Samples
- The Samples numeric field can have a value between 1 and 16. It controls the number of samples taken per pixel when calculating shadow maps.
- The higher this value, the more filtered, smoothed and anti-aliased the shadows cast by the current lamp will be, but the longer they will take to calculate and the more memory they will use. The anti-aliasing method used is determined by having one of the Box, Tent or Gauss buttons activated (see above).
- Having a Samples value of 1 is similar to turning off anti-aliasing for buffered shadows.
- Soft
- The Soft numeric field can have a value between 1.0 and 100.0. It indicates how wide an area is sampled when doing anti-aliasing on buffered shadows. The larger the Soft value, the more graduated/soft the area that is anti-aliased/softened on the edge of generated shadows.
- Sample Buffers
- The Sample Buffers setting can be set to values 1, 4 or 9, and represents the number of shadow buffers that will be used when doing anti-aliasing on buffered shadows.
- This option is used in special cases, like very small objects which move and need to generate really small shadows (such as strands). It appears that normally, pixel width shadows don’t anti-alias properly, and that increasing Buffer Size doesn’t help much.
- So this option allows you to have a sort of extra sample pass, done above the regular one (the one controlled by the Box/Tent/Gauss, Samples and Soft settings).
- The default 1 value will disable this option.
- Higher values will produce a smoother anti-aliasing – but be careful: using a Sample Buffers of 4 will require four times as much memory and process time, and so on, as Blender will have to compute that number of sample buffers.
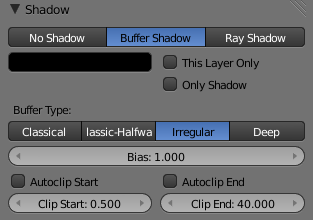
“Irregular”
Irregular shadow method is used to generate sharp/hard shadows that are placed as accurately as raytraced shadows. This method offers very good performance because it can be done as a multi-threaded process.
This method supports transparent shadows. To do so, you will first need to setup the shadow setting for the object which will receive the transparent shadow. (Material → Shadow → Cat Buffer Shadows and Buffer Bias)
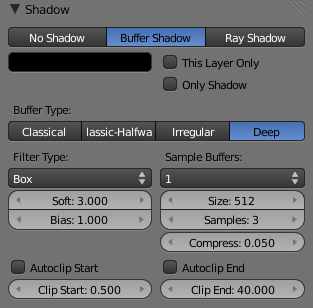
Deep generation method
Deep Shadow buffer supports transparency and better filtering , at the cost of more memory usage and processing time
- Compress: Deep shadow map compression treshold
Common options
The following settings are common to all buffered shadow generation method.
- Bias
- The Bias numeric field can have a value between 0.001 and 5.0. Bias is used to add a slight offset distance between an object and the shadows cast by it. This is sometimes required because of inaccuracies in the calculation which determines weather an area of an object is in shadow or not.
- Making the Bias value smaller results in the distance between the object and its shadow being smaller. If the Bias value is too small, an object can get artifacts, which can appear as lines and interference patterns on objects. This problem is usually called “self shadowing”, and can usually be fixed by increasing the Bias value, which exists for that purpose!
- Other methods for correcting self shadowing include increasing the size of the Shadow Buffer Size or using a different buffer shadow calculation method such as Classic-Halfway or Irregular.
- Self shadowing interference tends to affect curved surfaces more than flat ones, meaning that if your scene has a lot of curved surfaces it may be necessary to increase the Bias value or Shadow Buffer Size value.
- Having overly large Bias values not only places shadows further away from their casting objects, but can also cause objects that are very small to not cast any shadow at all. At that point altering Bias, Shadow Buffer Size or Spot Size values, among other things, may be required to fix the problem.
Finer Bias tuning
You can now refine the Bias value independently for each Material, using the Bias slider (Material menu, Shadow panel). This value is a factor by which the Bias value of each Spot buffered shadows lamp is multiplied, each time its light hits an object using this material. The 0.0 and 1.0 values are equivalent – they do not alter the lamp’s Bias original value.
|
- Clip Start & Clip End
- When a Spot light with buffered shadows is added to a scene, an extra line appears on the Spot 3D view representation.
- The start point of the line represents Clip Start’s value and the end of the line represents Clip End’s value. Clip Start can have a value between 0.1 and 1000.0, and Clip End, between 1.0 and 5000.0. Both values are represented in Blender Units.
- Clip Start indicates the point after which buffered shadows can be present within the Spot light area. Any shadow which could be present before this point is ignored and no shadow will be generated.
- Clip End indicates the point after which buffered shadows will not be generated within the Spot light area. Any shadow which could be present after this point is ignored and no shadow will be generated.
- The area between Clip Start and Clip End will be capable of having buffered shadows generated.
- Altering the Clip Start and Clip End values helps in controlling where shadows can be generated. Altering the range between Clip Start and Clip End can help speed up rendering, save memory and make the resultant shadows more accurate.
- When using a Spot lamp with buffered shadows, to maintain or increase quality of generated shadows, it is helpful to adjust the Clip Start and Clip End such that their values closely bound around the areas which they want to have shadows generated at. Minimizing the range between Clip Start and Clip End, minimizes the area shadows are computed in and therefore helps increase shadow quality in the more restricted area.
- Autoclip Start & Autoclip End
- As well as manually setting Clip Start and Clip End fields to control when buffered shadows start and end, it is also possible to have Blender pick the best value independently for each Clip Start and Clip End field.
- Blender does this by looking at where the visible vertices are when viewed from the Spot lamp position.
Hints
Any object in Blender can act as a camera in the 3D view. Hence you can select the Spot light and switch to a view from its perspective by pressing Ctrl0 NumPad.


