Doc:2.6/Manual/Modeling/Meshes/Editing/Sculpt Mode
Overview
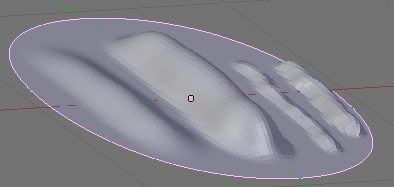
Sculpt Mode is similar to Edit Mode in that it is used to alter the shape of a model, but Sculpt Mode uses a very different workflow: instead of dealing with individual elements (vertices, edges, and faces), an area of the model is altered using a brush. In other words, instead of selecting a group of vertices, Sculpt Mode automatically selects vertices based on where the brush is, and modifies them accordingly.
Sculpt Mode
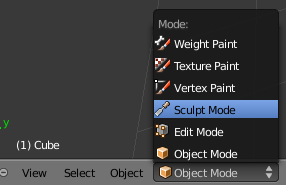
Sculpt mode is selected from the mode menu of the 3D View header.
Once sculpt mode is activated the Toolbar of the 3D View will change to sculpt mode specific panels. The panels in the toolbar will be Brush, Texture, Tool, Symmetry, Stroke, Curve, Appearance, and Options. Also a red circle will appear that follows the location of the cursor in the 3d view.
Sculpt Brushes
Brushes are brush presets. They are a combination of a 'tool', along with stroke, texture, and options.
Sculpt Mode has sixteen brushes, each of which operates on the model in a unique way. Many can be toggled to have an additive or subtractive effect. They can be selected in the Tool menu. The current Brush presets are: Blob, Clay, Crease, Draw, Fill/Deepen, Flatten/Contrast, Grab, Inflate/Deflate, Layer, Nudge, Pinch/Magnify, Rotate, Scrape/Peak, Smooth, Snake Hook, Thumb:
- Blob
- Pushes mesh outward or inward into a spherical shape with settings to control the amount of pinching at the edge of the sphere.
- Clay (C)
- Similar to the Draw brush, but includes settings to adjust the plane on which the brush acts.
- Clay Strips
- Similar to the Clay brush, but it uses a cube test to define the brush area of influence rather than a sphere.
- Crease
- Creates sharp indents or ridges by pushing or pulling the mesh, while pinching the vertices together.
- Draw (D)
- Moves vertices inward or outward, based the average normal of the vertices contained within the drawn brush stroke.
- Fill
- The Fill brush works like the Flatten brush, but only brings vertices below the brush plane upwards. The inverse of the Scrape brush is to Deepen by pushing vertices above the plane downward.
- Flatten (T)
- The Flatten brush finds an 'area plane' located by default at the average height above/below the vertices within the brush area. The vertices are then pulled towards this plane. The inverse of the Flatten brush is the Contrast brush which pushes vertices up or down away from the brush plane.
- Grab (G)
- Grab is used to drag a group of points around. Unlike the other brushes, Grab does not modify different points as the brush is dragged across the model. Instead, Grab selects a group of vertices on mousedown, and pulls them to follow the mouse. The effect is similar to moving a group of vertices in Edit mode with proportional-editing enabled, except that Grab can make use of other Sculpt Mode options (like textures and symmetry).
- Inflate (I)
- Similar to Draw, except that vertices in Inflate mode are displaced in the direction of their own normals.
- Layer (L)
- This brush is similar to Draw, except that the height of the displacement layer is capped. This creates the appearance of a solid layer being drawn. This brush does not draw on top of itself; a brush stroke intersects itself. Releasing the mouse button and starting a new stroke will reset the depth and paint on top of the previous stroke.
- Nudge
- Moves vertices in the direction of the brush stroke.
- Pinch (P)
- Pinch pulls vertices towards the center of the brush. The inverse setting is Magnify, in which vertices are pushed away from the center of the brush.
- Rotate
- Rotates vertices within the brush in the direction the cursor is moved.
- Scrape
- The Scrape brush works like the Flatten brush, but only brings vertices above the plane downwards. The inverse of the Scrape brush is to Peak by pushing vertices above the plane up away from the plane.
- Smooth (S)
- As the name suggests, eliminates irregularities in the area of the mesh within the brush’s influence by smoothing the positions of the vertices.
- Snake Hook
- Pulls vertices along with the movement of the brush to create long, snake-like forms.
- Thumb
- Similar to the Nudge brush, this one flattens the mesh in the brush area, while moving it in the direction of the brush stroke.
Sculpting with the Multires Modifier
...
Sculpt Properties Panel
This panel appears in the tool palette on the left side of the 3D viewport.
Brush Menu
- Radius
- This option controls the radius of the brush, measured in pixels. F in the 3D view allows you to change the brush size interactively by dragging the mouse and then left clicking (the texture of the brush should be visible inside the circle). Typing a number then enter while in F sizing allows you to enter the size numerically. Brush size can be affected by enabling the pressure sensitivity icon, if a supported tablet is being used.
- Strength
- Strength controls how much each application of the brush affects the model. For example, higher values cause the Draw brush to add depth to the model more quickly, and cause the Smooth brush to smooth the model more quickly. This setting is not available for Grab, Snake Hook, or Rotate.
If the range of strengths doesn’t seem to fit the model (for example, if even the lowest strength setting still makes too large of a change on the model) then you can scale the model (in Edit Mode, not Object Mode). Larger sizes will make the brush’s effect smaller, and vice versa. You can change the brush strength interactively by pressing ⇧ ShiftF in the 3D view and then moving the brush and then left clicking. You can enter the size numerically also while in ⇧ ShiftF sizing. Brush strength can be affected by enabling the pressure sensitivity icon, if a supported tablet is being used.
- Autosmooth
- Sets the amount of smoothing to be applied to each stroke.
- Sculpt Plane
- Use this menu to set the plane in which the sculpting takes place.
- Plane Offset
- Adjusts the plane on which the brush acts toward or away from the viewer.
- Trim
- Enables trimming of the sculpt plane, determined by the Distance setting.
- Front Faces Only
- When enabled, the brush only affects vertices that are facing the viewer.
- Accumulate
- Causes stroke dabs to accumulate on top of each other.
Stroke Menu
- Stroke Method
- Defines the way brush strokes are applied to the mesh:
- Dots
- Standard brush stroke.
- Drag Dot
- Creates a single displacement in the brush shape. Click then drag on mesh to desired location, then release.
- Space
- Creates brush stroke as a series of dots, whose spacing is determined by the Spacing setting. Spacing represents the percentage of the brush diameter.
- Anchored
- Creates a single displacement at the brush location. Clicking and dragging will resize the brush diameter. When Edge to Edge the brush location and orientation is determined by a two point circle, where the first click is one point, and dragging places the second point, opposite from the first.
- Airbrush
- Flow of the brush continues as long as the mouse click is held, determined by the Rate setting. If disabled, the brush only modifies the model when the brush changes its location. This option is not available for the Grab brush.
The following parameters are available for the Dots, Space, and Airbrushstrokes:
- Smooth stroke
- Brush lags behind mouse and follows a smoother path. When enabled, the following become active:
- Radius
- Sets the minimum distance from the last point before stroke continues.
- Factor
- Sets the amount of smoothing
- Jitter
- Jitters the position of the brush while painting.
Curve Menu
The Curve section allows you to use a curve control to the right to modify the intensity of the brush from its centre (left part of the curve) towards its borders (right part of the curve).
Texture Menu
A texture can be used to determine the strength of brush effects as well. Select an existing texture from the texture box, or create a new one by selecting the New button
- Brush Mapping
- Sets the way the texture is mapped to the brush stroke:
- Fixed
- If Fixed is enabled, the texture follows the mouse, so it appears that the texture is being dragged across the model.
- Tiled
- The Tile option tiles the texture across the screen, so moving the brush appears to move separately from the texture. The Tile option is most useful with tileable images, rather than procedural textures.
- 3D
- The 3D option allows the brush to take full advantage of procedural textures. This mode uses vertex coordinates rather than the brush location to determine what area of the texture to use.
- Angle
- This is the rotation angle of the texture brush. It can be changed interactively via CtrlF in the 3D view. While in the interactive rotation you can enter a value numerically as well. Can be set to:
- User
- Directly input the angle value.
- Rake
- Angle follows the direction of the brush stroke. Not available with 3D textures.
- Random
- Angle is randomized.
- Offset
- Fine tunes the texture map placement in the x, y, and z axes.
- Size
- This setting allows you to modify the scaling factor of the texture. Not available for Drag textures.
- Sample Bias
- Value added to texture samples.
- Overlay
- When enabled, the texture is shown in the viewport, as determined by the ;Alpha value.
Symmetry Menu
Mirror the brush strokes across the selected local axes. Note that if you want to alter the directions the axes point in, you must rotate the model in Edit Mode, not Object Mode.
- Feather
- Reduces the strength of the stroke where it overlaps the planes of symmetry.
- Radial
- These settings allow for radial symmetry in the desired axes. The number determines how many times the stroke will be repeated within 360 degrees around the central axes.
Options Menu
- Threaded Sculpt
- Takes advantage of multiple CPU processors to improve sculpting performance.
- Fast Navigation
- For ;Multires models, show low resolution while navigation the viewport.
- Show Brush
-
- Shows the brush shape in the viewport.
- Unified Settings
- ;Size
- Forces the brush size to be shared across brushes.
- ;Strength
- Forces the brush strength to be shared across brushes.
- Lock
- These three buttons allow you to block any modification/deformation of your model along selected local axes, while you are sculpting it.
Appearance Menu
You can set the color of the brush depending on if it is in additive or subtractive mode.
You can also set the brush icon from an image file.
Tool Menu
Here you can select the type of brush preset to use. Reset Brush will return the settings of a brush to its defaults. You can also set Blender to use the current brush for Vertex Paint mode, Weight Paint mode, and Texture Paint mode using the toggle buttons.
Hiding and Revealing Mesh
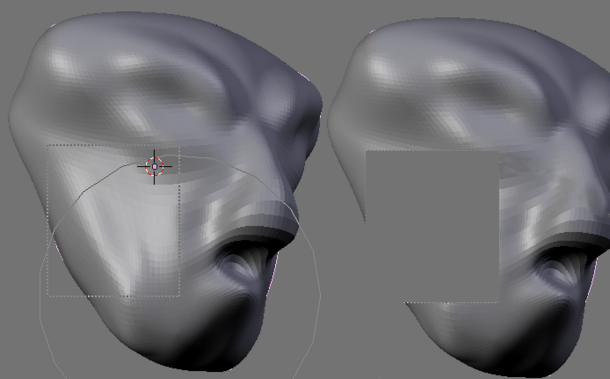
It is sometimes useful to isolate parts of a mesh to sculpt on. To hide a part of a mesh, press H then click & drag around the part you want to hide. To reveal a hidden part of a mesh, press ⇧ ShiftH then click & drag around the part you want to reveal. To reveal all hidden parts, just hit AltH.
Keyboard Shortcuts
These shortcuts may be customized under File > User preferences > Input > 3D View > Sculpt Mode.


