Doc:2.6/Manual/Modeling/Meshes/Mesh Structures
Vertices, Edges and Faces
In basic meshes, everything is built from three basic structures: Vertices, Edges and Faces (we’re not talking about curves, NURBS, and so forth here). But there is no need to be disappointed: this simplicity still provides us with a wealth of possibilities that will be the foundation for all our models.
Vertices
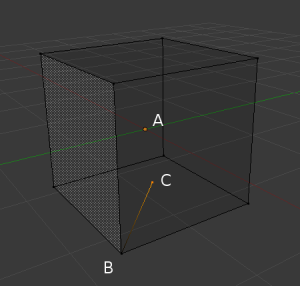
A vertex is primarily a single point or position in 3D space. It is usually invisible in rendering and in Object mode. Don’t mistake the center point of an object for a vertex. It looks similar, but it’s bigger and you can’t select it. (Vertex example) shows the center point labeled as “A”. “B” and “C” are vertices.
A simple way to create a new vertex is to click CtrlLMB ![]() in Edit mode. Of course, as a computer screen is two-dimensional, Blender can’t determine all three vertex coordinates from a single mouse click, so the new vertex is placed at the depth of the 3D cursor. Using the method described above, any vertices selected previously are automatically connected to the new ones by an edge. In the image above, the vertex labeled C is a new vertex added to the cube with a new edge added between in B and C.
in Edit mode. Of course, as a computer screen is two-dimensional, Blender can’t determine all three vertex coordinates from a single mouse click, so the new vertex is placed at the depth of the 3D cursor. Using the method described above, any vertices selected previously are automatically connected to the new ones by an edge. In the image above, the vertex labeled C is a new vertex added to the cube with a new edge added between in B and C.
Edges
An edge always connects two vertices by a straight line. The edges are the “wires” you see when you look at a mesh in wireframe view. They are usually invisible on the rendered image. They are used to construct faces. Create an edge by selecting two vertices and pressing F.
Faces
A face is the highest level structure in a mesh. Faces are used to build the actual surface of the object. They are what you see when you render the mesh. A face is defined as the area between either three (triangles) or four (quadrangles) vertices, with an edge on every side. Triangles are always flat and therefore easy to calculate. On the other hand, quadrangles "deform well" and are therefore preferred for subdivision modeling.
Take care when using four-sided faces (quads), because internally they are simply divided into two triangles each. Four-sided faces only work well if the face is pretty much flat (all points lie within one imaginary plane) and convex (the angle at no corner is greater than or equal to 180 degrees). This is the case with the faces of a cube, for example. That’s why you can’t see any diagonal in its wireframe model, because they would divide each square face into two triangles.
While you could build a cube with triangular faces, it would just look more confusing in Edit mode. An area between three or four vertices, outlined by edges, doesn’t have to be a face. If this area does not contain a face, it will simply be transparent or non-existent in the rendered image. To create a face, select three or four suitable vertices and press F.
Loops
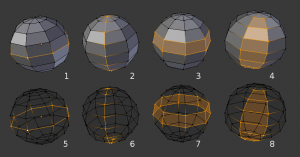
Edge and Face Loops are sets of faces or edges that form continuous “loops” as shown in (Edge and Face Loops). The top row (1-4) shows a solid view, the bottom row (5-8) a wireframe view of the same loops.
Note that loops 2 and 4 do not go around the whole model. Loops stop at so called poles because there is no unique way to continue a loop from a pole. Poles are vertices that are connected to either three, five, or more edges. Accordingly, vertices connected to exactly one, two or four edges are not poles.
In the image above, loops that do not end in poles are cyclic (1 and 3). They start and end at the same vertex and divide the model into two partitions. Loops can be a quick and powerful tool to work with specific, continuous regions of a mesh and are a prerequisite for organic character animation. For a detailed description of how to work with loops in Blender, please refer to the Manual page on Edge and Face Tools.
Edge Loops
Loops 1 and 2 in (Edge and Face Loops) are edge Loops. They connect vertices so that each one on the loop has exactly two neighbors that are not on the loop and placed on both sides of the loop (except the start and end vertices in the case of poles).
Edge Loops are an important concept especially in organic (subsurface) modeling and character animation. When used correctly, they allow you to build models with relatively few vertices that look very natural when used as subdivision surfaces and deform very well in animation.
Take (Edge Loops in organic modeling) as an example: the edge loops follow the natural contours and deformation lines of the skin and the underlying muscles and are more dense in areas that deform more when the character moves, for example at the shoulders or knees.
Further details on working with Edge Loops can be found in Edge Loop Selection.
Face Loops
These are a logical extension of Edge Loops in that they consist of the faces between two Edge Loops, as shown in loops 3 and 4 in (Edge and Face Loops). Note that for non-circular loops (4) the faces containing the poles are not included in a Face Loop.
Further details on working with Face Loops can be found in Face Loop Selection.

