Doc:2.6/Manual/Render/Output/Video
Page status (reviewing guidelines)
Page reviewed and in good shape |
Preparing your work for video
Once you have mastered the trick of animation you will surely start to produce wonderful animations, encoded with your favorite codecs, and possibly you'll share them on the Internet with the rest of the community.
Sooner or later you will be struck with the desire to build an animation for television, or maybe burn your own DVDs. To spare you some disappointment, here are some tips specifically targeted at Video preparation. The first and principal one is to remember the double-dashed white lines in the camera view!
If you render for PC then the whole rendered image which lies within the outer dashed rectangle will be shown. For television, some lines and some part of the lines will be lost due to the mechanics of the electron beam scanning in your TV's cathode ray tube. You are guaranteed that what is within the inner dashed rectangle in camera view will be visible on the screen. Everything within the two rectangles may or may not be visible, depending on the given TV set that your audience watches the video on.
Dimensions Presets
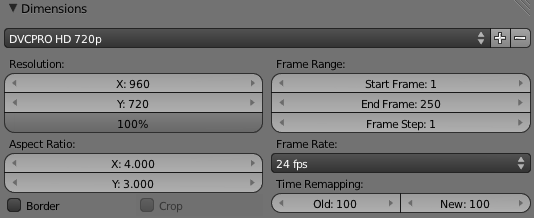
The rendering size is strictly dictated by the TV standard. Blender has 11 pre-set settings for your convenience:
| Preset | Resolution (X x Y) | Aspect Ratio (X x Y) | Frame Rate |
|---|---|---|---|
| DVCPRO HD 1080p | 1280x1080 | 3:2 | 24 fps |
| DVCPRO HD 720p | 960x720 | 4:3 | 24 fps |
| HDTV 1080p | 1920x1080 | 1:1 | 24 fps |
| HDTV 720p | 1280x720 | 1:1 | 24 fps |
| HDV 1080p | 1440x1080 | 4:3 | 23.98 fps |
| HDV NTSC 1080p | 1440x1080 | 4:3 | 29.97 fps |
| HDV PAL 1080p | 1440x1080 | 4:3 | 25 fps |
| TV NTSC 16:9 | 720x480 | 40:33 | 29.97 fps |
| TV NTSC 4:3 | 720x486 | 10:11 | 29.97 fps |
| TV PAL 16:9 | 720x576 | 16:11 | 25 fps |
| TV PAL 4:3 | 720x576 | 12:11 | 25 fps |
Note that if you render your animation at 1600x1200 resolution, and then burn a DVD, your image will not be clearer or crisper on the TV; in fact the DVD burning software will have had to downsize your images to fit the resolutions shown above, and you will have wasted about 4x disk space and render time.
Pixel Aspect Ratio
Older TV screens do not have the square pixels which Computer monitors have; their pixels are somewhat rectangular, so it is necessary to generate pre-distorted images which will look bad on a computer but which will display nicely on a TV set. It is important that you use the correct pixel aspect ratio when rendering to prevent re-sampling, resulting in lowered image quality.
Colour Saturation
Most video tapes and video signals are not based on the RGB model but on the YCrCb model: more precisely, the YUV in Europe (PAL), and the YIQ in the USA (NTSC), the latter being quite similar to the former. Hence some knowledge of this is necessary too.
The YCrCb model sends information as 'Luminance', or intensity (Y) and two 'Crominance' signals, red and blue (Cr and Cb). Actually a Black and White TV set shows only luminance, while color TV sets reconstruct color from Crominances (and from luminance). Construction of the YCrCb values from the RGB ones takes two steps (the constants in italics depend on the system: PAL or NTSC):
First, the Gamma correction (g varies: 2.2 for NTSC, 2.8 for PAL):
- R' = R1/g:*G' = G1/g
- B' = B1/g
Then, the conversion itself:
- Y = 0.299R' + 0.587G' + 0.114B'
- Cr = a1(R' - Y) + b1(B' - Y)
- Cb = a2(R' - Y) + b2(B' - Y)
Whereas a standard 24 bit RGB picture has 8 bits for each channel, to keep bandwidth down, and considering that the human eye is more sensitive to luminance than to chrominance, the luminance signal is sent with more bits than the two chrominance signals. This bit expansion results in a smaller dynamic of colors in video, than what you are used to on monitors. You hence have to keep in mind that not all colors can be correctly displayed.
A rule of thumb is to keep the colors as 'grayish' or 'unsaturated' as possible; this roughly means keeping the dynamics of your colors within 80% of one another. In other words, the difference between the highest RGB value and the lowest RGB value should not exceed 0.8 ([0-1] range) or 200 ([0-255] range).
This is not strict—something more than 0.8 is acceptable—but an RGB display with color contrast that ranges from 0.0 to 1.0 will appear to be very ugly (over-saturated) on video, while appearing bright and dynamic on a computer monitor.
Rendering to fields
The TV standards prescribe that there should be 25 frames per second (PAL) or 30 frames per second (NTSC). Since the phosphors of the screen do not maintain luminosity for very long, this could produce a noticeable flickering.
To minimize this, a TV does not represent frames as a Computer does ('progressive' mode), but rather represents half-frames, or fields at a double refresh rate, hence 50 half frames per second on PAL and 60 half frames per second on NTSC. This was originally bound to the frequency of power lines in Europe (50Hz) and the US (60Hz).
In particular, fields are "interlaced" in the sense that one field presents all the even lines of the complete frame and the subsequent field the odd ones.
Since there is a non-negligible time difference between each field (1/50 or 1/60 of a second) merely rendering a frame the usual way and splitting it into two half frames does not work. A noticeable jitter of the edges of moving objects would be present.
Options
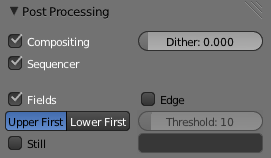
- Fields
-
- Enable field rendering. When the Fields button in the Render Panel is pressed (Post Processing section), Blender prepares each frame in two passes. On the first it renders only the even lines, then it advances in time by half a time step and renders all the odd lines. This produces odd results on a PC screen (Field Rendering result.) but will show correctly on a TV set.
- Upper First / Lower First
- Toggles between rendering the even and odd frames first.
- Still
- Disables the half-frame time step between fields (x).
Setting up the correct field order
Blender's default setting is to produce Even fields before Odd fields; this complies with European PAL standards. Odd fields are scanned first on NTSC. Of course, if you make the wrong selection things are even worse than if no Field rendering at all was used! If you are really confused, a simple trick to determine the correct field order is to render a short test animation of a white square moving from left to right on a black background. Prepare one version with odd field order and another with even field order, and look at them on a television screen. The one with the right field order will look smooth and the other one horrible. Doing this simple test will save you hours of wasted rendering time… |
Fields and Composite Nodes
Nodes are currently not field-aware. This is partly due to the fact that in fields, too much information is missing to do good neighborhood operations (blur, vector blur etc.). The solution is to render your animation at double the frame rate without fields and do the interlacing of the footage afterwards. |
Video Files
These formats are primarily used for compressing rendered sequences into a playable movie (they can also be used to make plain audio files).
A codec is a little routine that compresses the video so that it will fit on a DVD, or be able to be streamed out over the Internet, over a cable, or just be a reasonable file size. Codecs compress the channels of a video down to save space and enable continuous playback. Lossy codecs make smaller files at the expense of image quality. Some codecs, like H.264, are great for larger images. Codecs are used to encode and decode the movie, and so must be present on both the encoding machine (Blender) and the target machine. The results of the encoding are stored in a container file.
There are dozens, if not hundreds, of codecs, including XviD, H.264, DivX, Microsoft, and so on. Each has advantages and disadvantages and compatibility with different players on different operating systems.
Most codecs can only compress the RGB or YUV color space, but some support the Alpha channel as well. Codecs that support RGBA include:
- animation (quicktime)
- PNG *TIFF *Pixlet - not loss-less, and may be only available on Apple Mac.
- Lagarith Loss-less Video Codec
| AVI Codec | AVI codec compression. Available codecs are operating-system dependent. When an AVI codec is initially chosen, the codec dialog is automatically launched. The codec can be changed directly using the Set Codec button which appears (AVI Codec settings.). | |
| AVI Jpeg | AVI but with Jpeg compression. Lossy, smaller files but not as small as you can get with a Codec compression algorithm. Jpeg compression is also the one used in the DV format used in digital camcorders. | |
| AVI Raw | Audio-Video Interlaced (AVI) uncompressed frames. | |
| Frameserver | Blender puts out frames upon request as part of a render farm. The port number is specified in the OpenGL User Preferences panel. | |
| H.264 | Encodes movies with the H.264 codec. See Advanced Encoding. | |
| MPEG | Encodes movies with the MPEG codec. See Advanced Encoding. | |
| Ogg Theora | Encodes movies with the Theora codec as Ogg files. See Advanced Encoding. | |
| QuickTime | Apple's Quicktime .mov file. The Quicktime codec dialog is available when this codec is installed and this format is initially chosen. See Quicktime Encoding.
| |
| Xvid | Encodes movies with the Xvid codec. See Advanced Encoding. |
Advanced Encoding
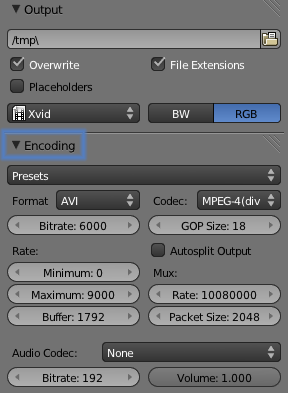
If the H.264, MPEG, Ogg Theora, or Xvid codecs are chosen, an Encoding panel becomes available. This has settings for encoding these file types, and other formats using FFmpeg.
FFmpeg, short for Fast Forward Moving Pictures Expert Group, is a collection of free and open source software libraries that can record, convert and stream digital audio and video in numerous formats. It includes libavcodec, an audio/video codec library used by several other projects, and libavformat, an audio/video container mux and demux library.
Video Settings
Here you choose which video codec you want to use, and compression settings. With all of these compression choices, there is a tradeoff between file size, compatibility across platforms, and playback quality.
When you view the System Console, you can see some of the output of the encoding process. You will see even more output if you execute Blender as blender -d .
You can use the presets, DV, SVCD, DVD, etc. which choose optimum settings for you for that type of output, or you can manually select the format (MPEG-1, MPEG-2, MPEG-4, AVI, Quicktime (if installed), DV, H.264, or Xvid (if installed). You must have the proper codec installed on your computer for Blender to be able to call it and use it to compress the video stream.
Video Formats
| Name | Extensions | Description |
|---|---|---|
| MPEG-1 | .mpg, .mpeg | A standard for lossy compression of video and audio. It is designed to compress VHS-quality raw digital video and CD audio down to 1.5 Mbit/s. |
| MPEG-2 | .dvd, .vob, .mpg., .mpeg | A standard for "the generic coding of moving pictures and associated audio information". It describes a combination of lossy video compression and lossy audio data compression methods which permit storage and transmission of movies using currently available storage media and transmission bandwidth. |
| MPEG-4(DivX) | .mp4, .mpg, .mpeg | Absorbs many of the features of MPEG-1 and MPEG-2 and other related standards, and adds new features. |
| AVI | .avi | A derivative of the Resource Interchange File Format (RIFF), which divides a file's data into blocks, or "chunks." |
| Quicktime | .mov | A multi-tracked format. QuickTime and MP4 container formats can use the same MPEG-4 formats; they are mostly interchangeable in a QuickTime-only environment. MP4, being an international standard, has more support. |
| DV | .dv | An intraframe video compression scheme, which uses the discrete cosine transform (DCT) to compress video on a frame-by-frame basis. Audio is stored uncompressed. |
| H.264 | .avi ("for now") | A standard for video compression, and is currently one of the most commonly used formats for the recording, compression, and distribution of high definition video. |
| Xvid | .avi ("for now") | A video codec library following the MPEG-4 standard. It uses ASP features such as b-frames, global and quarter pixel motion compensation, lumi masking, trellis quantization, and H.263, MPEG and custom quantization matrices. Xvid is a primary competitor of the DivX Pro Codec. |
| Ogg | .ogg, .ogv | A free lossy video compression format. It is developed by the Xiph.Org Foundation and distributed without licensing fees. |
| Matroska | .mkv | An open standard free container format, a file format that can hold an unlimited number of video, audio, picture or subtitle tracks in one file. |
| Flash | .flv | A container file format used to deliver video over the Internet using Adobe Flash Player. |
| Wav | .wav | An uncompressed (or lightly compressed) Microsoft and IBM audio file format. |
| Mp3 | .mp3 | A highly-compressed, patented digital audio encoding format using a form of lossy data compression. It is a common audio format for consumer audio storage, as well as a de facto standard of digital audio compression for the transfer and playback of music on digital audio players. |
Video Codecs
| Name | Description |
|---|---|
| None | For audio-only encoding. |
| MPEG-1 | (See Video Formats, above.) |
| MPEG-2 | (See Video Formats, above.) |
| MPEG-4(DivX) | (See Video Formats, above.) |
| HuffYUV | Loss-less video codec created by Ben Rudiak-Gould which is meant to replace uncompressed YCbCr as a video capture format. |
| DV | (See Video Formats, above.) |
| H.264 | (See Video Formats, above.) |
| Xvid | (See Video Formats, above.) |
| Theora | (See Ogg in Video Formats, above.) |
| Flash Video | (See Video Formats, above.) |
| FFmpeg video codec #1 | A.K.A. FFV1, a loss-less intra-frame video codec. It can use either variable length coding or arithmetic coding for entropy coding. The encoder and decoder are part of the free, open-source library libavcodec in FFmpeg. |
Options
- Bitrate
- Set the average bitrate (quality), which is the count of binary digits per frame. See also: ffmpeg -b:v
- Rate
- The bitrate control also includes a Minimum and a Maximum.
- Buffer
- The decoder bitstream buffer size.
- GOP Size
- The number of pictures per Group of Pictures. Set to 0 for "intra_only", which disables inter-frame video. From ffmpeg docs: "For streaming at very low bitrate application, use a low frame rate and a small GOP size. This is especially true for RealVideo where the Linux player does not seem to be very fast, so it can miss frames"
- Autosplit Output
- If your video is HUGE and exceeds 2Gig, enable Autosplit Output. The main control over output filesize is the GOP, or keyframe interlace. A higher number generally leads to a smaller file, but needs a higher-powered device to replay it.
- Mux
- Multiplexing settings.
- Rate
- Maximum bit rate of the multiplexed stream.
- Packet Size
- (Undocumented in ffmpeg)
Standards
Codecs cannot encode off-the-wall video sizes, so stick to the XY sizes used in the presets for standard TV sizes.
|
Audio Settings
Audio is encoded using the codec you choose.
Audio Codecs
| MP2 | A lossy audio compression format defined by ISO/IEC 11172-3. |
| MP3 | (See MP3 in Video Formats, above.) |
| AC3 | Audio Codec 3, an audio compression technology developed by Dolby Laboratories. |
| AAC | "Advanced Audio Codec," a standardized, lossy compression and encoding scheme for digital audio. Designed to be the successor of the MP3 format, AAC generally achieves better sound quality than MP3 at similar bit rates. |
| Vorbis | An open-standard, highly-compressed format comparable to MP3 or AAC. Had been shown to perform significantly better than many other lossy audio formats in the past in that it produced smaller files at equivalent or higher quality while retaining computational complexity comparable to other MDCT formats such as AAC or Windows Media Audio. |
| FLAC | Free Loss-less Audio Codec. Digital audio compressed by FLAC's algorithm can typically be reduced to 50–60% of its original size, and decompressed into an identical copy of the original audio data. |
| PCM | Pulse Code Modulation, a method used to digitally represent sampled analog signals. It is the standard form for digital audio in computers and various Blu-ray, Compact Disc and DVD formats, as well as other uses such as digital telephone systems |
- Bitrate
- For each codec, you can to control the bitrate (quality) of the sound in the movie. This example shows MP3 encoding at 128kbps. Higher bitrates are bigger files that stream worse but sound better. Stick to powers of 2 for compatibility.
- Samplerate
- Samplerate controls the number of samples per second of the audio. The default, 44100, is standard for many file types, including CD audio, and produces a high quality sound.
- Volume
- Set the output volume of the audio.
Tips
Choosing which format to use depends on what you are going to do with the image.
If you are animating a movie and are not going to do any post-processing or special effects on it, use either AVI-JPEG or AVI Codec and choose the XviD open codec. If you want to output your movie with sound that you have loaded into the VSE, use FFMPEG.
If you are going to do post-processing on your movie, it is best to use a frame set rendered as OpenEXR images; if you only want one file, then choose AVI Raw. While AVI Raw is huge, it preserves the exact quality of output for post-processing. After post-processing (compositing and/or sequencing), you can compress it down. You don't want to post-process a compressed file, because the compression artifacts might throw off what you are trying to accomplish with the post-processing.
Note that you might not want to render directly to a video format. If a problem occurs while rendering, you have to re-render all frames from the beginning. If you first render out a set of static images (such as the default PNG, or the higher-quality OpenEXR), you can stitch them together with an Image Strip in the Video Sequence Editor (VSE). This way, you can easily:
- Restart the rendering from the place (the frame) where the problem occurred.
- Try out different video options in seconds, rather than minutes or hours.
- Enjoy the rest of the features of the VSE, such as adding Image Strips from previous renders, audio, video clips, etc.
- To preserve alpha transparency in a video file (such as a .mov) after rendering to a sequence of stills (such as a .png) first select your file type then make sure to select PNG in the "video codec" drop down menu. If your video renders a black background and you are expecting a clear background make sure you've changed the default encoder (JPEG). This applies at least to quicktime files. Simply toggling to RGBA under the output tab is not sufficient.
Home-made Render Farm
An easy way to get multiple machines to share the rendering workload is to:
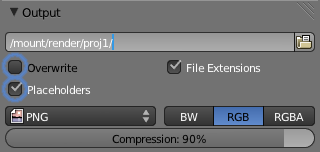
- Set up a shared directory (such as a Windows Share or an NFS mount)
- Un-check "Overwrite" and check "Placeholders"
- Start as many machines as you wish rendering to that directory -- they will not step on each other's toes.


