Doc:2.6/Manual/Render/YafRay
Blender produces all the information needed to render a scene. While it has its own internal rendering engine, you can export or link to external renderers for image computaiton.
One of these is Yafaray, and an overview and quick start guide is provided here. For more detailed information, consult the Yafray web site.
Description
Yafray, as the lengthened version of its name (Yet Another Free RAYtracer) suggests, is a free, XML speaking, cross platform raytracer developed by the Yafray team.. It works with many 3D modelling applications (with Wings and Aztec serving as examples), but the focus on this document shall fall upon its use with Blender.
Yafaray is currently available (under the LGPL license) for Windows, Linux ( via source code compilation, or .deb or .rpm installation ), Mac OSX, and Mac Intel; and installation packages, as well as Yafray's source code, can be downloaded here.
Options
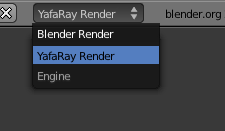
Blender releases between 2.34 and 2.5x have the option to call Yafray in the place of Blender's internal renderer (assuming it's installed). This can be done by selecting "Yafaray Render" from the drop-down engine selector menu on the Info header.
Render Pipeline
When Yafaray is used, it is inserted into the pipeline before any compositor or sequencer actions, because it is the renderer, and the compositor and sequencer work on rendered images. The image data given to Yafray is the scene objects, materials, lights, etc. Yafray does not know nor care about render layers and cannot feed Blender's node compositor or sequencer effects, since it takes a completely different approach and cannot produce the different render layers that the Blender internal renderer can. Yafaray renders frames based on Blender scene data.
|
To use Yafaray with Blender's compositor, render the image using Yafray, and then use the image input node to get that image into the compositor where it can be post-pro. You can then feed that to Sequencer via the Scene strip and Do Composite enabled. To feed the Sequencer directly from Yafray's output, use the Image strip after Yafaray has completed the render.
Two other panels should appear once Yafaray's selected from this menu, which serve to supply a number of Yafray's options to you (other options are available exclusively as XML code).
- XML
- This button, if pressed, will export your scene to a .xml file in your system's 'tmp' directory before Yafray renders it. Useful if you wish to make modifications to the XML file, or render the scene from a command line interface. Should you wish, however, to view Yafray's progress during a render in Blender's render window, it's better to unclick this button.
- AutoAA
- This options allows you to toggle between manual and automatic control of anti-aliasing options in the scene. Anti-aliasing is similar to Blender internals OSA, which in effect dictates the accuracy of the edges in the render.
- In cases where you may need to manually control the anti-aliasing options ( which becomes necessary if you wish to make use of Yafray's depth-of-field option ), it's useful to remember that increasing the amount of samples per pass will increase the accuracy of the edges in the final render; decreasing the amount of samples per pass will, as you'd expect, decrease the accuracy, causing edges in the scene to seem rough, and jagged.
- Proc.
- This option allows you to select the number of processors Yafray's allowed to make use of. For those of us who aren't lucky enough to have multiple processors, it's best to leave this option as it's default.
- Gam.
- This option allows for manual correction of gamma values in the scene. The default (1) turns this option off.
- Exp.
- This option allows for manual adjustment of exposure levels in the scene. A more indepth explanation of this option will come later.
Global Illumination
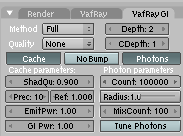
The next tab along, titled "Yafray GI", provides a selection of methods with which Yafray's able to light a scene. Methods available are:
- Full
- This method works well for most scenes, most notably indoor scenes, where the use of photons becomes appropriate.
- Skydome
- This method is more suited to outdoor scenes.
- Cache
- Clicking the cache button speeds up rendering by allowing Yafray to be more selective it's distribution of samples. When this button's depressed, Yafray renders a pre-pass to determine the most suitable allocation of samples, before rendering the image itself, increasing the efficiency of the render.
The cache button then reveals three more options.
- ShadQu
- This option allows for greater control over the quality of shadows. By increasing this option from its default (0.900), you also increase the number of samples taken in shadowed areas, which in turn not only increases the quality of shadows in the scene, but also increases render times.
- Prec
- This option sets the maximum number of pixels per-square without samples. By decreasing this option from its default (10), you increase the number of samples taken in the scene. Decreasing this option also increases render times.
- Ref
- This option allows the user to specify the threshold to refine shadows. By decreasing this option from its default (1.000), you invite Yafray to increase the number of passes taken to distribute samples in shadowed areas, thereby increasing the quality of the shadows in the scene, and increasing render times.
Examples
Starting with the default Blender set up, enable Yafray in the Rendering Buttons panel (F10), deselect the XML option in the "yafray" tab, and select the "full" method from the "yafray GI" tab, and set the quality to "low". Then click "Render" (F12).
Console output
Provided the evironment allows it, Yafray should output information to the console window ( in Windows, Blender opens along side a console window by default. In GNU/Linux, however, to view the console output, you'll need to start Blender from the console - Usually by typing "blender" into a terminal emulator window ).
If you switch to the console after the render's completed, you should ( provided the "cache" option's enabled ) notice something similar to this:
Console output
Launching 1 threads Fake pass: [#############] |
Output description
The render's split up into two seperate passes. The first, "fake" pass is made as a direct result of the "cache" option being enabled, and it's purpose is to determine the best distribution of samples in the scene ( without the cache option enabled, the samples are distributed evenly among the scene ). The number of samples is then output onto the next line.
The next pass is the "real" render pass, where Yafray renders the image based on the sample map created in the previous pass.
Render window output
Now we'll look at the Yafray's output to the render window, during the render.
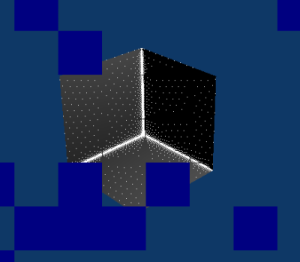
Provided the XML option is turned off, Yafray will continually update it's visual output to the render window - Much like Blender does. The image to the right was captured during the "fake" pass stage of the render, and the white dots represent the allocation of samples in the scene. Notice how the samples are only placed on areas of the scene that are directly affected by light, meaning that, in the demonstration image, only the parts of the scene with a surface are considered.
This also means that in shadowed areas of the scene, the number of samples is greater.
You can notice that the density of white dots which, as I pointed out earlier, represent the number of samples per pixel in that area of the image, is greater in areas that are likely to be shadowed (in this case, I deleted the vertex of the cube closest to the camera, revealing inside edges, which aren't as exposed to the light).
The rendered image
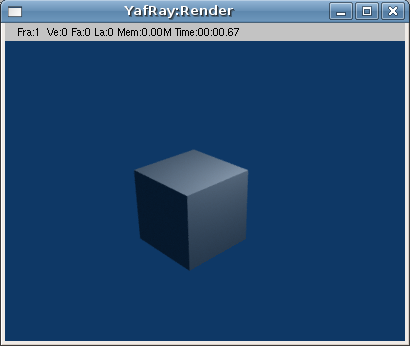
You'll notice how the cube, despite Blender's default grey material being applied, has been coloured blue. This is because the Full method is affected by the "world" colour of the scene, which, again as Blender's default, is blue. To change this, switch to the "shading" panel (F5), and select the little world icon. To have materials show properly, set the world shader to white.
Notes
Amount of Light
YafRay deals with light completely differently than the Blender Internal Renderer, and apparently light intensity needs to be pumped by large amounts for YafRay. the images reflect a Blender Internal, a Yafray render without Global Illumination (GI), and one with Full GI. As you can see, results vary widely based on the illumination method chosen.
A solution is to use very large Area lamps (Square, 100 Size but Samples at only 4, Energy 10) for softer shadows, in combination with a Sun lamp at much lower Energy value (less than 1.0) if you want a distinct shadow edge. Sun lamps seem to provide much greater intensity than Area lamps in YafRay but the shadow edges are quite harsh.
Try using the Skydome setting for the YafRay GI because with Full GI you may get weird blotchy artifacts that no one seems to know how to remedy, but may be related to the scale of my Blender scene, which is 1BU = 1cm, with a figure built to life-size. You'll be doing something like this as well if you build a scale model to match camera perspectives.
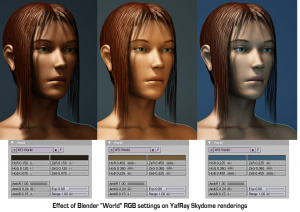
Blender World parameters may include a small AO setting which YafRay does seem to take into account, so you might try adding some in your scene. Also be aware that the World Sky colors (Ho & Ze) are treated as a "hemi" light source, and will color your scene accordingly when using Skydome -- play with these RGB values to perhaps boost the overall lighting intensity by "filling in" with GI. In the pics below, the World lighting settings were doubled for the render on the right.
Everything seems to need to be boosted for YafRay -- some Materials look very dull unless you "double-up" some of the components (such as by using an image texture twice with "Add"), and the RGB & Shader tab settings are very different from what you would use with the Internal renderer.
You can also adjust the EmitPwr and Exp settings in the YafRay renderer tabs to compensate for the lighting differences. It gets to be quite a juggling act. The plus side is that you are able to get lighting of a much richer character for a scene, so it can be worth the trouble.
SkyDome
Using the Blender Internal (BI) renderer, the only way to get the world Horizon, Zenith, or Textured color to affect the material color is to use Ambient Occlusion set to Sky Color or Sky Texture; otherwise (without AO) it only affects the color of the background. The only variable to directly affect the final object coloration in Blender Internal is the color of Ambient light, and then each material can receive a specified amount of that ambient light (by default 50%). The color of the ambient light in BI cannot be varied over the height of the image and is applied uniformly to the subject. Ambient Occlusion, based on the settings, affects the color of the model based on its geometry.
In Yafray, however, a key difference is that the color of all of these matter, as shown in the example. The example has the same material (the skin and hair) rendered using different Horizon and Zenith colors. Each of these, in effect, change the ambient light cast onto the subject. If the Zenith was darker, as is usually the reality, the tops of the model would be darker than the the lower portions. Using the color of the sky and horizon to affect the lighting of subjects lends a much more realistic blending of a subject into the environment, leading to more photorealistic results.
To achieve the same effect in Blender, you can use Ambient Occlusion, or light your subject with Hemisphere lamps which are the same color as your sky zenith and horizon.
