Attic:Manual/Video Sequences
This section of the User Manual tells you how to use the Video Sequence Editor functions, and how to use Blender to assemble your movie. This section is laid out in two main parts. The first part is more of a descriptive reference of the tools you have at your disposal; what Blender can do, organized according to Blender capability:
- Setting Up Your Workspace: the Sequence Screen Layout
- Using the Video Sequence Editor
- Previewing Results
- Animating Sequences using the Ipo Sequence mode
The second part describes a typical workflow and tells you how to use Blender to get the video editing job done, citing examples and results. It takes you through the process of editing a video to produce a final movie.
A third part provides some reference links.
Sequence Screen Layout
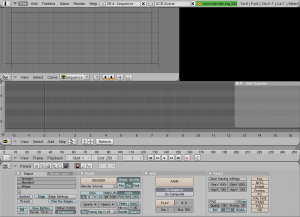
Blender comes with a few screen layouts, one of which is 5-Sequence. This screen layout is shown to the right. The three main windows are an Ipo window and VSE window on the top row, and another VSE window in the middle, and a Timeline window below that, with the base Buttons windows at the bottom.
The Ipo Window is in Sequence mode; when you animate a sequence, it's Ipo curves will show up here, so you can make fine adjustments to its motion. The black VSE window is set to show you a preview of the finished sequence. Upon opening, it is black because there isn't anything to show.
The middle VSE window, in Sequence mode, is your work area. The VSE window is in the middle, because it is where you will be doing most of your work; being in the middle means your mouse has to travel the least amount of distance, and you are efficient. Keep this in mind when you are arranging any screen layout.
The Timeline window below it lets you select where (time-wise) in your animation you want to work, and allow you to quickly set the range of animation you want to scrub. Use the Timeline window's VCR buttons to playback the animation.
Scrub
Just like scrubbing a dirty pot with a brush, where you go back and forth, back and forth, until it is clean, the term scrubbing in video is going back and forth over a small range of frames, examining and correcting errors, until it is done.
|
Using the VSE
The Video Sequence Editor has a header (where the menu and mode are shown) and a workspace, and works in one of four modes. In Sequence mode, the workspace is horizontally-striped into channels, and each video strip will go in a horizontal channel. Each channel is numbered on the left-hand side, starting from 0 and going up; the picture to the right shows three channels (zero to two). Stripes toward the bottom are more dominant, which we'll get to in a minute. In the x direction, seconds of animtion or frames of animation are used as the measure of time (seconds 1 through 7 are shown). You can scale the time using the zoom keys or mouse actions (see the Reference for more info).
When you click Render or Anim to generate an image or video, Blender has a choice of what image to compose for the current frame/scrub range:
- Current Scene layer result
- Sequence Editor channel 0 result
- Composition Node Editor renderlayer result
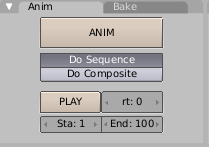
Tell Blender to use the output of the Video Sequence Editor by enabling "Do Sequence" in the Buttons Window, Scene Render buttons, Anim panel.
View Menu
As usual, this menu controls what and how you view in the workspace.
Mode: Sequence
Hotkey: ⇧ ShiftSpace, Ctrl↑, Ctrl↓
Menu: View -> Maximize Window
Use this when working arranging a lot of strips and you want to use all of your screen to work.
Mode: Sequence
Hotkey: T
Menu: View -> Show Frames, View -> Show Seconds
Time toggles the units of measure across the bottom of the workspace between seconds and frames. Seconds depends on the Frames/second setting in the Scene Render Format panel in the Buttons window.
Mode: Sequence
Menu: View -> Lock Time to Other Windows
Locking Time to other windows means that if you change your position in time (by left-clicking in the workspace to move your vertical green cursor), other windows will update as well to reflect what the video will look like at that time.
Mode: Sequence
Hotkey: . NumPad
Menu: View -> View Selected
Zooms in the display to fit only the selected strips
Mode: Sequence
Hotkey: ↖ Home
Menu: View -> View All
Zooms (out) the display to show all strips
Mode: Sequence
Hotkey: ⇧ ShiftAltA
Menu: View -> Play Back Animation in 3D View
Plays the animation for the selected scrub frame range in all windows: In VSE windows, shows you their respective display (Image, Chroma, Luma). In any 3D windows, shows you the objects moving.
Mode: Sequence, Image, Chroma, Luma
Hotkey: AltA
Menu: View -> Play Back Animation
Plays the animation for the selected scrub frame range in the window.
Select Menu
This menu helps you select strips.
Mode: Sequence
Hotkey: A
Menu: Select -> Select/Deselect All
Selecs all the strips loaded.
Mode: Sequence
Hotkey: B
Menu: Select -> Border Select
Begins the Box mode select process. Click and drag a rectangular lasso around a region of strips in your Sequence workspace. When you release the mouse button, the additional strips will be selected.
Add Menu
Mode: Sequence
Hotkey: Space
Menu: Add
This is the main menu you will be using. In general, you load up your strips, create strips of special transition effects, and then animate out your sequence by selecting "Do Sequence" and clicking the Anim button. You can use the Add menu in the header, or hover your mouse cursor over the Sequence workspace and press Space.
Clips can be Huge
A three minute quicktime .mov file can be 140Megs. Loading it, even over a high-speed LAN can take some time. Don't assume your computer or Blender has locked up if nothing happens for awhile.
|
Add Movie and Image (Stills or Sequences)
First, let's add a clip: a movie file (avi or mov), an image or numbered sequence of images, or a scene in your .blend file. Blender does not care which of these you use; they all become a strip in the VSE. When you choose to add one of these, the VSE window will switch to a file browser for you to select what you want to add. Supported files have a little rectangle next to their name (blue for images, green for clips) as a visual cue that you can pick them successfully. LEFT CLICK to select a single file (like a movie) or, in the case of numbered image sequences, right-click and drag over the names to highlight multiple files. When you click the Select <whatever> button, the window pane will switch back to VSE, and the strip will be rubber-banded to your mouse. You cannot load multiple movies at the same time by right-clicking them; no movies load if you right click them. Right-clicking only works for images.
Error: The selected file is not a movie or FFMPEG support not compiled in!
means that the file is not a movie that Blender can recognize, or you selected with the wrong button. You get this error message because you right-clicked on a movie file, OR you don't have a codec that can decode the avi file. If it's the latter, find a codec so you can play the file outside of Blender, and then you will be able to load it. If it's the former, you must left-click to select movies.
|
In order to add items to the VSE, left-click for movies, left-click for single images, or right-click and drag for image sequences. Move your mouse to the frame/time and stripe you want, and click to break the rubberband and drop the strip in place (in a channel and starting at a frame).
You can always grab and move it again as described above. When you add an image, Blender makes it into a 50-frame strip, which means that image will be in your video for two seconds (at 25 fps). Aside from re-positioning it, you will want to scale it by right-clicking on either the start or end arrow, and dragging left or right. As you move, the frame number updates to say where the arrow is.
If you scroll up the workspace, you will see an information channel (at vertical location 0) that gives you some helpful hints about the active strip. The example below shows a color strip from frames 1 to 25, the a mov file, and then an image strip. The info channel shows handy information about the image strip, whose name has been scrunched in the strip display, but is clearly spelled out in the information strip.
Add Scene
You can add the virtual image output of a Scene in your current .blend file as well. Select the scene from the popup list, and a strip will be added and rubberbanded to your mouse just like a movie or image. The strip length will be determined based on the animation settings in that scene (not the current scene, unless the VSE is operating in the same scene).
When adding a Scene strip, please note that, in order to show you the srip in the VSE Image preview mode, Blender must render the scene. This may take awhile if the scene is complex, so there may be a delay between the time you select the scene and the time the strip appears. To reduce the delay, simplify the scene rendering by selecting fewer layers to render.
Add Audio
The VSE can incorporate an audio channel which you can hear as you scrub. Add an audio track when you are trying to time your video/animation to an audio track, or vice versa. Please refer to the Audio Sequences section for more information.
Add (Special) Effect
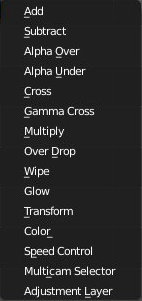
To cut-splice two strips, simply move them up against one another. Use special effects (sfx) for special purposes:
- Mix strips together (Add, Subtract, Multiply)
- These do the color math on the colors of both frames, creating a result just like the Mix node would do. For example, a blue shirt plus a yellow filter equals a white shirt.
- Composite (layer) strips (alphaover, under, and drop)
- Using the alpha channel, this sfx composites a result based on transparent areas of the dominant image. With Alphaover, select the background strip first, then the foreground (where it has some transparent areas). The easy way to remember this is just like you were putting papers down on our desk, and the alphaover is your desk lamp. Looking "down" through the channels, the blank areas of channel 2 would let the opaque areas of channel 1 show through, if you layer the background strip in Channel 1; Channel 1 is the matte.
- Enhance a strip (glow, transform, speed)
- Glow increases the luminance of the selected strip
- Transform shifts, scales and rotates the images within a strip
- Speed Control time-warps the strip, making it play faster or slower than it normally would
- Transition between two overlapping strips (Cross, Gamma Cross, Wipe)
- Cross does an image fade from one to the other; nice simple smooth transition.
- Gamma uses color correction in doing the fade.
- Wipe drops one down over the other.
To use an effect that combines or makes a transition between (or composites) two strips, you must Box select or shift-click two of them. When you add the effect strip, it will be placed in a channel above the two in Grab mode (click to drop it). Its duration will be the overlap between the two strips as a maximum. If you picked the wrong effect, you can always change it using the Strip->Change Effect selection. With some effects, like the AlphaOver, the order in which you select the strips is important.
The effect strip has the frame length, the name of the effect, and the channels it operates on. Change the length as you would any strip, and press Change to switch effects.
Some effects (Add, Multiply) can be controlled through the Ipo curve; others (Color Generator, Glow) are controlled through the Properties panel.
Adding Plugin Effects
Sequence Plugins are special little routines written by special programmers in the C language as a dynamic load library (.DLL). A DLL can be loaded at any time (dynamically) as it is needed, so it "plugs in" to Blender.
You find these DLLs by:
- Visit the Resource Page for Plugins
- Hunt the internet and visiting programmer's websites
- Explore the plugins that are installed with Blender.
When you find them, download them, saving them in the Blender Plugin Sequence directory. The location of this directory on your machine is under your install directory or overridden by a setting in your User Preferences panel.
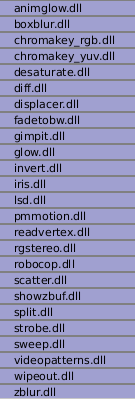
The image to the right shows the Sequence DLL's that I have available on my system. Each of them do some special effect indicated by their name or as explained on the Resource Page for Plugins or programmer website. For example, the Iris plugin transitions between two strips by opening an expanding hole in the middle of the first and letting the second one show through, like an iris of a camera opening up. Some of these plugins can be five or more years old and still work very well; Blender tries to ensure backward compatibility, and they should work independent of output format or resolution (size).
Strip Menu
This menu allows you to operate on video strip(s) as a whole.
Mode: Sequence
Hotkey: M, AltM
Menu: Strip -> Make Meta Strip, Separate Meta Strip
A Meta-Strip is a group of strips. Select all the strips you want to group, and Make them into one meta. The meta spans from the beginning of the first strip to the end of the last one, and condenses all channels into a single strip, just like doing a mixdown in audio software. Separating (ungrouping) them restors them to their relative positions and channels.
Mode: Sequence
Hotkey: X, ⇧ ShiftD
Menu: Strip-> Delete, Duplicate
If you have added a strip by mistake or no longer want it, delete it by pressing X or using this menu option. Duplicate a strip to make an unlinked copy; drag it to a time and channel, and drop it by LMB ![]() click.
click.
Mode: Sequence
Hotkey: K
Menu: Strip -> Cut at Curent Frame
While splicing two strips happens just by placing them finish-to-start, cut a strip by pressing K to cut. At the selected frame for the selected strips, K cuts them in two. Use Kut to trim off roll-ups or lead-ins, or roll-downs or extra film shot ("C" was already taken for Change).
Mode: Sequence
Hotkey: ⇧ ShiftS
Menu: Strip -> Snap to Curent Frame
Position your cursor (vertical green line) to the time you want. Snap to current frame to start a strip exactly at the beginning of the frame. If your Time display is in seconds, you can get to fractional parts of a second by zooming the display; you can get all the way down to an individual frame.
Mode: Sequence
Hotkey: G
Menu: Strip -> Grab
Move you mouse horizontally to change the strip's position in time. Move vertically to change channels
Mode: Sequence
Hotkey: N
Menu: Strip -> Strip Properties
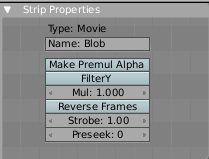
Press N to display a floating panel that shows you properties for the object selected; in this case a video Strip. By default, the name of a strip shown in the workspace is its filename. You can name strips by LMB ![]() clicking in the Name: field and entering a descriptive name; the workspace will display that name.
clicking in the Name: field and entering a descriptive name; the workspace will display that name.
Use the Make Premul Alpha button if a strip has an Alpha (transparency) channel. Use FilterY if the strip is from broadcast video and has even or odd interlacing fields. Enhance the color saturation through the Multiply field. Play a strip backwards by enabling Reverse Frames. Tell Blender to display every nth frame by entering a Strobe value. Finally, when using MPEG video, an image is built up over the course of a few frames; use the Preseek field to tell Blender to look ahead and compose the image based on the next n frames.
Effects Strip Properties
Each Effects strip has a different set of properties that you use to control it. The properties vary based on what the strip does.
|
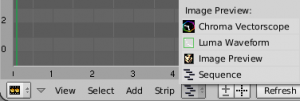
VSE Preview Modes
In addition to being a work area for arranging video strips, the VSE workspace can show you different aspects of the composite result, for the current frame:
- Chroma: Color hue and saturation
- Luma: Brightness/contrast
- Image: Colors (what you see)
- Sequence: Video strips
In the Chroma, Luma, and Image modes, a channel selector appears; channel 0 is the result of compositing the strips with their special effects strips. Channel 1 is what the current frame's image from the strip in channel 1 looks like (channel 1 is at the bottom of the heap). The display of these modes is either the composite (channel 0) or the frame from the strip (channels 1 through n).
Zoom the view of any of these workspaces by scrolling your middle mouse wheel.
Chroma Vectorscope
For the selected channel, this display shows the colorspace of the image inside a hexagon. Each point of the hexagon is a primary color: red, magenta, blue, cyan, green, and yellow. Black is at the center, and overall saturation is scaled as dots closer to the outside.
Use this display to check for too much color saturation. While over-saturated images look great for op-art and computer displays, they stink when shown on the big screen TV. Use the Alt-Animation key to scrub the video; this display will update with a new/revised map for each frame. Just like watching the Image preview to see what it looks like, watch the Chroma Vectorscope to watch for color use.
Luma Waveform
For the selected channel, brightness, or luminosity, is mapped with this display. Left to right, the waveform shows you peak and average luminosity for those vertical pixels. Black, or alpha 0, has no luminosity.
Use this display to check for appropriate contrast and luminosity across all frames in the channel. When spots in the film that should have even illumination don't, it looks like a flashbulb went off or an extra light was suddently turned on. This can happen if two strips were rendered or shot under different lighting conditions but are supposed to be contiguous.
Image Preview
In the upper right window pane of the Sequence screen layout is another VSE window, this one set to Image Preview mode. It shows you what the resulting video will look like when saved.
Sequence Mode
The main working mode for adding strips and moving them around, cutting, grouping (making meta) and splicing them through special effects as described above.
Changing the Length of a Strip
To edit a movie or image strip:
- RMB
 in the middle of the strip selects the entire strip; holding it down (or pressing Grab) and then moving the mouse drags a strip around.
 - RMB
 on the left arrow of the strip selects the start frame offset for that strip; holding it down (or pressing Grab and then moving the mouse left/right changes the start frame within the strip by the number of frames you move it:
- If you have a 20-image sequence strip, and drag the left arrow to the right by 10 frames, the strip will start at image 11 (images 1 to 10 will be skipped). Use this to clip off a rollup or useless lead-in.
- Dragging the left arrow left will create a lead-in (copies) of the first frame for as many frames as you drag it. Use this when you want some frames for transitions to the this clip.
- RMB
 on the right arrow of the strip selects the end frame of the strip; holding it down (or pressing Grab) and then moving the mouse changes the ending frame within the strip:
- Dragging the right arrow to the left shortens the clip; any original images at the tail are ignored. Use this to quickly clip off a rolldown.
- Dragging the right arrow right extends the clip by making a copy of the last image. Use this for transitions out of this clip.
Action Stops
When extending the start or end, keep in mind that only the last image copies, so when viewed, action will stop on that frame. Start your transition (fade, cross) a little early while action is still happening so that the stop action is not that noticeable (unless, of course, you want it to be, like the 80's drama sitcoms).
|
Change the length of an effect strip by changing the start/end frame of the origin strips.
Zoom, Scale Display and Refresh Header Buttons
These buttons are found throughout Blender on a window's header. LMB ![]() Click and drag the +/- button left and right to scale the display around the cursor (the vertical green line). Moving left zooms out, and right zooms in across frames. Moving up and down zooms in and out of channels.
Click and drag the +/- button left and right to scale the display around the cursor (the vertical green line). Moving left zooms out, and right zooms in across frames. Moving up and down zooms in and out of channels.
Clicking the crosshair puts your mouse in a box-select mode. Select a region of the workspace by LMB ![]() clicking and dragging over a rectangular region of the workspace. When you release the mouse, the workspace display will zoom in to fit that region in your entire display.
clicking and dragging over a rectangular region of the workspace. When you release the mouse, the workspace display will zoom in to fit that region in your entire display.
On lesser powered-PCs, Blender may defer window update until you stop working and it gets some CPU time to work behind the scenes doing computation. In this way, Blender does not make you wait on it; it waits on you and gives you precedence. Click the Refresh button to force Blender to update and synchronize all displays to the current frame.
Animating and Controlling Effects
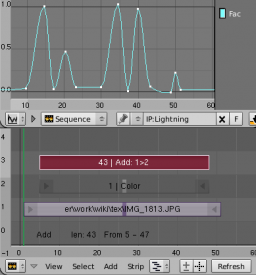
By default, when you add a special effect, like a cross, Blender provides a smooth transition to the new picture, from 0.0 to 1.0, over the duration of the frames (the sfx strip). In the case of an add or multiply or subtrace etc. sfx, Blender add the effect immediately, and keeps it there; the factor jumps to 1.0 and stays at 1.0. Now, we know how much you all like to control things, so you have the Ipo Window that can operate on a strip, or Sequence. This is why there is an Ipo Window in the upper left-hand corner of the screen layout.
Here you see an example of animating the Add effect to produce the effect that lightning has. To add control points in the Ipo Window, CtrlLMB ![]() click anywhere, and a Factor curve will be added. In this case, we have added gray to our image in a jagged Ipo set. I think the effect is very convincing. When (or if you have already) gotten into nodes, the use of this Factor is the same in many nodes, especially the Mix node. The Mix node, in Add mode, does exactly the same thing as the Add sfx strip here, and is controlled the same way by feeding the Factor input.
click anywhere, and a Factor curve will be added. In this case, we have added gray to our image in a jagged Ipo set. I think the effect is very convincing. When (or if you have already) gotten into nodes, the use of this Factor is the same in many nodes, especially the Mix node. The Mix node, in Add mode, does exactly the same thing as the Add sfx strip here, and is controlled the same way by feeding the Factor input.
Not all sfx can be animated; Glow will not do it for me, but the Add, Multiply, Divide, Subtract do. To make the Wipe or Transform go faster, just shorten its strip. It would be best to shorten it by shortening the duration by which the two strips overlap.
Mode: Sequence
Hotkey: N
Menu: Strip -> Strip Properties
Use the Strip Properties panel to control the effects strip; with the Glow sfx strip properties, you control the threshold, clamp, boost, blur effect. With the Transform strip, use the properties panel to control the start and ending scale, offset/location, and rotation. Control the length of the strip to vary the speed with which the transform happens.
Working with Blender for Video Editing
This section covers the workflow of the video editor, providing numerous examples of practically using the tools described above. While editing can occur in any order, in the real world it begins based on what footage has been shot, called "in the can".
Lots of times, footage is shot out of sequence. For example, they may shoot the fight scene first, then the introduction, then the thrilling climax, and titles added just before release. This style of shooting is motivational, and you have some exciting dailies to show the producer and to lock in total funding, but is hard on the actors to give a good performance, and hard on the editor because he can't tell the whole story. It's analogous to writing a book by starting to write chapter 13 first.
This section assumes that all footage has been shot, and we want to edit the video in sequence to produce a post-production pre-audio copy.
This section assumes you will be producing an animation, and that the audio track will be recorded or synched after you are done, so you don't have to make markers or insert synch frames into your video.
Collecting and Organizing Footage
Video is huge and even a screaming machine can take a half-hour to encode a three-minute segment. Accidently deleting or overwriting a source file is disasterous, as there is no way to go back in time and reshoot a live action scene. There are many ways to set up your file structure, but when you do, you might want to check out this page on suggestions for organizing your video files.
Cut Rollup/Rolldown
The Director says "lights, camera, action" to turn on the lights, start the camera rolling, and to get the actors in gear to do their thang. In between camera and action, a clapper claps to enable us to sync audio later with the video. After the scene is complete, he says "cut" which stops the action and camera. When you get the raw footage uploaded, you need to chunk it out into clips that can be reviewed, and the best chosen. The part where the camera starts up to the clap is the rollup and is useless. Any filming from the time he says cut to the end of filming is rolldown garbage.
Everything from the start of the raw footage up to the clapper making the clap can be cut. To cut rollup, simply position your cursor to the frame where the clapper bar meets the clapper as seen in the Sequence window set on Image display (the strip must be selected). Back up one frame Rightarrow and press K to cut, and confirm. The strip is cut in two; just like using a bench and a razor. Select the rollup and press X to delete it. Grab and slide the remainder to frame 1.
At the end, everything filmed after and including the word "cut" can be cut, leaving a middle segment that may contain multiple partial or complete takes. To cut rolldown, find where he says "cut", and Kut and X delete the tail (unless there's another scene and/or take left). Sometimes the director will forget to say cut, and the camera keeps rolling, so you have to cut it for him by looking at it and seeing when the actors finish. Cut from there to the next clap (or end of footage), but move up the footage to a higher channel. It will be kept for review by the director, but won't be shown since the video beneath it will be shown instead.
Cut out Flubs
For example, an actor may get halfway through their lines, flub the last word of the third sentence, do an "ahblahyadayada" to get the marbles out of their mouth, and start over with the start of the third sentence without prompting. In this case, the middle flub needs to be cut out of the middle (more often than not, they will have moved their head or background has changed resulting in a discontinuity, and the footage will have to be tossed. However, using the offset and displace nodes and transform sfx, it may be possible to salvage it and splice the two). Cutting without a clap is a little dangerous, since the audio engineer is going to have to cut out the exact same flub. In this case, keep a record the actual number of frames cut by moving the cut to a higher channel, and the audio engineer can calculate how many milliseconds to cut as well.
For this reason, when you cut the flub, just move the flub up a channel or two, and slide the remainder underneath it. This way the flub is still available for a gag reel, and is available for you to review when the audio engineer asks how many frames were cut because he lost the tracking sheet.
You may also cut out dead time in this manner; cutting straight to the action (from the clap to the start of useable footage) while preserving frames for later review or use by other people.
Save Scrubs
I hope the previous sections show you how you can use Blender as a full featured video editing system. Ok, time to save:
- In the Buttons window, Output panel, change the output filename to reflect the scene and take number (shown on the clapper). You may want to disable extensions.
- In the Timeline window header, set the start and end frames for the take
- Scrub it
- Enable Do Sequence in the Anim panel, and set whatever your format is needed
- Click Anim and that clip will be saved.
Let's move on to using Blender to composite the action footage into a movie.
Video Conversion
Many times input video will be in different formats (avi jpeg and quicktime) and/or different sizes (resolutions) and/or different frame rates. As we have seen, Blender automatically converts stills (images and image sequences) into video when Added. Regardless of the input, Blender renders a single output in the format (codec, resolution, framerate) specified.
Images or video are scaled or cropped to fit within the resolution window. If they are smaller than the output resolution, they are centered in the video (unless offset by the Transform effect).
Video of differing frame rates can easily be mixed and matched. With regard to frame rate, video is imported on frame-by-frame basis based on its run-time. If a 10 second video that was encoded at 24 frames per second is loaded, 240 frames will be loaded in, even if your output is, say, 30 frames per second. This means that your exported video sequence may run faster or slower than input. In this example, the imported video will be export to run for a duration of 8 seconds (240 frames / 30 frames per second = 8 seconds) instead of 10 seconds. If you want to correct this, select the segment and use the Speed Control effect, specifying a factor of 24 / 30 = 0.80, and the segement will be run in slight slow motion relative to the 30 fps you wanted. You will have to extend the video strip to end two seconds later (to fill up the gap) by right-clicking and grabbing the end frame, and dragging it to the right.
Examples
This section provides some practical uses for Blender's VSE.
Making a Slide Show
Allright, you've just come back from vacation at the beach and before your beautiful tan starts peeling, you want to make a video/DVD showing the pictures you took. Simple:
- Add->Images and (the VSE window changes to a file browser) right-click each of the pictures (probably jpeg) that you uploaded from your digital camera and want to include. If you want to include a mass of them, just hold down the right button and drag the mouse over their filenames.
- When they are all selected, click the Select Images button and (the file browser window changes back to the VSE) drag and drop the strip to start at frame 1
- Set your end frame to the end frame of your strip (the number of images selected). Hint: use the Channel 0 "Last:" information
- In the Scene-Render buttons, set your Frames/Second to 1 (format panel) and choose an .avi or .mov format
- Enter your output filename (output panel), enable Do Sequence, and click Anim.
I'd really like to make it more complicated than that, but sorry, it is that easy. Your resulting video will play your pictures, one every second.
Using Speed for a Slow-Motion Effect
Ok, so you see your video and your pictures just fly by. You want to sssslooow them dowwwwwwn. You cannot specify a fractional frame rate less than one, so, you need to affect the speed of the video clip. Select the clip and Add->Effect->Speed Control sfx strip. Click to drop it and press N to get the Properties (I still can't figure out how they got N for Properties, can you?). Set the Global Speed to be the factor by which you want to adjust the speed. To cut the displayed speed by 50%, enter 0.50. Now, a 30-frame clip will play at half speed, and thus display only the first 15 frames.
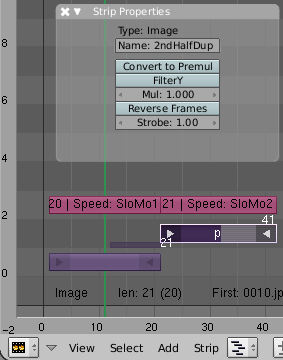
If you want the remaining frames to show in slo-mo after the first set is displayed, duplicate the strip, offset it, and add another Speed control as shown to the right. When the strip on Channel 1, as modified by the sfx strip on Channel 3 finishes, the strip selected on channel 2 starts, as modified by its sfx speed control in channel 3. The trick in creating the second strip is to
- Select the original strip and ⇧ ShiftDuplicate it. In this case, it is a 20-frame image set.
- Drag the clone to half-way above the original and drop it.
- Select the left handle (start), grab it, and move it over half-way. This changes the start frame offset; the strip will now start playing at frame 11 (relative to within itself)
- Select the right handle (end), grab it and move it over half-again as much (in this case, 10 frames) This sets the duration to be 20 frames within your video.
- Add a 50% Speed Control for the first strip, and a 100% speed control for the second. For the second strip, you are already telling blender to play 10 frames over a 20-frame duration, which is already half speed, so you don't need the speed control to slow it down anymore, just to scale the frames selected to the duration of the clip.
That's it! Set your render to animate (in this example) all 40 frames.
Why not just extend the original clip out, you ask? Well, the Speed Control operates based on the number of frames it is going to show, divided by the number of frames it has to show them over. For example, if a strip has 20 frames in it, and you specify a speed factor of 50%, it knows it has to display 10 frames. If that strip is, say, stretched to cover 30 frames of video, it will play each of the 10 frames for 3 frames (3 x 10=30). Understanding the math will help you be effective and get the control to do what you want it to.
Converting a Frame Sequence to a Movie Clip
Suppose you have (wisely) rendered you animation to a frame set sequence, such as a sequence of PNG or EXR formatted image files. The files are named MyAnim-0001.exr through MyAnim-0030.exr. In your working VSE, choose Add->Sequence. Your VSE pane changes to a file browser window. Use that window to navigate to the directory where your images are stored, RMB ![]() click and drag over all 30 filenames. If you miss one, you can just RMB
click and drag over all 30 filenames. If you miss one, you can just RMB ![]() click it and the one previously selected will remain selected. Upon clicking "Select Images" your screen will return to being a VSE, and you mouse will have a purple horizontal strip attached to it. The strip represents your image sequence, and has a number in front of it (the start frame) and a number behind (the last frame). Move your mouse to position the strip so that it has a start frame of 1, and LMB
click it and the one previously selected will remain selected. Upon clicking "Select Images" your screen will return to being a VSE, and you mouse will have a purple horizontal strip attached to it. The strip represents your image sequence, and has a number in front of it (the start frame) and a number behind (the last frame). Move your mouse to position the strip so that it has a start frame of 1, and LMB ![]() click to drop it. Refer to the reference manual for more possible mouse and hotkey actions on the strip.
click to drop it. Refer to the reference manual for more possible mouse and hotkey actions on the strip.
In the Timeline header, set the End: frame to be the last frame of the strip. Click the VCR-like play button to see the animation preview in the VSE Preview window pane. It will repeat forever, so click the pause button when you've seen it enough times (Play turns into the Pause button, so you don't even have to move your mouse.)
In the Buttons window, Scene (F10) buttons, Render buttons, set (going left to right):
- In the Output panel, set the output render directory to the directory and name you want for your avi movie
- In the Anim panel, click the "Do Sequence" button.
- Lastly, in the Format panel, select AVI Codec and [Manual/xx|choose your codec].
Cross your fingers and click Anim. A popup Render window will show each frame of your movie, pretty quickly, and Blender will create the file named in your Output Render field with the .avi extension. You can now play the video in your favorite media player.
This simple example shows you how one screen layout has all windows needed in your workspace, and how they work together to get the job done.
Splicing and Transitions
Splicing is making something by taping together parts that have sliced. In video, there are many ways to join up parts or transition from one to the other. Almost all of these techniques originated with physical film or inventive darkroom techniques, so as you read them, try to imagine how you might do these with physical film.
A cut splice is simply the two pieces of film strips taped finish-to-start.
Making the two strips transition from one the other is accomplished by overlaying the srips and adding a Cross or Gamma Cross or Wipe effect.
Fading in or out is crossing a color generator effects strip (set the color in its properties panel) with the video strip. Usually you fade to or from black.
Note that the Alpha effects do not work with the color generators; you can only Cross with them.
