利用者:Soylentgreen/Map Input
- What is the source of the Input Coordinates?
- Where is the top left corner? Where does the Texture begin?
- How large is the Texture, how often has it to be repeated?
- Do we have multiple points to begin the texture, like at a cube?
- Shall the Texture be rotated?
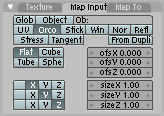
Let's begin with the Button rows at the top.
Source of the Input Coordinates
- UV: Uses a special kind of mapping called 'UV' mapping. This is especially useful when using images as textures as seen in Manual/UV Unwrapping And Texturing.
- Object: Uses an Object as source of coordinates; usually an Empty. The Object name must be specified in the text button on the right. This is the preferred way to place a small image as a logo or whatever at a given point on the object.
- Glob: Uses Blender Global 3D coordinates. This is also usefull for animations. If you move the object, the texture moves across it. It's nice for letting objects appear or disappear at a certain position in space.
- Orco: Uses the Object local, original, coordinates.
- Stick: Uses the Object local, sticky, coordinates. If you have made Sticky coordinates first (F9->Mesh Panel->Sticky Button), the texture is rendered in camera view (so called "Camera Mapping").
- Win: Uses the rendered image window coordinates. This is well suited to blend two objects.
- Nor: Uses the direction of the normal vector as coordinates. This is very usefull to create certain special effects (see below).
- Refl: Uses the direction of the reflection vector as coordinates. You will need this input for Environment Mapping.
Incidence Angle dependent Textures
I will mention the limitation off this technique right away: this will be no real Fresnel effect, because it is dependent from the camera angle - not really the incidence angle. But it works similar to Fresnel, when the camera is not to close to the surface or the face is relatively small compared to the camera. It works well with spheres, not so good with large planes.
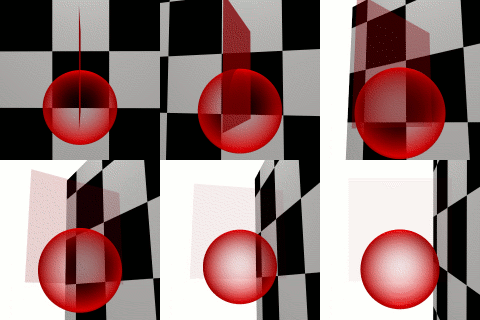
As an example we will fake Fresnel Alpha. Of course you can do better with the corresponding slider, but with this technique we can change every Map To channel, not only Alpha. So we use Alpha just for comparison reasons here.
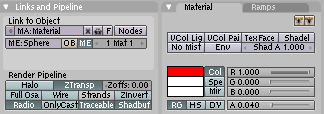
Create a new material and set the Alpha Value in the Material Panel to 0.04. Switch ZTranps in the MirrorTransp Panel on (Material settings for incidence dependent Alpha).
Now add a new texture, set Map Input to Nor. -/-/Z coordinates. Map To Alpha (Texture settings for incidence dependent Alpha).
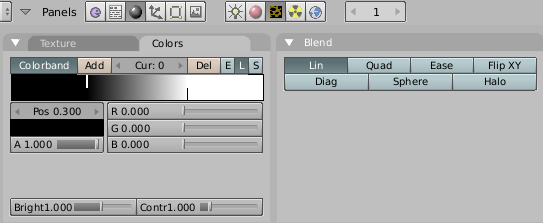
Choose the Texture Type Blend in the Texture Buttons (F6) Blend Type Sphere. Wie could adapt the blending with the Colorband in detail, but this example should show only the principle.
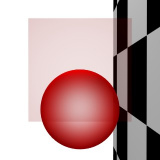
You clearly can see how the plane gets transparent (96%) if you view it directly perpendicular (Faked Fresnel Effect). For comparison "real" Fresnel (Real Fresnel Effect).
Instant Professionalism
To make a lighter image, you can set Map To Ref and/or some Emit. Set the blending method to Add. Since you get instant super light crispyness on your object (and it's very easy to achieve) it jestingly was called "Instant Professionalism".
Slope Dependent Textures
A very similar technique can be used to create textures that are dependent from the slope of the terrain. Use a linear Blend texture with a colorband (Texture settings for slope dependent textures))
Use this blend texture as a Stencil Map which will keep the "Steep" Texture (Material settings for slope dependent textures). With the shown settings the terrain rises in Z-Direction.
2D to 3D Mapping
The Image texture is the only true 2D texture, and is the most frequently used and most advanced of Blender's textures. The standard, built-in bump mapping and perspective-corrected mip-mapping, filtering, and anti-aliasing guarantee outstanding images (set DisplayButtons OSA to ON for this). Because pictures are two-dimensional, the way in which the 3D texture coordinate is translated to 2D must be specified in the mapping buttons.
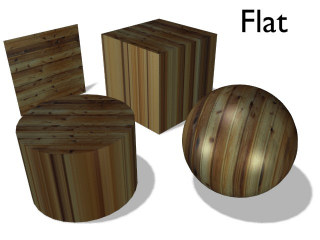
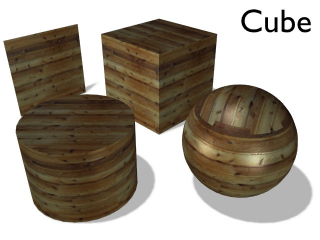
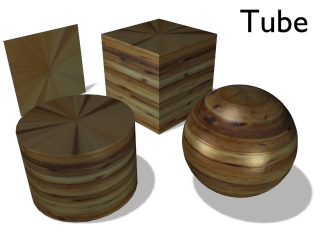
The four standard mappings are: Flat, Cube, Tube and Sphere. Depending on the overall shape of the object, one of these types is more useful.
- The Flat mapping gives the best results on single planar faces. It does produce interesting effects on the sphere, but compared to a sphere-mapped sphere the result looks flat. On faces not in the mapping plane the last pixel of the texture is repeated, which produces stripes on the cube and cylinder.
- The cube-mapping often gives the most useful results when the objects are not too curvy and organic (notice the seams on the sphere).
- The tube-mapping maps the texture around an object like a label on a bottle. The texture is therefore more stretched on the cylinder. This mapping is of course very good for making a label on a bottle or assigning stickers to rounded objects. However, this is not a cylindrical mapping so the ends of the cylinder are undefined.
- The sphere-mapping is the best type for mapping a sphere, and it is perfect for making a planet and similar stuff. It is often very useful for creating organic objects. It too produces interesting effects on a cylinder.
Coordinate Offset, Scaling and Transformation
- Ofs: Coordinates can be translated by assigning an offset. Enlarging of the Ofs moves the texture to top left.
- Size: Scaling of the texture. The texture is as often repeated as sized here.
- X,Y,Z: Changes the X, Y and Z coordinates. You can also switch of the respective coordinate.
