「Doc:JA/2.4/Manual/Textures/UV/Unwrapping a Mesh」の版間の差分
細 (Bot: Fixing redirects; cosmetic changes) |
細 (1版 をインポートしました) |
(相違点なし)
| |
2018年6月29日 (金) 04:43時点における最新版
最初のステップはメッシュをアンラップすることです。メッシュが必要とする面の数に関して完全であると感じるとき、アンラップを求めます。新しい面を追加したり既にアンラップされたモデルの面を分割するならば、Blenderはそれらの新しい面を追加します。この方法では、追加のジオメトリの変化を導くためにUVテクスチャイメージを使用することができます。
UVツールはBlender Version 2.46に大幅に強化されています。必要なら このページ(英文)を参照してください。
はじめに
モデルのアンラッピング、UVアンラッピングと呼ばれる作業は3Dビューウィンドウの編集モードで行います。この作業はUV画像エディタウィンドウで1つ以上のUV Islandsを作ります。
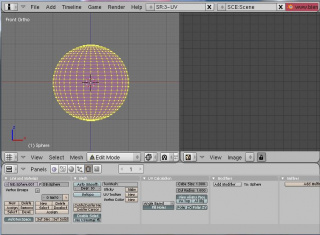
始めるには、ユーザー設定ウィンドウのヘルプの右のスクリーンレイアウトを選択リストからSR:3-Materialにし、UV画像エディタウィンドウ(Shift+f10)と3Dビューウィンドウ(Shift+f5)を表示してください。
全てのアンラッピング作業は編集モードで行われるので編集モードに入ってください。頂点、辺、面の選択モードにすることが出来ます。
ボタンウィンドウは編集コンテキストF9にあることに注目してください。
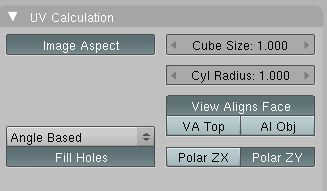
このパネルはアンラップ作業を制御します。このパネルの詳細については リファレンスマニュアルを参照してください。
作業の流れ
アンラップのプロセスは簡単ですが、アンラッピングの結果に大きな影響を与える沢山のオプションが存在します。それらのオプションを理解することでより効率的にアンラッピングを行うことが出来ます。プロセスは:
- アンラッピング作業全体を管理するUV計算パネルをセットします。(ボタンウィンドウ→編集タブ、編集モードで現れます)
- オブジェクトモードでアンラッピングするオブジェクトを選択します。
- 3Dビューウィンドウで描画モードをテクスチャッド(Alt+z)にします。(描画モード切り替えは3Dビューウィンドウヘッダーの立方体、もしくは球のアイコンです。)
- タブキーを押すか、3Dビューウィンドウヘッダーから編集モードに入ります。
- アンラップしたい面を選択します。面選択モードにするには3Dビューウィンドウの三角形のアイコンを押してください。(赤くない方です)
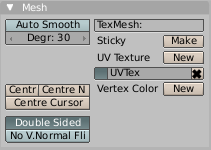
- メッシュパネルで、既存のUVテクスチャを有効にするか新しいUVテクスチャを作成するために「UVテクスチャ」の横の「新規」ボタンをクリックします。
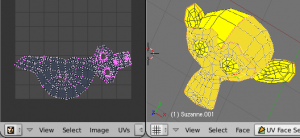
- 新しいUVテクスチャを作成した場合は選択された面は自動的に「フルサイズリセット(後述)」され、描画モードがテクスチャッドならばピンク色になります。非選択面は白になります。
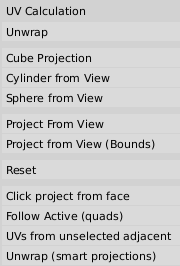
- Uを押すか、メッシュ->UVアンラップを選択します。右のようなポップアップメニューが表示されます。このメニューで使いたいアルゴリズムやメソッドを選択することが出来ます。
- ポップアップメニューから「自動展開」を選択します。
- これは、選択された面の頂点に対応するUVの位置を再計算します。
Every purple dot in the UV map corresponds to a vertex in the mesh. The dotted lines joining the UVs correspond to edges in the mesh. Each face in the UV map corresponds to a mesh face.
Each face of a mesh can have many UV Textures. Each UV Texture will have an individual image assigned to it. When you unwrap a face to a UV Texture in the UV/Image Editor, each face of the mesh is automatically assigned two extra internal features:
- four UV coordinates: These coordinates define the way an image or a texture is mapped onto the face. These are 2D coordinates, which is why they're called UV, to distinguish them from XYZ coordinates. These coordinates can be used for rendering or for realtime OpenGL display.
- a link to an Image: Every face in Blender can have a link to a different image. The UV coordinates define how this image is mapped onto the face. This image then can be rendered or displayed in realtime. A 3D window has to be in "Face Select" mode to be able to assign Images or change UV coordinates of the active Mesh Object.
This allows a face to participate in many UV Textures. A face at the hairline of a character might participate in the facial UV Texture, and in the scalp/hair UV Texture.
Active Face
The last face clicked is "active" (either selected via right-click or de-selected thru shift-right-click). If you select some faces, then de-select some others, the last face you de-selected is "active". If the active face is a de-selected one, you will not be able to map it or see its UV Texture, since, well, it isn't selected. All other faces that are selected are mapped though; just click on them to see their mapping.
|
UVオリエンテーション
When you map a face to a UV Texture, you have really no way of knowing the orientation. The flat square face that is a on the XY plane in 3D view could be a trapezoid on its side in the the UV/Image Editor.
The way to compare the orientation of the UV Texture face and the 3D View face is to apply a test image. In the UV/Image Editor window:
- Sync UV and Mesh Selection by clicking the icon on the UV/Image Editor. A little orange face-link icon shows up in the bottom left corner of the UV/Image Editor window. This shows all UV faces in the UV/Image Editor window, not just the ones selected in 3D View. This gives you a much better perspective on how all the faces are linked and laying flat in the UV/Image Editor
- Enable View->Draw Faces so that selected faces are pink in the UV/Image Editor which makes them easier to see.
- Select all the UV faces by A
- Create a test grid by clicking Image->New. In the popup click UV Test Grid and click OK.
The UV Test grid is a checkerboard with a diagonal series of + in the middle in a specific vertical color rotation: magenta, purple, blue, cyan, 2 x green, yellow, orange, and then back around again. This sequence is offset by one color, so you get a diagonal checker band. This makes it very easy to see the orientation of the UV face relative to the 3D View face.
By RMB ![]() selecting the face in either window can you determine the orientation of the window, since the corresponding face in the other window will be highlighted. clicking on a face of the object. If the face was white in the 3D space, and the UV window is black with just a grid background, it means that there is no image mapped to that face. To map an image for a selected face, simply choose it from the image selector or assign a new one. and turns pink when you click, it means that there currently is no UV mapping for it.
selecting the face in either window can you determine the orientation of the window, since the corresponding face in the other window will be highlighted. clicking on a face of the object. If the face was white in the 3D space, and the UV window is black with just a grid background, it means that there is no image mapped to that face. To map an image for a selected face, simply choose it from the image selector or assign a new one. and turns pink when you click, it means that there currently is no UV mapping for it.
UV回転
If you don't like the orientation of the UV face, for example if the picture is on its side or upside down, press R to Rotate the mapping of the selected UV's and the corresponding faces. Much like 3D View rotation, the header will show you how many degrees the mapping has rotated. Holding CTRL while rotating constrains the rotation to 5 degree increments.
UVロケーション
Changing the shape of a UV face (by moving the corner UVs) will also change the orientation of the mapping, since the vertex has not moved, but the mapping of image pixels to the face has (because you moved the UV location). Press G to grab the UV's and move them; LMB ![]() to drop, RMB
to drop, RMB ![]() to abort, just like vertices.
to abort, just like vertices.
You can also snap UV's just like vertices by activating the magnet icon on the UV/Image Editor header. If you do, the Snap Target Mode selector will appear: hold control to snap UVs to the closest, center, or median of another UV island.
UVへの画像のマッピング
When you entered UV Face Select mode, Blender created a mapping in the UV/Image editor window. If you examine your Editing (F9) buttons, the Mesh panel, you will see a new UV Texture entry, called "UVTex" by default. This panel section has a button to the left of the name, used to select the UV Texture map if there are many listed. The name can be changed by clicking into the field and typing. This texture map can be deleted by clicking the X. You can add arbitrary UV Textures by clicking New, but you will rarely have to, since Blender creates them automatically each time you unwrap.
We just very briefly talked about assigning an internally generated image to this UV Layout, the Test Grid. We call that image a "UV Texture" once it is mapped to the mesh using the UV layout and applied as a texture to the material for the mesh. Let's go over that process in more detail.
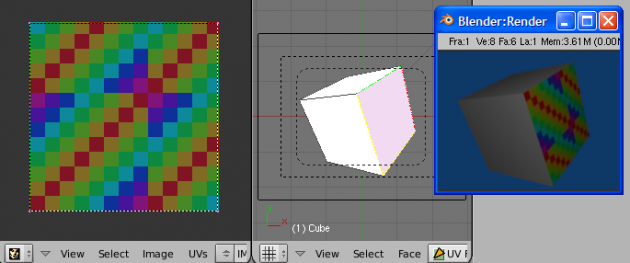
First, we created the image in memory. With the faces selected in the 3D window, move on over to the UV/Image Editor window. From the header menu, select Image->New. Here you select the size of the image to be used, and/or a test grid. Use the Test Grid to orient yourself to the direction of the UV mapping. If you select Test Grid and click OK, that image of the test grid is mapped to the faces. It cannot be rendered yet, because we have not told Blender how to reflect the light off the object when rendering. We do that by creating a Material Texture.
First, Add New material for the object. In the Material Texture tab, click Add New and a texture called "Tex" will be created and assigned to the top channel. In the Map Input panel, specify we want to use our UVTex UV-map, and map the texture to Col (which is selected by default). So, we have told Blender to color the surface of the mesh with a texture, but we haven't told Blender which texture to use.
Activate the Texture subcontext buttons, and load the UV image by clicking the the Load button in the Image panel.
A quick render will show that you have automatically mapped the color of the faces of the mesh to an image used as a UV texture. Congratulations!
These three links are crucial to understanding:
- A UV Layout, shown in the UV/Image Editor, that maps mesh faces to all or part of the image workspace,
- A Material assigned to those faces which maps a texture to the colors, and
- An image texture which loads an image.
Now here comes the confusing part: a mesh object can have many UV Layouts (listed in the Editing buttons panel, UV Texture list). A mesh object can have multiple materials, with a single material mapped to one or more faces of the object. A material can have many (up to 10) textures, each assigned to a texture channel. Each of those textures can be an image mapped to a UV Texture. So, Blender provides ultimate flexibility in mapping and layering images to faces of a mesh object.
You do not have to map all faces to an image. If you select the top face of the cube in UV Face Select mode, then Select->Inverse, you will have selected all the faces except the top one. Then, in the UV/Image Editor window, select a different image. Of course, instead of creating a new image, you can load any of the image formats supported by Blender (JPG, PNG, TGA, etc.)
Once a face has been mapped, RMB ![]() clicking on that face in the 3D View will cause the UV/Image Editor window to automatically show the image and UV coordinates for the selected face. The UV map for that face will be selected in the Mesh panel.
clicking on that face in the 3D View will cause the UV/Image Editor window to automatically show the image and UV coordinates for the selected face. The UV map for that face will be selected in the Mesh panel.
Images versus Maps
You may have heard the terms "Bump Map" or "Spec Map". These are simply terms to denote how a UV Texture is mapped to the material, and what purpose it serves. A Color image affects the color that you see. For skin, there are four common color maps, or images, that are applied to the mesh through the UV coordinates: Tone, Spec, Blemish, and Makeup. The Tone is the basic skin color, Spec is the color you see when the light shines directly on the skin. Blemish is the wonderful imperfections: varicose veins, pimples, scars, scrapes, and Makeup is coloring of the lips, eyes, cheeks. These images are Map To ... Col, or color.
All the other images are gray-scale images, where black (0.0) is "no effect," and white is 1.0 or "full effect." These images map the texture channel indicated, onto the mesh, through the UV Texture. For skin, there are commonly five: Bump (Map to Nor), Diffuse (map to Ref), Specular (map to Spec), Ambient (map to Amb), and Hardness (map to Hard). The Bump map wrinkles and gives the skin pock marks and that cellular unevenness. The Diffuse map makes the color weaker in some areas. The Specular color indicates the skin's thickness, as thinner skin looks redder because of the blood underneath when exposed directly to light. Ambient reflects how flushed the skin is, and Hardness highlights where the skin is oily.
For example, the skin is oily around the crease of the nose. For the Hardness map then, the image would be black except where the texture maps to the area around the outline of the nose, and there it would be white. In the Material settings, the maximum hardness might be 50. Instead of being universally hardness of 50 all over, by using the Hardness map we can control where it is between 0 and 50.
Using UV Textures, mapped to some aspect of the texture, enables us to achieve photo realism of any surface through CG. You are not limited to these. I saw a very good zombie skin texture that used an Alpha Map to place holes in the flesh where the bone could show through (ugh).
Panel Interaction
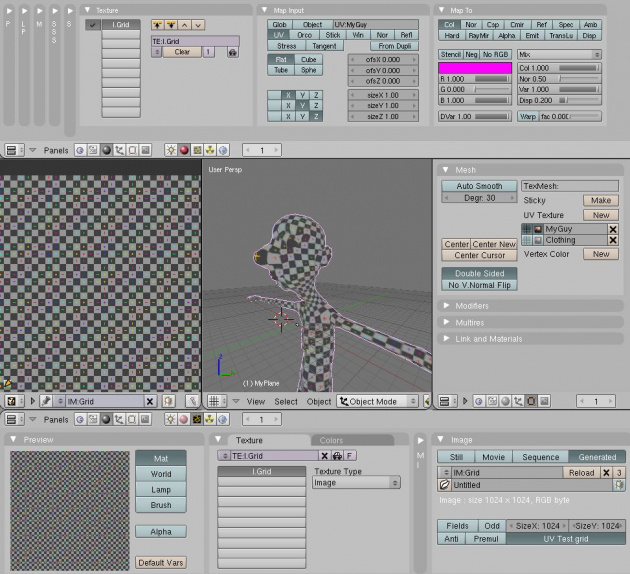
Please excuse me for belaboring the point, but it can be very confusing. There are three different button panel sets going on here that all link to one another, as shown below.
In the above example, on top is the Material buttons. The Texture panels for the Material show one texture named I.Grid, mapped to UV using the UV Texture named MyGuy. That I.Grid is mapped to affect the base color of the mesh. On the second row, you see the UV/Image Editor Window showing the Image called Grid, and the window in the center is the 3D View. The next window on the right, middle row, is the Mesh panel from the Editing context buttons, showing that we have two UV Textures; the active one called MyGuy and another one called Clothing. In the bottom row of buttons, we see the Texture subcontext of the Material buttons, and in fact see that the I.Grid texture is an Image texture that loads the Generated image that is 1K x 1K in size.
All of these names and such have to match up. I hope you can see how you can use a static image for simplicity, or use an animation to show someone blushing, or beginning to sweat, by using a movie or sequence to affect the different texture channels. I'm sure you've seen the different X-Men effects, so now you know how it was done, and how photo-realism can be achieved.
Unwrapping Using Seams
For most cases, using the Unwrap calculations of Cube, Cylinder, Sphere, or best fit will produce a good UV layout. However, for more complex meshes, especially those with lots of indentations, you may want to define a seam to limit and guide any of the unwrapping processes discussed above. Just like in sewing, a seam is where the ends of the image/cloth are sewn together. In unwrapping, the mesh is unwrapped at the seams.
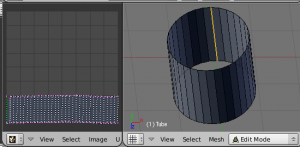
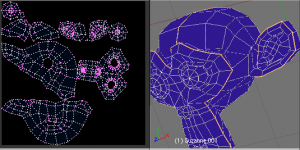
The easiest way to define a seam is Edge selection in Edit Mode. Select the edge(s) that define the seam with border or ⇧ ShiftRMB ![]() , and press CtrlE or use the Mesh->Edges->Mark Seam menu. In the example to the right, the back-most edge of the cylinder was selected as the seam (to hide the seam), and the default unwrap calculation was used. In the UV/Image Editor window, you can see that all the faces are nicely unwrapped, just as if you cut the seam with a scissors and spread out the fabric.
, and press CtrlE or use the Mesh->Edges->Mark Seam menu. In the example to the right, the back-most edge of the cylinder was selected as the seam (to hide the seam), and the default unwrap calculation was used. In the UV/Image Editor window, you can see that all the faces are nicely unwrapped, just as if you cut the seam with a scissors and spread out the fabric.
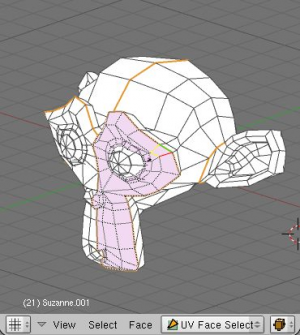
When marking seams, use the Select->Linked Faces in UV Face Select Mode to check your work. This menu option selects all faces connected to the selected one, up to a seam. If faces outside your intended seam are selected, you know that your seam is not continuous.
To add an edge to a seam, simply select the edge and CtrlE Mark Seam. To take an edge out of a seam, select it, CtrlE and Clear Seam.
You do not have to select continuous seams. If you select one edge, and follow that line and select another edge further down the line using Shift + Alt + RMB ⇧ ShiftAltRMB ![]() on the edges in UV face select mode, Blender will connect the line and select all edges in between.
on the edges in UV face select mode, Blender will connect the line and select all edges in between.
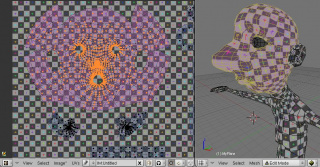
Just as there are many ways to skin a cat, there are many ways to define seams. In general though, you should think as if you were holding the object in one hand, and a pair of sharp scissors in the other, and you want to cut it apart and spread it on the table with as little tearing as possible. Note that we seamed the outside edges of her ears, to separate the front from the back. Her eyes are disconnected sub-meshes, so they are automatically unwrapped by themselves. A seam runs along the back of her head vertically, so that each side of her head is flattened out.
Another use for seams is to limit the faces unwrapped. For example, when texturing a head, you don't really need to texture the scalp on the top and back of the head since it will be covered in hair. So, define a seam at the hairline. Then, when you select a frontal face, and then select linked faces before unwrapping, the select will only go up to the hairline seam, and the scalp will not be unwrapped.
When unwrapping anything that is bilateral, like a head or a body, seam it along the mirror axis. For example, cleave a head or a whole body right down the middle in front view. When you unwrap, you will be able to overlay both halves onto the same texture space, so that the image pixels for the right hand will be shared with the left; the right side of the face will match the left, etc.
Finally, remember that you don't have to come up with "one unwrapping that works perfectly for everything everywhere." As we'll discuss later, you can easily have multiple UV unwrappings, using different approaches in different areas of your mesh.
Unwrapping Multiple Faces
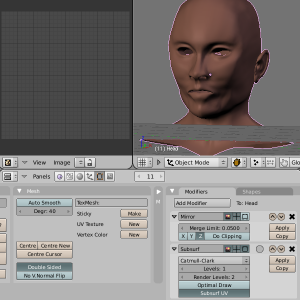
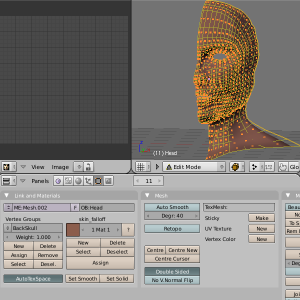
In general, you should only unwrap the faces you need to, and do so in a single unwrap operation. You only need to unwrap faces that will be painted using an image; all other faces can use procedural materials and textures or vertex paint. You want to keep your image as small as possible, so that means you want to keep the number of faces as small as possible. For example, if the body is always going to be covered in clothes or armor, there is no need to unwrap it. If the back of the head is always going to be covered by hair, there is no need to unwrap the scalp. If you are modeling a chair with an embroidered seat cushion, you only need to unwrap the cushion and not the chair legs. In the example to the right, we only need to unwrap one side of the face, cutting our image size in half, so we leave mirror modifier on; we also do not need to double the number of UV coordinates by applying the Subsurf modifier; we can just leave it as is. Note that at this point, there is no UV Texture in the Mesh panel.
To unwrap multiple faces to a single UV Texture, there are two ways to select the faces you want:
- In Edit Mode (⇆ Tab), enter Face Select mode and select the faces you want.
- In UV Face Select mode using the 3D window, right-click or border select the faces you want.
The example to the right shows that we have hidden many faces from view; the ears and the back of the head. We did so by creating and using the Vertex Groups, selecting the "BackSkull" group and Hiding them from view. We did this because we do not want to unwrap those areas, and we don't want them to get in the way during any further face selection that we may do.
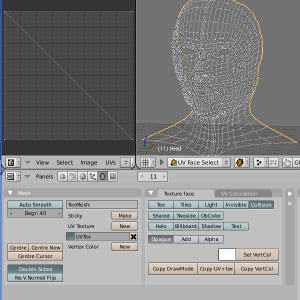
Once we enter UV Face Select mode, Blender creates a UV Texture map for us, shown in the Mesh panel, and displays that map in the UV/Image Editor Window. By default, the map is full-size reset overlay, which means that each selected face is mapped to the full size of the UV window, and the faces are overlaid on top of one another. This situation is identical to the above introduction where you mapped your first face of the cube; any face of the cube you clicked on would show this same full-size map; any image selected would be displayed on each face. If you were to assign an image now, you would see a patchwork style of render, much like the scene in the Matrix when Neo was in the TV room and saw himself tiled over and over. If we were to use an image that was tileable, the surface would be covered in a smooth repetition of that image, with the image skewed to fit the shape of each individual face. Use this unwrapping option to reset the map and undo any unwrapping (go back to the start).
If you did not select all desired faces prior to entering UV Face Select mode, you can select multiple additional faces in any of the following ways:
- Press A and all faces of the Mesh will be selected and highlighted by dotted lines.
- Select Linked faces from the 3D View menu; this will select additional faces up to a seam
- You can select many faces by ⇧ ShiftRMB
 clicking on each one you want. You may spin the object or your view of the object and resume selecting by ⇧ ShiftRMB
  .
. - BorderSelect in the 3D window.
- Enter EditMode and select the vertices or edges that define the face you want. After leaving EditMode and back in UV FAce Select mode, the faces defined by the selected vertices/edges will also be selected.
In UV Face Select mode, just like in Edit mode, you can also hide faces from view so they don't get in the way as you are trying to select faces:
- H to hide selected faces
- ⇧ ShiftH to hide the faces which are not selected, sort of the reverse of H by itself.
- AltH to reveal the hidden faces. Note that if you leave and then re-enter UV Face Select mode, they will be unhidden.
Only one face is considered active; the last one selected. Since the UV/Image Editor can only show one image at a time, it will show the image for the active face. IF you change the active face mapping (if you move the its UV coordinates), you may be overlapping or affect all other face mappings that are part of tha UV map (even if you cannot see them). So, before adjusting a face's UV coordinates, it is best to select adjoining faces to you see the whole map.
Face Unwrap using UV Calculation
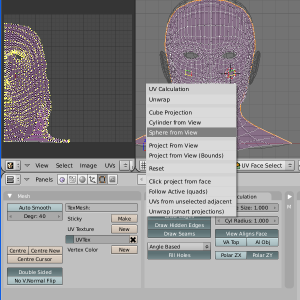
With our faces selected, it is now time to unwrap them to something more useful than Full-Size Reset. We want to unwrap them to the UV/Image Editor window using one of the UV Calculation shown to the right. In the 3D View header menu, select Face->Unwrap UVs or just press U. You can control the way the faces are mapped in two ways:
- Automatically using the 3D View window command Face->Unwrap UVs U
- Automatically using the UV/Image Editor window command UVs->Unwrap command E
- Creating seams and then unwrapping. A seam is marked in Edit mode by selecting edges that make the seam and then issuing the command to Mark Seam.
Above, when you selected a single face and went into Face Select Mode, Blender automatically mapped the selected face to the entire image for you, based on the face's UV orientation (the red and green borders). You can unwrap a face manually through the Face->Unwrap menu. How the selected faces map over to the image depends on the UV Calculation method that you choose.
The Face->Unwrap->Unwrap option unwraps the faces of the object to provide the 'best fit' scenario based on how the faces are connected and will fit within the image, and takes into account any seams within the selected faces. If possible, each selected face gets its own different area of the image and is not tucked under any other faces. If all faces of an object are selected, then each face is mapped to some portion of the image.
This point is crucial to understanding mapping later on: a face's UV image texture only has to use part of the image, not the whole image. Also, portions of the same image can be shared by multiple faces. A face can be mapped to less and less of the total image.
Based on the fundamental geometry of the object, and how it is viewed, the Face->Unwrap->Cube, Cylinder, and Sphere UV Calculations attempt to unfold the faces for you as an initial best fit. Here, the view from the 3D window is especially important. Also, the settings for cube size or cyclinder radius (Editing buttons, UV Calculation panel) must be set (in blender units) to encompass the object.
Normally, to unwrap a cylinder (tube) as if you slit it lengthwise and folded it flat, Blender wants the view to be vertical, with the tube standing 'up'. Different views will project the tube onto the UV map differently, skewing the image used. Also note the Polar coordinate axis selection buttons in the UV Calculation panel located in the Editing buttons window; they tell Blender which way is up.
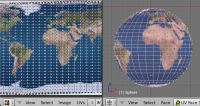
Recall the opening cartographer's approaching to mapping the world? Well, you can achieve the same here when unwrapping a sphere from different perspectives. Normally, to unwrap a sphere, view the sphere with the poles at the top and bottom. After unwrapping, Blender will give you a mercator projection; the point at the equator facing you will be in the middle of the image. A polar view will give a very different but common projection map. Using a mercator projection map of the earth as the UV image will give a very nice planet mapping onto the sphere.
In the 3D window, Face->Unwrap UVs->Project from View option maps the face as seen through the view of the 3D window it was selected from. It is almost like you had x-ray vision or squashed the mesh flat as a pancake onto the UV map. Use this option if you are using a picture of a real object as a UV Texture for an object that you have modeled. You will get some stretching in areas where the model receeds away from you.
In the 3D window, Face->Unwrap->Reset maps each selected face to the same area of the image, as previously discussed. To map all the faces of an object (a cube for example) to the same image, select all the faces of the cube, and unwrap them using the Reset menu option.
Note: The next four options create a UV map that stretches to maximum, and does not respect the image size. After using these options, you may have to zoom waaaaay out in the UV/Image Editor, select all UV coordinates, and scale them waaaaay down to fit inside the image area.
The Face->Unwrap->Click project from face is a three-step process that lets you orient the projection map according to a selected face's orientation. When selected, the upper User Information bar changes to display the step you are on, temporarily replacing the Blender version and statistics. The first click selects a bottom-left corner of that typical face. The second defines 'up' based on the face orientation, so click on the corner of that face that corresponds to the up direction from the first corner. The third click defines the V coordinate, namely which way is right on the map.
The Face->Unwrap->Follow Active (quads) takes the selected faces and lays them out perfectly square, even if the mesh face is irregularly shaped. Note that it does not respect the image size, so you may have to scale them all down a bit to fit the image area.
Use Face->Unwrap->UVs from unselected adjacent to expand your UV map by selecting un-mapped (new) faces and then this option. Blender will attempt to match up the coordinates of the new face with existing faces previously mapped. This option is helpful if you have added new faces and want to unwrap them.
Finally, the Face->Unwrap->Unwrap (smart projections), (which used to be called the Archimapper) gives you fine control over how automatic seams should be created, based on angular changes in your mesh. This option is especially well suited to unwrapping multiple mechanical objects all at once. The Archimapper is discussed a little later on.
Face Unwrap using the UV/Image Editor Menu
In the UV/Image Editor window menu, the menu item UVs also has a simple Unwrap option. There is no choice of different calculations to use; it is the same as selecting Face->Unwrap UVs->Unwrap in the 3D View. Use this option to unwrap additional faces with an existing set of unwrapped faces. The UV Coordinates for the addtional face will be added to the existing set in a non-overlapping manner. Warning: the UV coordinates for all of the faces will be recalculated.
Texture Face
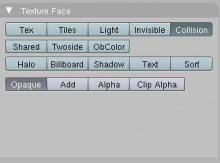
After you have created a UV Map, an additional panel will be displayed in Edit Mode that allows you control over how the image texture is applied to the faces. Consult the Reference manual for more information on this panel.
Unwrap (smart projections)
An architype mapper (archimap) is the final but possibly the best option for unwrapping a mesh, even simple geometric forms. This function examines the shape of your object, the faces selected and their relation to one another, and creates a UV map based on this information and settings that you supply. In prior versions of Blender (pre-2.43), it was a script.
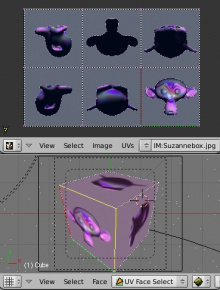
In the example to the right, the Archimapper mapped all of the faces of a cube to a neat arrangement of 3 sides on top, 3 sides on the bottom, for all six sides of the cube to fit squarely, just like the faces of the cube.
For more complex mechanical objects, this script can very quickly and easily create a very logical and straightforward UV layout for you.
Archimap allows you to unwrap multiple meshes in a single step (select multiple meshes in object mode). If you only have one mesh selected and are in Face Select mode, you can unwrap only selected faces, or if you select all the faces of the mesh, the whole object.
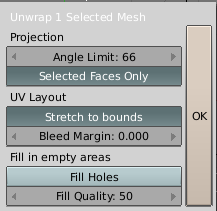
The popup panel allows the fine control over how the mesh is unwrapped. The angle limit controls how faces are grouped: a higher limit will lead to many small groups but less distortion, while a lower limit will create less groups at the expense of more distortion.
Archimap prefers you to have an image loaded if you want to Stretch to Bounds. When you use an image for a UV Texture, sometimes the edges of the image won't align perfectly or there will may be a border around the outside of the image. The Bleed Margin will shrink the overall UV coordinate map so that this margin is not mapped or used as UV Texture. For complex meshes, Archimap may create (by default) a map that has holes in it, resulting in wasted space in the image. Selecting Fill Holes will cause Archimap to do a little more work at ensuring each face is mapped as large as possible and that there are fewest holes (wasted image texture pixels) possible.
