「Doc:2.6/Manual/Data System/Scene Creation」の版間の差分
(s/Use Preferences/Info/) |
細 (1版 をインポートしました) |
(相違点なし)
| |
2018年6月29日 (金) 04:43時点における最新版
Page status (reviewing guidelines)
Copy
This page is a copy of the same page in 2.4 manual, need to be updated
|
Current Screen Layout and Scene
Scenes are a way to organize your work. Scenes can share objects, but can, for example, differ from one another in their rendered resolution or their camera view. The current window layout and scene are shown in the Info window header, usually displayed at the top of your screen:
Loading the UI with “File” → “Open”
Inside each .blend file, Blender saves the user interface layout - the arrangement of screen layouts when the file is saved. By default, this saved UI is loaded, over-riding any user defaults or the current screen layout. However, you can work on a blend file using your current UI settings by ignoring the UI settings saved in the file. This is done by restarting Blender or resetting it with (File → New, or CtrlX), and opening the file browser with (File → Open..., or F1). Turn off the Load UI button in the file browser header, and then open the file. This way, Blender will not disturb your current screen layout when it loads the new file.
Working with Scenes
Select a scene to work on by clicking the up-down arrow next to the scene name. Scenes and the objects they contain are generally specific to the project you are working on. However, they too can be saved in their current state to be re-used by pressing CtrlU. They will then appear the next time Blender starts or when the user selects File → New (CtrlX).
Blender comes with one default scene, which contains a camera, a lamp, and a box.
Adding a Scene
You can make a full copy of the current scene, start over with a blank slate, or create a scene that has links back to the current scene; objects will show up in the new scene, but will actually exist in the old one. Use this linking feature when, for example, the original scene contains the set, and the new scene is to contain the actors or props.
Starting Over
If you start with a new scene, be sure to add a camera and lights first!
|
Scenes are listed alphabetically in the drop-down list. If you want them to appear in a different order, start them with a numerical ordinal, like “1-”. The internal reference for a scene is the three-letter abbreviation “SCE”.
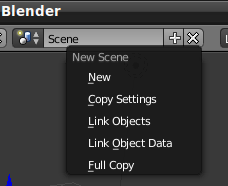
To add a scene, click on the scene list button, and select Add New. While you are adding a new scene, you have these options:
- Empty
- Create a completely empty scene.
- Link Objects
- All objects are linked to the new scene. The layer and selection flags of the objects can be configured differently for each scene.
- Link ObData
- Duplicates objects only. ObData linked to the objects, e.g. mesh and curve, are not duplicated.
- Full Copy
- Everything is duplicated.
Usually, for your first scene, you make a full copy of the default. Alternatively, you can just start with the default, and start editing the cube that is usually hanging around waiting for you to do creative things.
Naming a Scene
By ⇧ ShiftLMB ![]() -clicking on the scene name (usually “
-clicking on the scene name (usually “Scene.001”), you can change the name of the scene. For example, “BoyMeetsGirl” is usually the first of three acts.
You then proceed to model the props and objects in the scene using the 2-Model window layout.
Linking to a Scene
You can, at any moment, link any object from one scene to another. Just open the scene where these objects are, use CtrlL → To Scene..., and choose the scene where you want your objects to appear. Those will be linked to the original objects; to make them single user (independent, unlinked…) in a given scene go to that scene, select them and use U. You will be presented with a few options that allow you to free up the datablocks (Object, Material, Texture…) that you want.
Removing a scene from the file
You can delete the current scene by clicking the X next to the name.
