「利用者:Kellpossible/multi-snap-design」の版間の差分
(→Early Design Diagram) |
細 (1版 をインポートしました) |
(相違点なし)
| |
2018年6月29日 (金) 05:49時点における最新版
Multi Snap Design Ideas and Concepts
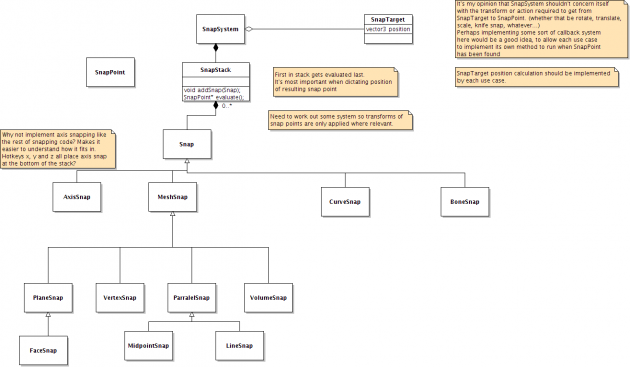
Early Design Diagram
Usage Example 1
Part 1
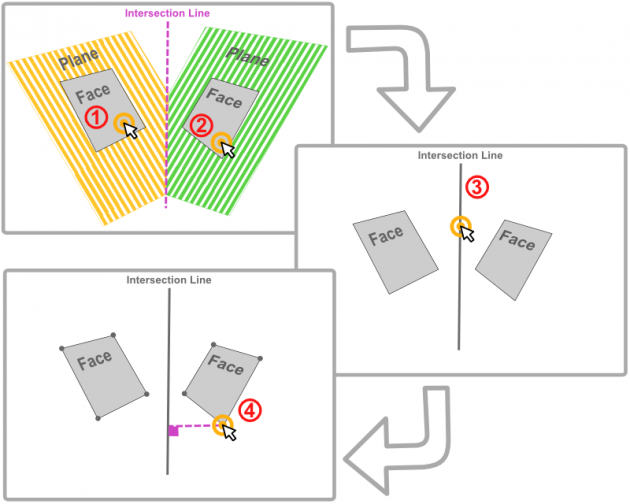
During a transform operation, the user initiates snapping, selecting in the user interface "snap to plane". This particular snapping mode requires an initial "selection" click on a face. So the snapping system enters "snap to face" mode so the user can make the "selection". The User Clicks, and the plane that they can snap to is displayed. The snapping system switches back to "snap to plane" now that the face has been picked, and as the user moves their mouse around, their transform selection now snaps to the plane. A second click now would confirm the transformation, but for the sake of the example the user will continue on and use multi snap.
Part 2
The user now selects "snap to plane" once again from the snapping menu in the user interface whilst their transform operation is still active. Once again they must select a face to confirm the location of this plane.
Part 3
From the intersection of these two planes, an intersection line is calculated. Using the code from snap to parallel, the snapping system enters "snap to parallel" mode using the calculated geometry of the line. As the user moves their mouse their transform selection now snaps to the geometry of this "imaginary" line. A click now would confirm the transform, but we'll take this one step further.
An alternative to this approach which might be more consistent with the other snapping modes, though perhaps not as efficient performance wise would be to simply have the snap-point location calculated in this way: As the user moves their mouse it calculates a secondary snap point on the second plane. The Primary Snap Point (the one the selected transform geometry snaps to), is calculated by finding the point on the first plane which is perpendicular to the secondary selected snap point. [EDIT]: actually, I think I take that back. Doing this would prevent a third snap from occurring because there would be no line geometry to calculate the perpendicular for.
Part 4
The user now selects snap to vertex from the snapping menu. As the user moves their mouse it will snap to nearby vertices, and the transform selection will snap to the perpendicular point on the intersection line. A final click confirms the operation.
Discovered Rules about Multi Snap
Subsequent Multi Snaps
- selecting "snap to face" or "snap to plane" allows up to 2 subsequent multi snaps.
- selecting "snap to line" or "snap to parallel" allows only one subsequent multi snap.
- selecting "snap to vertex" or "snap to midpoint" prevents any subsequent multi snaps from being available in the menu.
Snap Point location calculation during Multi Snap
"snap to face" or "snap to plane"
With "snap to face" or "snap to plane" being the first selected during a multi snap, this is how the Primary Snapping Point (the one the transform geometry snaps to), is calculated: The user activates a second snap, and as they move the mouse the secondary snap point moves. The primary snapping point is the point lying on the face or plane which is perpendicular to the secondary snapping point. In the case of a face, this point is restricted to the bounds of the face. The only exception to this rule is when snap to plane or face is the second selected snap. Then, the secondary snap is calculated using some intermediate geometry (line) generated from the intersection of the two.
"snap to line" or "snap to parallel"(infinite line)
"snap to line" or "snap to parallel" being the first selected during a multi snap, the calculation of the Primary snapping point is pretty much the same as with face or planar snapping. The Primary snapping point is the point lying on the line which is perpendicular to the secondary snapping point

