「利用者:Sculptorjim/Vertex Paint/Introduction」の版間の差分
細 (1版 をインポートしました) |
|
(相違点なし)
| |
2018年6月29日 (金) 05:52時点における最新版
Introduction
Blender features a built-in painter that allows you to paint your mesh all sorts of pretty colors. This section describes the Vertex Painter, which paints your base mesh by assigning colors to vertices, and blending those to give a face a color. Just like having your own virtual airbrush.
Setting Up
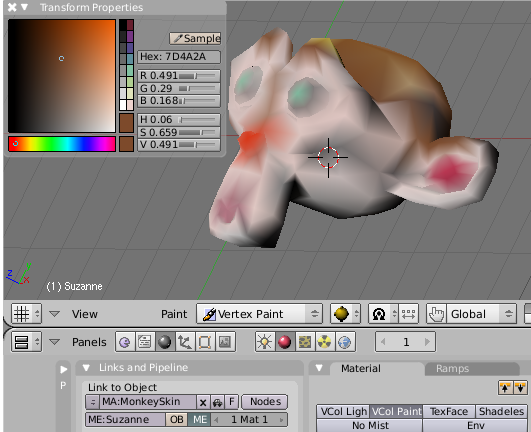
Mode: To be able to paint a mesh, you must select the object and go into Vertex Paint mode using the mode selector on the 3D Window header. Your cursor in the 3D window will switch to a cute little paintbrush.
Viewport Shading: To be able to see what you are painting, select Shaded as the Viewport Shading (also in the 3D window header). You don't have to be in Edit mode to paint, and although some find it distracting to see all those dots, it sometimes helps to see where the vertices actually are.
Textured Viewport Shading
If your 3D View is in Textured Viewport Shading mode, any Vertex Color paint layer will override a UV Texture layer, but will not affect rendering. In Shaded view, the correct view is shown: UV Textures override any Vertex Paint layer.
|
Detail: The more vertices you have, and the denser they are, the more detailed the paint effects will be. (The editing Subdivide button is really handy if you need it).
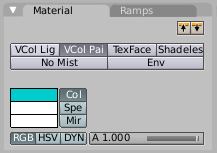
Render: You can paint all day inside Blender without having a material assigned to the object. However, you will not be able to Render without one. In the Buttons window, the Shading F5 buttons, assign a new material if the object does not have one. Enable the VCol Paint button in the material settings of the Shading buttons. This tells Blender to use the vertex colors you are going to paint (instead of the base material color) when it renders the image.
Multicolored lights: You can also tell Blender to use the vertex colors as a light source for the mesh when rendering; enable VCol Light and use the material Emit setting (on the Shaders panel) to vary the intensity of the light produced. Setting different colors for vertices, and then spinning the object, will make a warbling array of colors. If you want it to cast light and shadows on other objects, put a lamp inside of it and make it partially transparent (alpha less than 1.0).
Face Painting: By default, you will be painting the whole mesh. To only paint part of the mesh, press F for Faces when in Vertex Paint mode. The faces of the mesh will be outlined for you. Just like when editing a mesh, RMB ![]() clicking on a face, or ⇧ ShiftRMB
clicking on a face, or ⇧ ShiftRMB ![]() clicking, or doing a Border select with the LMB
clicking, or doing a Border select with the LMB ![]() button selects only certain faces to paint. Doing a Border select with the RMB
button selects only certain faces to paint. Doing a Border select with the RMB ![]() button excludes those faces from painting. Selecting some faces and pressing H Hides them from view and thus painting (but only for the current painting session; they are unhidden when you leave paint mode… or if you press AltH!).
button excludes those faces from painting. Selecting some faces and pressing H Hides them from view and thus painting (but only for the current painting session; they are unhidden when you leave paint mode… or if you press AltH!).
Color Picker Applet
Press traNsform to have a floating color picker applet readily available. Use the color picker by RMB ![]() clicking on a predefined color, color bar and gradient, or LMB
clicking on a predefined color, color bar and gradient, or LMB ![]() clicking the sliders, and/or eyedropper sampler. Choose a pretty color, and LMB
clicking the sliders, and/or eyedropper sampler. Choose a pretty color, and LMB ![]() click-drag over your mesh to apply the color. You may supply a hissing sound when you click just to make it more entertaining.
click-drag over your mesh to apply the color. You may supply a hissing sound when you click just to make it more entertaining.
Each time you paint a stroke without leaving the 3D window, Blender saves the stroke in the Undo buffer, so to undo a stroke, just press CtrlZ. Set the Opacity (density) and Size of your brush in the Paint panel (in a Editing (F9) context). Many other painting controls are available in that area; see the Reference Manual for details on the painting tool.
You may move your view about in the 3D window using normal 3D space controls. Note that the window shows you what the object will look like under current lighting conditions, so just like the real world, you may have to turn the object or add/move the lights to see what your paint job really looks like.
Vertex Paint Panel
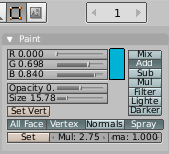
In the Editing F9 buttons, in Vertex Paint mode, there will be a Paint panel that has many controls for your paintbrush. Use the RGB sliders to choose a color the same way as the floating applet. The panel also allows you to control the paint Opacity (how 'thick' the paint is applied), the Size of the brush, and how the paint is applied to existing colors. You can apply via Mix, Add, Subtract, Multiply, Filter, Lighter, or Darker. For example, if a vertex was purple, and you set your brush to Subtract Blue, painting that vertex would make it red, since purple minus the blue is red.
To make all vertices a consistent color, set the color and click Set Vert. By default, when you paint, the paint color spreads to all faces connected to the vertice and blends in based on the size of the face. Disable All Face and Vertex to uniformly paint a face. Enabling Normals shows you the incident light appearance; use this if you have Textures applied to the material that affect the Normal.
By default, holding down the LMB ![]() is just like holding down a spray can button; the more you hold, the more paint is applied. Disable Spray and each click sprays a little bit of paint but no more, and holding down the button has no effect.
is just like holding down a spray can button; the more you hold, the more paint is applied. Disable Spray and each click sprays a little bit of paint but no more, and holding down the button has no effect.
The bottom row of buttons allow you to uniformly multiply the color values, effectively increasing (a Multiply factor >1.0) or decreasing (factor <1.0). Change the value and click Set. Use Gamma correction for cross-platform image gamma correction.
Saving and Exporting
Whenever you save your .blend file, the vertex paint job is saved with it, inside the .blend file. There is nothing special you have to do.
You can also save your paint job as an external image (e.g. JPG or PNG) by baking the paint to a UV Image. You do this by unwrapping the painted mesh onto a flat surface, like carefully unwrapping a Christmas present and smoothing the paper out onto a tabletop. This process is called Baking the Vertex Paint and is discussed in UV Texturing.
Overpainting and Textures
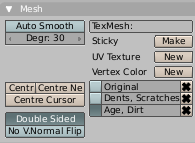
Entering Vertex Paint mode creates a Vertex Color layer, named and indicated in the Editing buttons, Mesh Panel. You can create multiple layers of Vertex Paint by clicking the New button, located in the Editing buttons, Mesh Panel, to the right of the Vertex Colors label. Each layer is painted independently, and unpainted areas of an upper layer allow more original layers (shown higher in the list) to show through. Selecting a layer shows that painting in the 3D view and/or in Render output – and deactivates (hides) all those that were overlaying it! Select a layer by clicking one or both of the buttons next to its name (left one for 3D view, right one for Render), and change the name by clicking on the name and entering something creative. The example has the Original paint job of the car, overlaid with some dents and scratches, which is further overlaid by the effects of aging and dirt (a light brown-gray dusting). When rendered, all three layers will be shown, because the third layer is currently selected.
You may also paint under a UV image by enabling the use of UV images (Material Texface button), assigning faces using the UV Face Select mode, and loading the image using the UV/Image editor. Any painting you do on one object's face that is UV-mapped does not affect the UV/image, but non-mapped faces will show the vertex colors you have painted. To make permanent mods to the UV image, use the painting tool in that window via Image->Texture Painting. Partially transparent UV images (with an alpha less than one) will allow the base vertex paint to show through.
Any texture (such as the cloud texture) that maps to the color of the material will also affect the vertex coloring.
The end color of the material also depends on the amount of ambient light it receives and the color of that ambient light. If the material is partially transparent, then the color seen will also depend on the color of the objects behind it. The ulitmate color also depends on the color of lights (lamps, reflections, radiance/glow, and other vertex color lights) that shine upon it.


