「利用者:Sftrabbit/GSoC 2013/Documentation/First Week Notes」の版間の差分
(Created page with "=First Week Notes= ==Getting started== On the first day, I was a little unsure of where I was heading yet, so I spent the day getting up to speed with recent mailings, started ...") |
細 (1版 をインポートしました) |
(相違点なし)
| |
2018年6月29日 (金) 06:04時点における最新版
目次
First Week Notes
Getting started
On the first day, I was a little unsure of where I was heading yet, so I spent the day getting up to speed with recent mailings, started making notes, bookmarking useful information, etc. It was useful to write a little to-do list based on the “Getting Started” email that Ton had sent out earlier. I also made notes of people and their IRC nicks so I could remember who was who. I synced my branch with the trunk so I could start working from the latest code. It was a little nerve-wracking to do my first commit, in case I accidentally destroyed the entire SVN repository, but it was fine.
First task
I spoke with Keir in the evening. We agreed that it'd be nice to tackle the work in small chunks rather than one big commit at the end. That's better for me as I can gradually get used to everything.
Then I got my first task: add constraints to the focal length for bundle adjustment. The user should be able to specify minimum and maximum constraints on the camera focal length and the bundle adjuster will only optimize within this range. This would require changes to the UI, libmv, and interfacing with Ceres Solver.
Ceres Solver
The Ceres Solver library is used to solve non-linear least squares problems. The process of motion tracking can be seen as such an optimization problem, where the parameter space is the position, orientation, and intrinsic properties of the camera (or other objects you want to track). To learn how to use Ceres, I followed the official tutorial and compiled a few simple examples. It's very cool and also very easy to use.
Blender architecture==
I had to learn a lot about the Blender architecture before I could get started with coding. My approach was to look specifically at everything that is involved in camera solving, from clicking the button to getting a result, so I would be ready to tackle the task. For two days or so I read through the source and learnt about the following things:
- DNA - Describes how data is stored in the .blend files and in memory once the file is loaded using C structs (with some packing restrictions). For motion tracking (and the rest of the clip space), the relevant DNA structs are defined in
source/blender/makesdna/DNA_movieclip.candDNA_tracking_types.c. - RNA - Provides a more friendly interface to the underlying data. For motion tracking, take a look at
source/blender/makesrna/intern/rna_movieclip.candrna_tracking.c - Python UI - The user interface for the clip space is created in
release/scripts/startup/bl_ui/space_clip.py. TheCLIP_PT_tools_solveclass describes the solving panel. It's worth noting that the HT, PT, UL, and MT appear to stand for Header Type, Panel Type, Unordered List, and Menu Type respectively, although this isn't documented anywhere. - Operators - In the UI,
col.operator("clip.solve_camera", ...)is used to create a button. This button will invoke the operator identified byclip.solve_camera. Operators are registered by the clip space in theclip_operatortypesfunction insource/blender/editors/space_clip/space_clip.cfile. In this case, theCLIP_OT_solve_camerafunction is registered. The operator identifier in Python is automatically translated fromsome.operatortoSOME_OT_operator. TheCLIP_OT_solve_camerafunction simply provides some callbacks - theinvokecallback is called when the button is pressed. - Jobs - The
solve_camera_invokefunction creates awmJobwith an associatedSolveCameraJobobject for storing data needed for the job. The kernel functionsBKE_tracking_reconstruction_checkandBKE_tracking_reconstruction_context_neware used to initialise this data. Thesolve_camera_startjobfunction is set as the start function for the job, which callsBKE_tracking_reconstruction_solve. - libmv - The
BKE_tracking_reconstruction_solvefunction passes objects containing the relevant options tolibmv_solveReconstruction, which is part of the C API for libmv defined inextern/libmv/libmv-capi.cc. The libmv library itself is written in C++ and interfaces with Ceres Solver.
It was very useful to write code traces and diagrams to help with understanding the flow of code.
User interface
The libmv_solveReconstruction function calls libmv::EuclideanBundleCommonIntrinsics twice. The first time, BUNDLE_NO_INTRINSICS is passed, causing it to treat the camera's intrinsic parameters as constant. The second call only occurs if the user has selected parameters to refine in the user interface, and those selected parameters are optimized over. This means that the bundle adjuster may find a better solution if it is allowed to vary these parameters slightly.
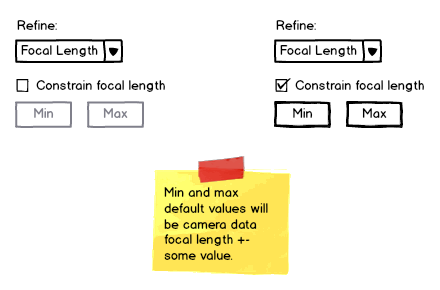
My task is to allow the use to specify a minimum and maximum focal length so that, when the focal length has been selected for refinement, it is only refined within this range. I created a mock-up of the user interface I expected to be most appropriate for this:
Applying the constraint
While waiting for feedback on the UI design, I started coding the constraint on the libmv side. Since Ceres Solver works with unconstrained parameters, the focal length parameter needs to be transformed so that regardless of the optimized value, the transformed value will be in the given range. This can be done by using the following transformation:
actual_focal = min + (max - min) * (1 + sin(bundled_focal))/2
