「Extensions:2.6/Py/Scripts/3D interaction/BatchOperations」の版間の差分
細 (1版 をインポートしました) |
|
(相違点なし)
| |
2018年6月29日 (金) 06:12時点における最新版
| UI location | |||
|---|---|---|---|
| Version | 0.6.8 | Author(s) | dairin0d, moth3r |
| Blender | 2.7.0+ | License | GPL 3+ |
| Category | 3D View | Distribution | External |
| File name | space_view3d_batch_operations.zip |
|---|---|
| Current version download | https://github.com/dairin0d/batch-operations/releases/download/v0.6.8/space_view3d_batch_operations.zip |
| Links | https://github.com/dairin0d/batch-operations |
|---|
目次
[非表示]
(The addon is experimental, the documentation might be quickly outdated)
Overview
This addon provides high-level management and certain batch operations for modifiers / materials / object groups.
When enabled, the addon registers "Batch" category panels in the left (tool) shelf, and/or the same panels in the right shelf (you can choose the shelves in the addon preferences).
Right now the addon provides management/batch operations for 3 categories of things:
- Modifiers
- Materials
- Groups
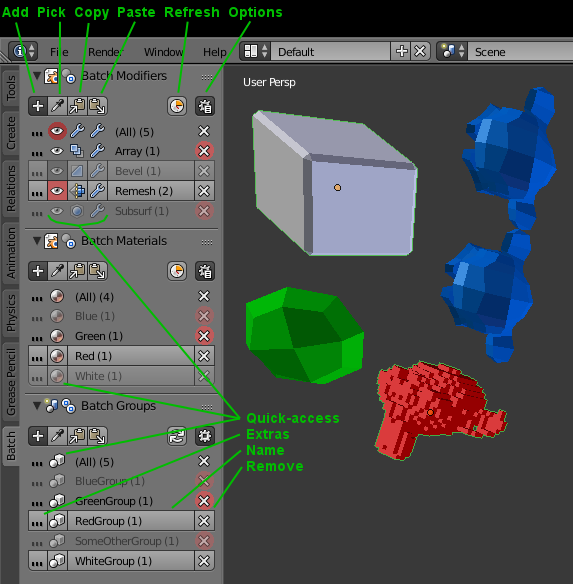
Each category resides in its own panel. Generally, each panel consists of:
- The panel header - displays the category's current Filter and Paste mode as icons.
- The toolbar - contains Add, Pick, Copy, Paste, Refresh and Options buttons/menus.
- The item table - lists the items (modifiers/materials/etc.) in the current Filter; each row contains buttons that work with the corresponding item.
Filter and Refresh
The Filter determines what items (modifiers/materials/etc.) will be displayed in the table.
- Selection - only the items present in the selection.
- Visible - only items present in the visible objects, i.e. non-hidden and in the currently visible layer(s).
- Layer - only items present in the objects in the currently visible layer(s).
- Scene - only items present in the objects in the current scene.
- File - all the items in the whole .blend file.
By default, the item table is refreshed each 0.5 seconds (the interval can be customized in the addon preferences).
However, you can also switch to a manual refresh mode (by Ctrl+clicking on the Refresh button in the toolbar or by toggling the "Auto refresh" in the Options menu).
To force the refresh, left-click on the Refresh button (this works even with "Auto refresh" on).
Closely related to Filter is the "Affect selection" option. If it's disabled, the operations you invoke will be applied to all the objects in the current Filter. However, if it's enabled and there is at least one object selected, the operations you invoke will be applied only to the selected objects. Throughout this documentation, the corresponding set of objects (to which the operations will be applied) will be referred to as the affectable objects.
Copy/Paste and Pick
The copy/paste functionality can be invoked either through the corresponding buttons in the category's toolbar, or through the shortcuts Ctrl+C / Ctrl+V in the corresponding tabs of the Properties space (i.e. Ctrl+C/Ctrl+V will copy/paste materials in the Material tab, and will copy/paste modifiers in the Modifiers tab).
The Copy operation saves the corresponding items from the active (or pinned) object in a category-specific buffer. For ID blocks (materials, groups and such), only their names are strored, so if you rename something before pasting, the result might be different from what you expect.
The Paste operation applies the contents of the copy buffer to the affectable objects. There are 3 Paste modes:
- Override - override each object's items (materials/modifiers/etc.) with the contents of the copy buffer.
- Add - adds the contents of the copy buffer to each object (leaving the existing items intact).
- Filter - remove from each object the items that are not present in the copy buffer.
The Pick function allows you to pick in 3D view(s) the object you want to copy the items from. When you do this, the corresponding items will also be automatically pasted to the affectable objects.
Add
The Add menu in the toolbar shows all the items from the file that are not present in the currently displayed item table (and, in the case of ID blocks, an option to create a new item). Clicking on any menu entry will add the corresponding item to the affectable objects.
The item table
The item table is shown when at least 1 item (material/modifier/etc.) is detected with the current Filter. The first row named "(All)" provides operations that apply to all the selected rows in the table.
Selected rows are displayed in full color, and deselected rows are displayed as greyed-out.
- Shift+clicking on the row's name will toggle its selected state.
- Shift+Ctrl+clicking on the row's name will also set all other rows to the inverse of this row's selected state.
- Shift+clicking on the "(All)" row will toggle the selected state of all the other rows
- Shift+Ctrl+clicking on the "(All)" row will (de)select all the other rows.
The default selected/deselected state for rows can be specified in the addon preferences.
The items present in the selected objects are displayed as "embossed" rows, and items not present in the selected objects are displayed as "flat" rows.
If the "Affect selection" option is enabled, the Remove buttons will be displayed in red for the items that cannot be affected by non-global Remove (and some other operations).
Left-clicking on the row's name will select all objects that have this item. If "Sync selection" option is enabled, the rows' selected state will be synchronized with the currently selected objects (it works in both ways).
Ctrl+clicking on the row's name will allow you to rename the item. For the "(All)" row, the addon will try to find the longest commong substring among the items' names, which can be used as a limited form of pattern-based renaming. By default, the renaming is provided through a pop-up dialog, but you can switch to in-place renaming in the addon preferences.
Alt+clicking and Alt+Ctrl+clicking on the row's name will invoke an assign action, which is explained in the corresponding section of this documentation.
To the right of the name is the Remove button.
- Left-clicking on Remove will remove the corresponding item from the affectable objects.
- Ctrl+clicking on Remove will apply this operation globally (i.e. to all objects in the file); as the result, the corresponding datablock(s) will have no users.
- Alt+clicking on Remove will purge (delete) the item from the file completely.
As a general rule, unless stated otherwise, holding Ctrl while clicking on a button will perform the corresponding action globally (for all objects in the file).
To the left of the name are zero or more quick-access buttons. You can specify for each category the list of quick-access buttons in the addon preferences.
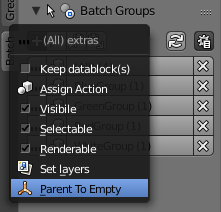
The leftmost button is the Extras menu, which contains both the quick-access and not-quick-acess operations.
Assign actions
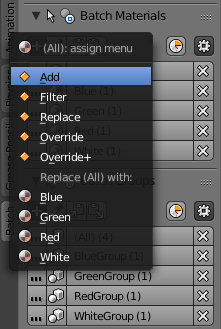
Assign actions "assign" the corresponding item(s) from the table to the affectable objects. There are 4 main types of assign actions:
- Add - makes sure that each affectable object has at least one instance of the given item(s). In terms of sets, this is the "union" operation.
- Filter - makes sure that each affectable object has only instances of the given item(s). In terms of sets, this is the "intersection" operation.
- Replace - replaces one set of items with another set of items. There are 2 variants:
- Replace - replaces items of all selected rows with the item of the current row.
- Replace with - replaces the item of the current row with the item you chose from the menu.
- Override - for each affectable object, overrides its items with the given item(s).
- Override+ - applicable only in the case of materials; the difference from Override is that Override+ does not remove material slots, if there are more of them than necessary.
There is a dedicated Assign Action button (in quick-access by default), with category-dependent icon.
- Left-clicking on it will show a menu with all possible assign actions. There, clicking on an etry will apply the corresponding action to the affectable objects.
- Shift+clicking and Alt+clicking on it will invoke the corresponding assign action (customizable in the Options).
An assign action (customizable in the Options) can also be invoked by Alt+clicking on the row's name.
Other quick-access buttons
For ID datablocks, there is a "Keep datablock(s)" toggle, which adds/removes the "fake user".
For modifiers, there are:
- Use in render - toggle on/off the "Use in render" option for the modifiers of the corresponding type(s)
- Show in viewport - toggle on/off the "Show in viewport" option for the modifiers of the corresponding type(s)
- Show in editmode - toggle on/off the "Show in editmode" option for the modifiers of the corresponding type(s)
- Show on cage - toggle on/off the "Show on cage" option for the modifiers of the corresponding type(s)
- Apply to spline - toggle on/off the "Apply to spline" option for the modifiers of the corresponding type(s)
- Apply modifier - apply the corresponding modifier; if you Alt+click, the modifier will be applied to a new shape instead of being baked into the mesh.
- This operation is controlled by the following settings (customizable in the Options):
- Convert to mesh - non-meshes will be converted to meshes before the modifier is applied.
- Make single user - for each object to which the modifier is applied, the mesh/curve/etc. will be duplicated (to not affect other meshes/curves/etc.)
- Remove disabled - if modifier is disabled (due to some unmet requirements), it will be removed on apply.
As a general rule, any toggle shown in the quick access will be tinted red, if the objects containing this item have different values of the corresponding attribute.
Not-quick-access operations
- Visible - toggles on/off the "restrict viewport visibility" setting for all the objects in the scene that contain the corresponding item
- Selectable - toggles on/off the "restrict viewport selection" setting for all the objects in the scene that contain the corresponding item
- Renderable - toggles on/off the "restrict rendering" setting for all the objects in the scene that contain the corresponding item
- Set layers - presents a pop-up dialog to set layers for all the objects in the scene that contain the corresponding item
- Parent To Empty - unparents the all the objects in the scene from all their parents (+deletes Empty-type parents), and places them all under a single Empty-type parent.
- Left-click: the new parent will be located at the average position of the source objects.
- Ctrl+click: the new parent will be located at the 3D cursor.
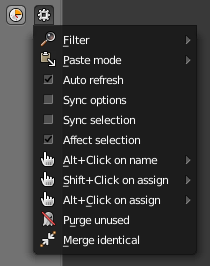
Category Options
- Filter - specifies the current Filter.
- Paste mode - specifies the current Paste mode.
- Autorefresh - enable/disable autorefresh.
- Sync options - if enabled, all the options and copy/pasting will be synchronized with the other categories that have this option enabled.
- Sync selection - enable/disable selection synchronization (see "The item table" paragraph).
- Affect selection - if enabled, the selection will take priority when applying operations (see "The item table" paragraph).
- Alt+Click on name - specifies the assign action for Alt+clicking on the row's name
- Shift+Click on assign - specifies the assign action for Shift+clicking on the assign button
- Alt+Click on assign - specifies the assign action for Alt+clicking on the assign button
For some categories, the following batch operations can be also accessed from the Options menu:
- Purge unused - delete all items with 0 users; if Ctrl+click, the items with only fake users will also be deleted.
- Merge identical - replace all the identical items with the one that has the greatest number of users and/or the shortest name.


