「利用者:Mindrones/Wiki/Subdivision modelling/The pole/Key-Loop and Fill-Loop」の版間の差分
細 (moved User:Mindrones/Subdivision modelling/The pole/Key-Loop and Fill-Loop to User:Mindrones/Wiki/Subdivision modelling/The pole/Key-Loop and Fill-Loop) |
細 (1版 をインポートしました) |
(相違点なし)
| |
2018年6月29日 (金) 03:40時点における最新版
Key-Loop/Fill-Loop
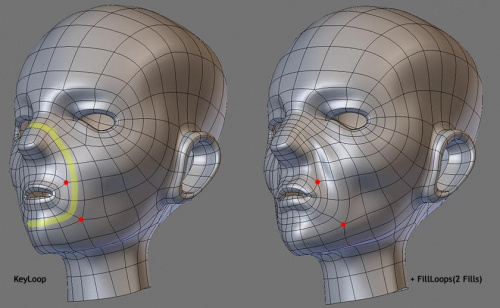
Earlier in the “Form” thread I mentioned the Key and Fill concept and how you can use it in anything that you do. Key-XXX/Fill-XXX, where XXX can be anything and in this case they are Key-Loop/Fill-Loop. When you look at Edgeloop references out there what you are seeing is a bunch of Key-Loops for you to Fill in.
In a KeyLoop stage Poles are close to each other and when you add in the Fill(s) they start to fall apart after the tweak (It's difficult to keep them together after the Fill(s)). During the fill stage you can increase the resolution for the KeyLoop that you're working on and while doing so you can move a specific pole away to a place where you think it belongs. If you have been collecting wireframe references now is a good time to open them and observe. Immediately you'll learn that all modelers are different in the way they place Poles.
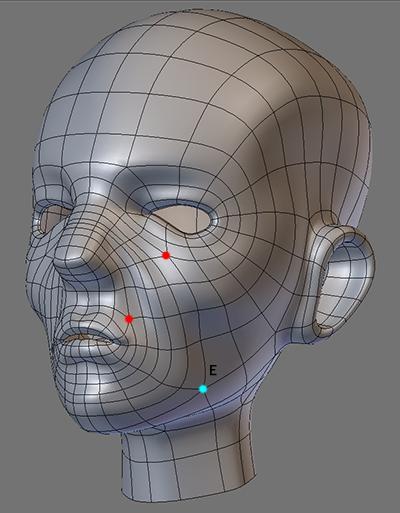
There is no right or wrong but the general rule is: Don't put them in areas that deform and in the image above (cyan dot) I put it there because I want it there. When I get into deformation and that area doesn't deform well then I will do something about it but for now I will leave it there. I leave it there because I have looked through many wireframes and I see that pole there... somewhere there, it doesn't have to be exactly there.
注意
This is a copy of this thread from Someartist and others (Someartist gave permission to resume here his thread)
|

