「利用者:Nazg-gul/MaskEditor」の版間の差分
(→TODO before release) |
細 (1版 をインポートしました) |
(相違点なし)
| |
2018年6月29日 (金) 05:45時点における最新版
目次
Mask Tools
Abstract
Currently there's no way to work with masks in Blender. It makes compositing of rendered scene into real footage difficult and requires tangled setups of render layers and hooks modifiers.
The very high goal of this project is to introduce more clear and comfortable way of interacting with masks in Blender in a way like:
- Create mask in editor space using different tools.
- Animation system, drivers, tracking data can be used to drive masks over the time.
- Mask can be reused all over.
- Mask is flexible to be used for FullHD final render and proxied footage for the preview.
General Info
Mask is a grayscale raster image which is created from vector image. Artists interacts with vector image to create mask with needed shape and then it automatically gets rasterized when using in compositor or wherever else.
User interacts with masks in the following editors:
- Movie Clip Editor
- Image Editor
- Compositor
- Sequencer
Clip Editor and Image editor are used to edit masks, Compositor and Sequencer are just using already created mask.
注意
Users would expect a way to create/edit masks directly from compositor, but it's a bit more further goal which is totally correlates with Bartek's "can't grab and move" way of compositing.
|
Masks has got own ID block and can be accessed form all over.
Editing Masks
Masks can be edited in either Image Editor or Movie Clip Editor. Movie Clip Editor allows to link mask to motion tracking data to drive the whole mask or it's points using data came from tracker.
Working with masks can happen on different levels:
- Spline/Feather points. This is the most low-level editing tools which affects on properties of individual curves' control points such as position and weight.Individual points might be parented to such data as motion tracking markers.
- Splines. This tools are working on spline level and operates on such things as interpolation method for weight. To be clear, spline is an array of points which defines one single curve of mask.
- Mask-Layer. Mask layers consists of several splines and used to "grouped" operation on splines. Example of such tools might be parenting the whole set of splines to single motion tracking data or simple to transform all of them together. As addition, splines from the same layer are behaving in a way, that concentric splines are defining holes in mask, but if two splines from different layers are concentric they wouldn't define hole -- they'll just be union in final mask.
- Overall Mask. In this case one is working with properties which are global for the whole mask and curves in it.
Editing of mask splines happens in a way similar to editing bezier curves or (paths) in GIMP: control points are adding to define spline itself, handles of different types are used to smooth bends. This allows to define only few points of mask and make it following needed object on the footage smoothly. Internally control points and handles coordinates are stored in normalized 0..1 space which allows masks to be reused for any kind of resolution.
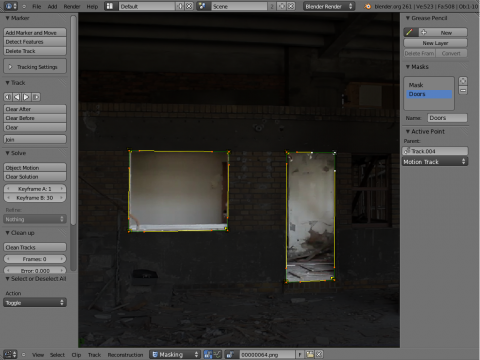
To prevent tools mess, special mode called Masking is added to Clip and Image editors. When Maskign mode is enabled, almost all Clip/Image specific tools and properties are hidden and only tools needed for interacting with masks are displayed.
It's possible to control feather of mask, including a way to define non-linear feather. Linear feather is controlled by a slider, non-linear feather is controlled in the same curve-based way to define feather falloff.
Masks, Objects, Splines and Points
Point is the most low-level entity which is used to define mask. It's a simple point with it's coordinate, handles and set of father points which are associated with this point. Points might be parented to different stuff like markers from motion tracking.
Set of points are defining single Spline. Currently bezier splines are only supported. This means that algorithms are going from first point of spline to last point of spline and creates smooth curve using bezier's approaches.
One or several splines might belong to the same Layer. this means that this splines might be transformed together and this and only this spline could be used to define holes in mask. Actually, a layer might be associated as single item from footage to be masked.
For example if there're two unwanted guys in the footage one of which goes from left to right and other guys goes in opposite direction there might be two Mask-Layers to mask them. At the point of intersection of this guys shapes would be occlude each other in a way that both shapes are masking stuff. if motion of that guys is simple enough, single tacked point on each of them might be used to drive Mask-Layer. Several splines for each layer might be used in case if that guys should be occluded in a way that their face is visible.
Mask is an ID datablock which is the most high-level entity which might be used for masking purposes. It's getting re-used from different places and might hold global parameters for all entities it's consists of.
Using Masks
When mask is used in compositor or sequencer, it's getting automatically converted to raster and further they're used as regular grayscale image.
In compositor there's special input node needed mask can be picked. Output socket of this contains rasterized image created from mask. This rasterized image can be used as input for other nodes such as Invert, Multiply, Mix nodes and so on.
By default, render resulution is used to rasterize mask for Mask input node. If RGBA buffer is connected to this node, it's resolution would be used for rasterization.
In the sequencer it can be special type of strip or effect strip.
Accessing masks
Using masks in motion-tracking workflow isn't the only possible usage of masks: they can also be used for things like rotoscoping. So, mask isn't necessarily comes together with MovieClip datablock -- it can be used against rendered scene to achieve some result. Hence, mask as independent ID block allows to access them in the same way from every area of Blender.
When Movie Clip Editor is switched to Masking mode, it's possible to choose mask to edit and choose clip to be used as a backdrop and as "source" of motion tracking information for pinning mask curves' points to markers.
Define Masks
Ways to define mask-layer:
- Ctrl + LMB
 is used to place new control point and define handles orientation (click to place control point, click followed with slide to place new control point and set smoothness for it).
 - Existing control points can be dragged.
- Mask can be created from grease pencil strokes.
- ⇧ Shift + LMB
 is used to define feathering outline curve.
Mask can be created from non-closed curve (which is useful to mask out linear objects like wires, hairs and so).
Drive Masks
Masks can be driven over the time so it'll be following some object from the footage (e.g. running actor), This can be done in several ways:
- Keyframed animation of control points using standard animation system (F-Curves). This can be useful when there's no enough quality, or no good feature points in the footage.
- Control points can be driven by regular drivers system.
- Control point can be pinned to some motion track (track created by motion-tracking tools). This way is the main way to interact with masks in motion-tracking workflow.
- The whole mask can be driven instead of individual control points.
- Masks can be parented to each other, so driving one mask would imply driving parented masks.
注意
There are several ways of how to control and store this things, need to do further research.
|
S-Curves
Using separated spline to define feather is the most flexible approach but it's a bit difficult to maintain. For example if mask is used to occlude something from footage using parenting motion tracking one would need to worry about keeping father points in sync with overall shape.
Nice solution was discovered in Blender Institute with high collaboration of Ton Roosendaal and that solution was called S-Curves.
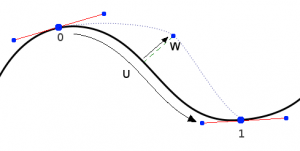
Generally speaking, S-Curve is almost the same as Bezier curve, but except of handles every control point also has got points which defines feather between this point and next point of spline. Each feather point is stored in UV space where U means position across spline segment W means distance between main spline and feather point.
This allows to deform main spline in almost any way and father would be updated automatically to reflect that changes.
For example if there's just rotation of spline feather would stay completely unchanged. If one point is moving father than another father would be automatically stretched uniformly along that segment and overall shape would be almost the same as artists would want it to be.
Some other ideas
There are plenty of ways to make masks totally rock, but some of them requires redesign of other areas of Blender. Some of such ways are:
- Create masks from node editor.
- Mask size. With current compositor it's not so obvious to guess which resolution should be used to rasterize mask. Canvas-based compositor should make it possible to automatically find out needed resolution to rasterize mask.
- Motion blur (see discussion below).
Code: Data Structures
Data Structures Diagram
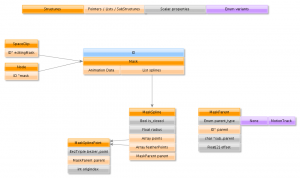
Here's brief diagram of data structures needed to support all features of masks listed above. Also main relations between data structures is displayed.
注意
Diagram image needs to be updated to reflect recent changes in DNA.
|
Data Structures
注意
There's currently ongoing discussion and name Object might be replaces with something else here.
|
Main data structure which defines mask:
typedef struct Mask {
	ID id;
	struct AnimData *adt;
	ListBase maskobjs;   /* mask objects */
	int act_maskobj;     /* index of active mask object */
	int tot_maskobj;     /* total number of mask objects */
} Mask;
Data structure which hols all data needed for parenting:
typedef struct MaskParent {
	int flag;             /* parenting flags */
	int id_type;          /* type of parenting */
	ID *id;               /* ID block of entity to which mask/spline is parented to
	                       * in case of parenting to movie tracking data set to MovieClip datablock */
	char parent[64];      /* entity of parent to which parenting happened
	                       * in case of parenting to movie tracking data contains name of object */
	char sub_parent[64];  /* sub-entity of parent to which parenting happened
	                       * in case of parenting to movie tracking data contains name of track */
	float offset[2];      /* offset from parent position, so object/control point can be parented to a
	                       * motion track and also be animated (see ZanQdo's request below)  */
} MaskParent;
Each mask is a set of objects which are getting rasterized separately from each other. Here's data structure which defines spline itself:
typedef struct MaskObject {
	struct MaskObject *next, *prev;

	char name[64];                     /* name of the mask object (64 = MAD_ID_NAME - 2) */

	ListBase splines;                  /* list of splines which defines this mask object */
	struct MaskSpline *act_spline;     /* active spline */
	struct MaskSplinePoint *act_point; /* active point */
} MaskObject;
This objects are consists of splines. This splines are getting rasterized together in a way that concentric splines are generating holes in final mask.
typedef struct MaskSpline {
	struct MaskSpline *next, *prev;

	int flag;                /* defferent spline flag (closed, ...) */
	int tot_point;           /* total number of points */
	MaskSplinePoint *points; /* points which defines spline itself */
	MaskParent parent;       /* parenting information of the whole spline */

	int weight_interp, pad;  /* weight interpolation */
}
Flag in MaskSpline contains such bits as if spline is closed or not (maybe something else in future).
Points used for spline itself and it's feather are the same data type:
typedef struct MaskSplinePointUW {
	float u, w;            /* u coordinate along spline segment and weight of this point */
	int flag;              /* different flags of this point */
} MaskSplinePointUW;

typedef struct MaskSplinePoint {
	BezTriple bezt;        /* actual point coordinates and it's handles  */
	int pad;
	int tot_uw;            /* number of uv feather values */
	MaskSplinePointUW *uw; /* feather UV values */
	MaskParent parent;     /* parenting information of particular spline point */
} MaskSplinePoint;
MaskSplinePointUW are used to define feather along two neighbor points of spline (current and next). This feather is stored as array of UW points where U is coordinate along spline segment (0 means father point has got the same coordinate as current spline point, 1 means it've got the same coordinate as next spline point). W defines distance from spline along normal at that point.
TODO before release
- Fix Pivot Point Menu: either make it work or remove it
- Fix Mask Dopesheet Singel channel summary. Idea: if channel collapsed keyframes cannot be erased (happens to easily and that way the collapsed display would have a real use)
- Fix the wonky Feather Controls (weird curve interpolation)
- Sequencer/Mask - make it work or remove it.
Discussion
Sobotka 09:43, 11 January 2012 (CET)
Two points:
- Feathering. Should allow for a value that can be adjusted for feathering both negative (outline of spline inwards) to positive (outline of spline outwards.)
- Motion blur. A toggle that uses the currently set shutter speed (Shouldn't this be a global value anyways?) and calculate the tweening distance according to shutter speed.
xglasyliax 16:58, 11 January 2012 (CST)
Regarding point #1 above. The way I envision handling the double edge part is to pull out a 2nd curve from the first. Perhaps holding a SHFT or CTRL key while moving a vert would pull out a secondary vert, theoretically "connected" to the original. If you pull out a secondary set of points, you can define an outer edge curve very easily, and it's easy to both see and animate, just like a regular curve. The secondary curve would then connect back to the primary curve at any vert which has no outer edge vert of it's own.
ZanQdo 16:58, 17 January 2012 (CST)
About driven/tracked points: Manual animation should be possible on top of them, as an animation layer or parent behavior in order to fine tune the results
About keyframing: I think we need to decide the method of keying. Full blocked seems to be usually the best method, at least per bezier, meaning keyframes are inserted in *all* CVs of a bezier
About layering: Would like to see some talk about how to handle multiple layers of masks, their opacities, their order and their subtractive vs additive capabilities
Calli 19:00, 4 Juni 2012 (MEZ)
Please stick to CTRL-LMB for creation of points. Just copy the workflow from the Curves, don't invent another way....


