「Extensions:2.6/Py/Scripts/Render/Render Shots」の版間の差分
(Corrected link to point to right location) |
細 (1版 をインポートしました) |
(相違点なし)
| |
2018年6月29日 (金) 05:50時点における最新版
| UI location | Properties > Render > Render Shots | ||
|---|---|---|---|
| Usage | There are four main buttons in the Render Shots panel:
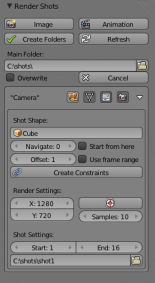
Clicking the “Create Folders” button will display an option to select/create the main folder where all the output folders for each camera will be created. The “Overwrite” option, if checked, will overwrite any folders if they already exist, deleting any files they contain. Clicking the “Cancel” button will leave this mode. When everything is set, click the “Create Folders” button again and all the folders will be created accordingly. Another way to set the output folders is to manually browse and select/create the folders under the “Shot Settings” section for each camera. When choosing the output destination, you may add the name of the shot after the folder name, example: C:/renders/shots/shot1, where "shots" is the name of the folder to render to, and "shot1" is the name to use for the image(s). If you choose to not add a name, the name of the camera is used by default. Please note that if you're rendering an animation and a camera is called, for example, "Camera.001", the images will be called: "Camera0010001.png", "Camera0010002.png", etc (the last four digits being relevant to the frame number). Below the main buttons, you should see a list of the cameras in the scene. There are several options available for each camera:
“Shot Shapes” mode allows you to use any mesh object to render several shots with the one camera. This can be useful for both still images and animations. It works by setting the camera’s location to each vertex in the selected shape and renders an image from that view. Once enabled, you can quickly setup tracking constraints for the camera by clicking the “Create Constraints” button. This adds an Empty object to the scene for the camera to look at and follow, as well as the two tracking constraints needed. With the constraints added, simply choose an object to use from the drop-down list, which displays a list of the objects in the scene. Clicking the “Animation” render button will now use the selected object’s vertices to render several shots. Before rendering, you can navigate through the object’s vertices to get an idea of the shot composition by using the “Navigate” option. You can also choose to begin rendering from a particular vertex by checking the “Start from here” checkbox, which uses the current vertex selected by the “Navigate” option. Please note that this will not render the previous vertices. For animations, you can use the “Offset” option to add more shots. By default, this is set to 1, which will render one shot per vertex. Higher values will increase the number of shots and interpolate between them. For example; if you’re using a shape with 32 vertices and an offset of 2, 64 images will be rendered. 96 images will be rendered with an offset of 3, etc. Instead of using an offset, you can choose to use the camera’s start and end frames settings, which will spread the shots across the frame range, adding more frames if the distribution would be an odd amount. “Render Settings” mode allows you to further customise the camera by defining a specific resolution, and samples per pixel if Cycles is enabled. As you tweak the camera’s resolution, you can preview the changes by clicking the button with the help/float icon. Once finished, click the “ESC” key to exit the this mode. | ||
| Version | 0.3.1 | Author(s) | Aaron Symons |
| Blender | 2.63a | License | GPL |
| Category | Render | Distribution | Extern |
| File name | render_shots.py |
|---|---|
| Current version download | https://developer.blender.org/T32122 |
| Python modules | bpy, props, os, shutil |
| Warning | If an output destination is not specified it will not include the respective camera during render and will log it as a warning in the console along with the camera’s name. |
|---|
