「利用者:Simtron/Doc:2.6/Manual/3D interaction/Transformations/Basics/Rotation」の版間の差分
(Minor spelling edit) |
細 (1版 をインポートしました) |
(相違点なし)
| |
2018年6月29日 (金) 05:48時点における最新版
Page status (reviewing guidelines)
Partial page
Text
no link to Transform Control
|
Rotate
Mode: Object and Edit modes in 3D Editor, Graph Editor and UV Editor.
Hotkey: R
Menu: Context dependent.
Description
This option rotates the active entities in 3D space or graph editor or UV editor about their median point or Pivot point. On initiating this process, the initial position of the mouse will be taken as the reference and depending upon the choice of pivot point, i.e., about active element or median point or individual origins or 3D cursor location or bounding box center, the rotation transformation is carried out. Similar action can be observed in all situations where this operation can be employed.
The distance of the cursor dosent affect the angle of rotation.Rather it gives the user higher precession in controlling the rotation. The angle of rotation is decided by the amount of total and partial rotations made by the cursor around the pivot center.
3D View
There are 2 types of rotate options in the 3D View:
- Using the Transform Widget helper, when you choose the Rotation Widget in the header of the 3DView.
- Using shortcuts and combinations of shortcuts.
Rotation Widget
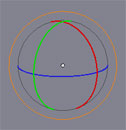
In Blender, this is the Rotation Widget which is not active by default and must be activated from the transformation widget selection menu in the 3D window's header. You can access this option by click holding LMB ![]() and dragging one of the rings. Each ring specifies an axis of rotation.
and dragging one of the rings. Each ring specifies an axis of rotation.
Short cuts in 3D View
The shortcut to initiate the rotation operation in the 3D view is by pressing the R key which can be a mnemonic for rotation.
- Constrain the rotation about the X, Y or Z axis.
- R (Trackball)
- Pressing R while already rotating toggles the rotation mode between a single axis rotation (either aligned to the screen or around a certain axis) and a two axis, “trackball” rotation. In “Trackball” mode, the rotation of the object is controlled by both the X and Y location of the mouse pointer, similar to the trackball view rotation mode. This can be a quick way to rotate an object into place, without having to keep changing the view rotation while adjusting. However, it is more difficult to use than the simple rotation.
- R+x/y/z
- Isolated axis rotation can be achieved by pressing X/Y/Z keys after pressing the r key.With this operation rotation will occur in the axis which is specified.
- R+shift+x/y/z
- Complementary Isolated axis rotation can be achieved by pressing ⇧ Shift key followed by X/Y/Z keys after pressing the r key. In this operation the rotation will occur in all axes except for the axis which is specified.
- R+x/y/z+numerical specification
- After following the R+x/y/z operation, the numerical value for rotation can be feed in by just typing the decimal value of rotation in terms of degrees. The value can be both positive and negative.
- Alt+r
- Clears all the rotation transformations from the active object. This option works only in the object mode only.
Orientations
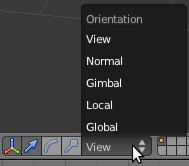
There are 5 orientations for all tranformations.
- » Global(default)
- » Local
- » Normal
- » Gimbal
- » View
- » Global(default)
Each mode is a co-ordinate system in which the transformations can be carried out. One can look up for more about these orientations on wikipedia. These orientations can be choosen from the pop up menu just by the side of transformation manipulator choice widget group.
- R+xx/yy/zz
- Isolated axis rotation about the Local axis can be achieved by pressing Xx/Yy/Zz keys after pressing the r key. Ofcourse this can be followed by a numerical specification of rotation.
- Similar to above operation, R key followed by ⇧ Shift and Xx or Yy or Zz will directly allow you to rotate the objects in local axes complementary to the one specified.
Controling rotate Precision
In addition to the Axis constraint options listed above, Blender offer some options to limit the amount of the transformation in small or predefined steps.
- Options for precision control:
- ⇧ Shift
- This is a slow transformation option. While still in the rotation mode i.e.,after R pressed, if the ⇧ Shift key is pressed, the rate of transformation is reduced giving you precise rotation.
- Ctrl
- Snap while rotating the object based on the snapping constraint which has been already set. For this option you may not necessarily enable the snap option. It will work from the snap disabled mode itself.
- Ctrl+⇧ Shift
- Intutively this is the combination of the Ctrl and the ⇧ Shift operations individually. This option will rotate the object with high precission along with the snapping constraint.
- <decimal number>
- This operation can be used along with any single axis based rotation transformation to specify the amount of the rotation in degrees. This option gives the user complete control over the rotation transformation.As an example R + X + 12.34 will result in rotation of the object about x axis by 12.34 degrees.
Python Scripting
You can also use Python Scripting in Blender to rotate Objects or elements to a specific location, either using the Python interactive console, or running a Python script in the Text Editor Window.
- To get the details of the rotation of an object
- bpy.context.scene.objects.active.rotation_euler
Returns you a tuple carrying 3 float value which specify angle in radians rotated about 3 primary axes and the fourth entry is a string of 3 characters 'XYZ' by default specifying the primary axis, for the active object in the scene.One can assign a different value to this variable to change the rotation of the object. The value can be specified by a rotation vecor i.e., a 3d tuple encapsulated in another tuple.
- Operator for rotation
- bpy.ops.transform.rotate(value=(-<Rotation value in radians>,), axis=(-<Proportion of rotation about X axis>,<Proportion of rotation about Y axis>, <Proportion of rotation about Z axis>), constraint_axis=(<bool>, <bool>, <bool>), constraint_orientation='<ORIENTATION>', mirror=<bool>, proportional='<ENABLED/DISABLED>', proportional_edit_falloff='<falloff choice>', proportional_size=<decimal>, snap=<bool>, snap_target='<SNAP TARGET>', snap_point=(0, 0, 0), snap_align=False, snap_normal=(0, 0, 0), release_confirm=<bool>)


