「Doc:2.6/Manual/Materials/Assigning a material」の版間の差分
(→Reusing Existing Materials) |
細 (1版 をインポートしました) |
(相違点なし)
| |
2018年6月29日 (金) 04:39時点における最新版
Assigning a Material
Materials available in the currently-open Blender file can be investigated by clicking on the Materials button ![]() in the Properties Window Header. In this section we look at how to assign or remove a material to/from the Active Object in Blender, either by:
in the Properties Window Header. In this section we look at how to assign or remove a material to/from the Active Object in Blender, either by:
- creating a new material,
- re-using an existing material, or
- deleting a material.
We also give hints about practical material usage.
Creating a new Material
Every time a new Object is created it has no material linked to it. You can create a new material for the object by
- Selecting the object
- In the Properties window, click on the object button
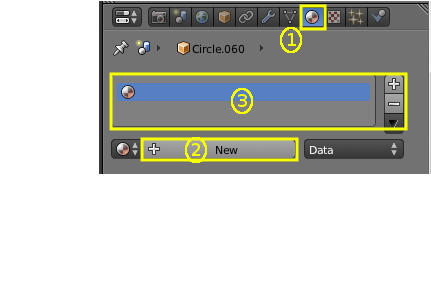
- Click on the Materials button in the Properties Panel Header (1)
The Shading context window then appears. This contains the following elements:
- Context - The currently-selected scene and object
- Object Material Slots (3) - this window shows the "slots" for the material (or materials) that this object data contains.
- Active Material (2). Initially empty, asking for "New".
To add a new material, click "+" in the Active Material box. This action has a series of effects:
- opens the new material in the Active Material box,
- brings up additional buttons in the immediate panel,
- adds the new material to the Available Materials list,
- adds the new material to the Object Material Slots list for the active object (or its object data - see below)
- brings up a preview of the new material,
- provides you with a range of panels allowing you to select the properties of the new material.
New Material Panel Buttons
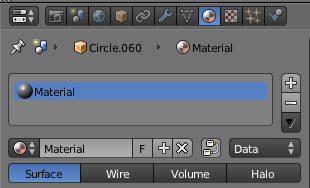
Details of the additional buttons which appear in the Material panel for a new Active Material are as follows:
- Active Material
 - Available Materials
- See Reusing Existing Materials below.
- Name
- Like other datablocks, Blender will automatically set the name of the new material to Material, Material.001 and so on. You can change this by over-typing with your own choice of name.
- Number of Users
- Specifies the number of meshes which use this material.
- F - Fake User;
- If lit, this material will always be saved within the Blender file, even if it has no meshes which use it (see Deleting a Material).
- X
- Delete this material (see Deleting a Material).
| Naming materials | |
| It's a very good idea to give your materials clear names so you can keep track of them, especially when they're linked to multiple objects. Try to make your names descriptive of the material, not its function (e.g. "Yellow Painted" rather than "Kitchen Table Color") |
- Data
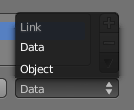
- Specifies whether the material is to be linked to the Object or to the Object Data.
- The Link pop-up menu has two choices, Data and Object. These two menu choices determine whether the material is linked to the object or to the data, (in this case) the mesh (or curve, nurbs, etc.). The Data menu item determines that this material will be linked to the mesh's datablock which is linked to the object's datablock. The Object menu item determines that the material will be linked to the object's data block directly.
- This has consequences of course. For example, different objects may share the same mesh datablock. Since this datablock defines the shape of the object, any change in edit mode will be reflected on all of those objects. Moreover, anything linked to that mesh datablock will be shared by every object that shares that mesh. So, if the material is linked to the mesh, every object will share it.
- On the other hand, if the material is linked directly to the object datablock, the objects can have different materials and still share the same mesh. Short explanation: If connected to the object, you can have several instances of the same obData using different materials. If linked to mesh data, you can't. See Data System for more information.
- Object Render Format menu.
- This menu has four options which define how the object is to be rendered:
- Surface
- Material applied to object planes.
- Wire
- Material applied to wires following the object edges
- Volume
- Material applied to the object volume.
- Halos
- Material applied to halos around each object vertex.
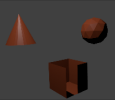
- Object Renders
Reusing Existing Materials
Blender is built to allow you to reuse anything, including material settings, between many objects. Instead of creating duplicate materials, you can simply re-use an existing material. There are several ways to do this using the Available Materials menu:
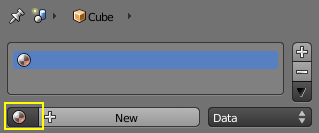
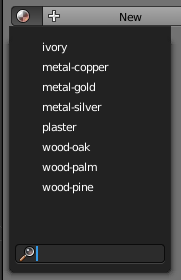
- Single Object - With the object selected, click the sphere located to the left of the Material name. A drop-down list appears showing all the materials available in the current Blender file. To use one, just click on it.
| Searching for Materials | |
| The search field at the bottom of the material list allows you to search the names in the list. For example, by entering "wood" all existent materials are filtered so that only materials containing "wood" are displayed in the list. |
- Multiple Objects - In the 3D View, with CtrlL you can quickly link all selected objects to the material (and other aspects) of the active object. Very useful if you need to set a large number of objects to the same material; just select all of them, then the object that has the desired material, and CtrlL link them to that "parent". (See Tip on Linking Data in Creating about data linking.)
Deleting a Material
To delete a material, select the material and click X in the Available Materials List entry.
Although the material will seem to disappear immediately, the Delete action can depend on how the material is used elsewhere.
If the material is linked to the Object and there are other objects which use this material, then the material will be removed from that object (but remain on all its other objects).
If the "Fake User" button (F) has been lit in the Available Materials list, then the material will be retained when the file is saved, even if it has no users.
Only if it has 0 "real" users, and no "Fake" user, will the material be permanently deleted. Note that it will still remain in the Materials list until the Blender file is saved, but will have disappeared when the file is reloaded.
