「Dev:IT/2.5/Py/Scripts/Cookbook/Code snippets/Interface」の版間の差分
(→Pannelli e pulsanti) |
(相違点なし)
|
2011年8月10日 (水) 17:02時点における版
Interfaccia
Molti script hanno necessità di comunicare con l'utente in qualche modo. Uno script può essere richiamto da menù o da un pulsante in un pannello, e può prendere i valori da sliders, checkboxes, menù drop down o input boxes. Gli elementi dell'interfaccia utente sono implementati come classi Python. In questo capitolo parleremo di due tipi di elementi dell'interfaccia:
- Un pannello è una classe derivata da
bpy.types.Panel. Ha proprietà e una funzione draw, che è richiamata ogni volta che il pannello è ridisegnato. - Un operatore è una classe derivata da
bpy.types.Operator. Ha proprietà, una funzione execute e opzionalmente una funzione invoke. Gli operatori possono essere registrati per farli apparire nei menù. In particolare un pulsante è un operatore. Quando lo premi, la funzione execute è chiamata.
Sia i pannelli che gli operatori devono essere registrati prima di poterli usare. Il modo più semplice per registrare ogni cosa in un file, è quello di aggiungere alla fine una chiamata a bpy.utils.register_module(__name__).
La parte delle API dell'interfaccia, è probabilmente la meno stabile delle altre parti, così il codice in questa sezione può non funzionare nelle release future.
Pannelli e pulsanti
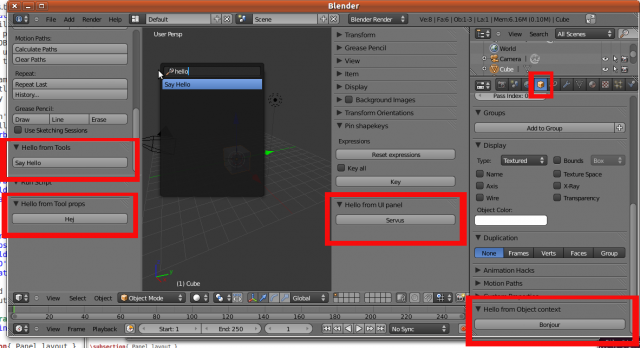
Questo programma aggiunge 5 differenti pannelli all'interfaccia utente in posti diversi. Ogni pannello ha un nome e un pulsante. Lo stesso operatore è usato per tutti i pulsanti, ma il testo può essere cambiato utilizzando l'argomento testo. Quando premi un pulsante, Blender stampa un saluto nella console.
L'operatore del pulsante può essere richiamato senza argomenti, come nel primo pannello:
self.layout.operator("hello.hello")
Blender cercherà un operatore con bl_idname uguale a hello.hello e lo aggiungerà al panello. Il testo sul pulsante di default è la sua bl_label, per es. Say Hello. La classe OBJECT_OT_HelloButton ha anche una proprietà stringa personalizzata chiamata country. uò essere usata per passare argomenti al pulsante. Se l'operatore è chiamato senza argomenti, la proprietà country di default sarà una stringa vuota.
bl_idname deve essere una stringa contenente solo lettere minuscole, cifre e carateri di sottolineatura, più un punto (uno solo); hello.hello satisfies these criteria. soddisfa questo criterio. A parte questo non sembrano esserci altre restrizioni in bl_idname.
L'aspetto predefinito e il comportamento del pulsante può essere modificato. Richiamiamo il pulsante nel seguente modo:
self.layout.operator("hello.hello", text='Hej').country = "Sweden"
Il testo su questo pulsante è Hej e il valore della proprietà country è “Sweden”. Quando premiamo questo pulsante, Blender stampa il seguente teso nella console:
Hello world from Sweden!
Alla fine del file, ogni cosa è registrata con una chiamata a
bpy.utils.register_module(__name__)
Il nostro pulsante operatore appena definito, può essere usatocome qualsiasi altro operatore di Blender. Ecco una sessione dalla console di Blender:
>>> bpy.ops.hello.hello(country = "USA")
Hello world from USA!
{'FINISHED'}
Un altro modo per richiamare un nuovo operatore è quello di premere Space. Un selettore con tutti gli operatori disponibili sarà visualizzato alla posizione del mouse. Raffina la selezione scrivendo una sottostringa del nostro operatore bl_label. L'operatore, con i parametri di default, sarà eseguito e la frase Hello world! sarà stampata nella console.
#----------------------------------------------------------
# File hello.py
#----------------------------------------------------------
import bpy

#
#    Menu in tools region
#
class ToolsPanel(bpy.types.Panel):
    bl_label = "Hello from Tools"
    bl_space_type = "VIEW_3D"
    bl_region_type = "TOOLS"

    def draw(self, context):
        self.layout.operator("hello.hello")

#
#    Menu in toolprops region
#
class ToolPropsPanel(bpy.types.Panel):
    bl_label = "Hello from Tool props"
    bl_space_type = "VIEW_3D"
    bl_region_type = "TOOL_PROPS"

    def draw(self, context):
        self.layout.operator("hello.hello", text='Hej').country = "Sweden"

#
#    Menu in UI region
#
class UIPanel(bpy.types.Panel):
    bl_label = "Hello from UI panel"
    bl_space_type = "VIEW_3D"
    bl_region_type = "UI"

    def draw(self, context):
        self.layout.operator("hello.hello", text='Servus')

#
#    Menu in window region, object context
#
class ObjectPanel(bpy.types.Panel):
    bl_label = "Hello from Object context"
    bl_space_type = "PROPERTIES"
    bl_region_type = "WINDOW"
    bl_context = "object"

    def draw(self, context):
        self.layout.operator("hello.hello", text='Bonjour').country = "France"

#
#    Menu in window region, material context
#
class MaterialPanel(bpy.types.Panel):
    bl_label = "Hello from Material context"
    bl_space_type = "PROPERTIES"
    bl_region_type = "WINDOW"
    bl_context = "material"

    def draw(self, context):
        self.layout.operator("hello.hello", text='Ciao').country = "Italy"

#
#    The Hello button prints a message in the console
#
class OBJECT_OT_HelloButton(bpy.types.Operator):
    bl_idname = "hello.hello"
    bl_label = "Say Hello"
    country = bpy.props.StringProperty()

    def execute(self, context):
        if self.country == '':
            print("Hello world!")
        else:
            print("Hello world from %s!" % self.country)
        return{'FINISHED'}

#
#	Registration
#   All panels and operators must be registered with Blender; otherwise
#   they do not show up. The simplest way to register everything in the
#   file is with a call to bpy.utils.register_module(__name__).
#

bpy.utils.register_module(__name__)
Il Filebrowser richiede che bl_region_type sia impostato su CHANNELS:
import bpy

class FILEBROWSER_PT_hello(bpy.types.Panel):
    bl_label = "Hello World Filebrowser Panel"
    bl_space_type = "FILE_BROWSER"
    bl_region_type = "CHANNELS"

    def draw(self, context):
        layout = self.layout

        obj = context.object

        row = layout.row()
        row.label(text="Hello world!", icon='WORLD_DATA')

def register():
    bpy.utils.register_class(FILEBROWSER_PT_hello)


def unregister():
    bpy.utils.unregister_class(FILEBROWSER_PT_hello)

if __name__ == "__main__":  # only for live edit.
    bpy.utils.register_module(__name__)
Layout del pannello e altri argomenti
Questo programma mostra come organizzare il lay out del pannello. Quando lo script è eseguito, un pannello è creato nell'area props del tool shelf, con i pulsanti piazzati in maniera banale.
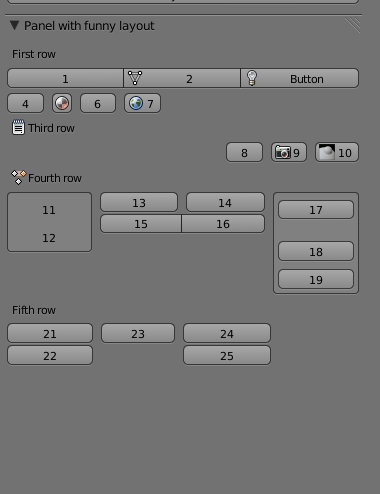
Lo script mostra anche un metodo per mandare molti argomenti a un operatore.
La classe OBJECT_OT_Button ha due proprietà, number e row, e stampa i valori di queste proprietà nella console. Essendo entrambe le proprietà di tipo intero, avranno come valore di default 0 se non sarà impostato. Quindi se premiamo i pulsanti 7,8 e 23, lo script stampa:
Row 0 button 7
Row 3 button 0
Row 0 button 0
Ma se vogliamo impostare entrambe le proprietà number e row per es. richiamando l'operatore con 2 argomenti? Questo non può essere fatto direttamente, ma possiamo creare una terza proprietà chiamata loc, che è una stringa che è analizzata dall'operatore se di lunghezza diversa da 0. Se premiamo il pulsante 13, lo script stampa
Row 4 button 13
Questo metodo, può essere utilizzato per spedire a un operatore delle strutture dati più complesse. In alternativa, possiamo usare delle variabili globali per questo uso (vedi la sottosezione Una finestra di dialogo popup).
#----------------------------------------------------------
# File layout.py
#----------------------------------------------------------
import bpy

#   Layout panel
class LayoutPanel(bpy.types.Panel):
    bl_label = "Panel with funny layout"
    bl_space_type = "VIEW_3D"
    bl_region_type = "TOOL_PROPS"

    def draw(self, context):
        layout = self.layout

        layout.label("First row")
        row = layout.row(align=True)
        row.alignment = 'EXPAND'
        row.operator("my.button", text="1").number=1
        row.operator("my.button", text="2", icon='MESH_DATA').number=2
        row.operator("my.button", icon='LAMP_DATA').number=3

        row = layout.row(align=False)
        row.alignment = 'LEFT'
        row.operator("my.button", text="4").number=4
        row.operator("my.button", text="", icon='MATERIAL').number=5
        row.operator("my.button", text="6", icon='BLENDER').number=6
        row.operator("my.button", text="7", icon='WORLD').number=7

        layout.label("Third row", icon='TEXT')
        row = layout.row()
        row.alignment = 'RIGHT'
        row.operator("my.button", text="8").row=3
        row.operator("my.button", text="9", icon='SCENE').row=3
        row.operator("my.button", text="10", icon='BRUSH_INFLATE').row=3

        layout.label("Fourth row", icon='ACTION')
        row = layout.row()
        box = row.box()
        box.operator("my.button", text="11", emboss=False).loc="4 11"
        box.operator("my.button", text="12", emboss=False).loc="4 12"
        col = row.column()
        subrow = col.row()
        subrow.operator("my.button", text="13").loc="4 13"
        subrow.operator("my.button", text="14").loc="4 14"
        subrow = col.row(align=True)
        subrow.operator("my.button", text="15").loc="4 15"
        subrow.operator("my.button", text="16").loc="4 16"
        box = row.box()
        box.operator("my.button", text="17").number=17
        box.separator()
        box.operator("my.button", text="18")
        box.operator("my.button", text="19")

        layout.label("Fifth row")
        row = layout.row()
        split = row.split(percentage=0.25)
        col = split.column()
        col.operator("my.button", text="21").loc="5 21"
        col.operator("my.button", text="22")
        split = split.split(percentage=0.3)
        col = split.column()
        col.operator("my.button", text="23")
        split = split.split(percentage=0.5)
        col = split.column()
        col.operator("my.button", text="24")
        col.operator("my.button", text="25")

#   Button
class OBJECT_OT_Button(bpy.types.Operator):
    bl_idname = "my.button"
    bl_label = "Button"
    number = bpy.props.IntProperty()
    row = bpy.props.IntProperty()
    loc = bpy.props.StringProperty()

    def execute(self, context):
        if self.loc:
            words = self.loc.split()
            self.row = int(words[0])
            self.number = int(words[1])
        print("Row %d button %d" % (self.row, self.number))
        return{'FINISHED'}

#    Registration
bpy.utils.register_module(__name__)
Pannello delle proprietà
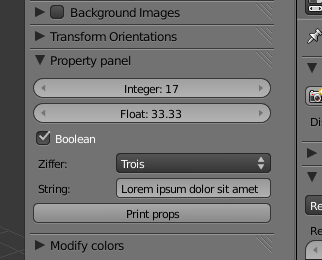
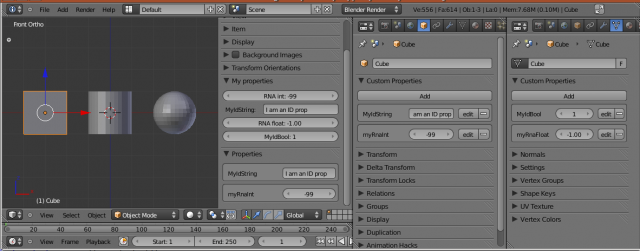
Le proprietà sono state discusse nella sezione Proprietà, ma non abbiamo spiegato come mostrare proprietà personalizzate in un pannello. Questo script fa esattamente questo. Una proprietà RNA è mostrata con la sintassi
layout.prop(ob, 'myRnaInt')
Una proprietà ID è mostrata con
layout.prop(ob, '["myRnaInt"]')
Nota che il pannello è registrato esplicitamente con bpy.utils.register_class(MyPropPanel) invece di usare register_module per registrare ogni cosa. Quale metodo è utilizzato non è rilevante in questo esempio, perché MyPropPanel è la sola cosa che serve registrare.
#----------------------------------------------------------
# File panel_props.py
#----------------------------------------------------------
import bpy
from bpy.props import *

# Clean the scene and create some objects
bpy.ops.object.select_by_type(type='MESH')
bpy.ops.object.delete()
bpy.ops.mesh.primitive_cube_add(location=(-3,0,0))
cube = bpy.context.object
bpy.ops.mesh.primitive_cylinder_add(location=(0,0,0))
cyl = bpy.context.object
bpy.ops.mesh.primitive_uv_sphere_add(location=(3,0,0))
sphere = bpy.context.object

# Define an RNA prop for every object
bpy.types.Object.myRnaInt = IntProperty(
    name="RNA int",
    min = -100, max = 100,
    default = 33)

# Define an RNA prop for every mesh
bpy.types.Mesh.myRnaFloat = FloatProperty(
    name="RNA float",
    default = 12.345)

# Set the cube's RNA props
cube.myRnaInt = -99
cube.data.myRnaFloat = -1

# Create ID props by setting them.
cube["MyIdString"] = "I am an ID prop"
cube.data["MyIdBool"] = True

#    Property panel
class MyPropPanel(bpy.types.Panel):
    bl_label = "My properties"
    bl_space_type = "VIEW_3D"
    bl_region_type = "UI"

    def draw(self, context):
        ob = context.object
        if not ob:
            return
        layout = self.layout
        layout.prop(ob, 'myRnaInt')
        try:
            ob["MyIdString"]
            layout.prop(ob, '["MyIdString"]')
        except:
            pass
        if ob.type == 'MESH':
            me = ob.data
            layout.prop(me, 'myRnaFloat')
            try:
                me["MyIdBool"]
                layout.prop(me, '["MyIdBool"]')
            except:
                pass

# Registration
bpy.utils.register_class(MyPropPanel)
Usare le proprietà della scena per memorizzare informazioni
Questo programa permette all'utente di inserire vari tipi di informazioni, che saranno spedite da pannello al pulsante. Il meccanismo è utilizzare una proprietà RNA definita dall'utente, che può essere impostata dal pannello e letta dai pulsanti. Tutti i tipi di dati di Blender possono avere proprietà. Proprietà globali che non sono direttamente associate con qualche oggetto specifico possono essere opportunamente memorizzate nella scena corrente. Nota, comunque che queste saranno perdute se vai su una nuova scena.
#----------------------------------------------------------
# File scene_props.py
#----------------------------------------------------------
import bpy
from bpy.props import *

#
#    Store properties in the active scene
#
def initSceneProperties(scn):
    bpy.types.Scene.MyInt = IntProperty(
        name = "Integer",
        description = "Enter an integer")
    scn['MyInt'] = 17

    bpy.types.Scene.MyFloat = FloatProperty(
        name = "Float",
        description = "Enter a float",
        default = 33.33,
        min = -100,
        max = 100)

    bpy.types.Scene.MyBool = BoolProperty(
        name = "Boolean",
        description = "True or False?")
    scn['MyBool'] = True

    bpy.types.Scene.MyEnum = EnumProperty(
        items = [('Eine', 'Un', 'One'),
                 ('Zwei', 'Deux', 'Two'),
                 ('Drei', 'Trois', 'Three')],
        name = "Ziffer")
    scn['MyEnum'] = 2

    bpy.types.Scene.MyString = StringProperty(
        name = "String")
    scn['MyString'] = "Lorem ipsum dolor sit amet"
    return

initSceneProperties(bpy.context.scene)

#
#    Menu in UI region
#
class UIPanel(bpy.types.Panel):
    bl_label = "Property panel"
    bl_space_type = "VIEW_3D"
    bl_region_type = "UI"

    def draw(self, context):
        layout = self.layout
        scn = context.scene
        layout.prop(scn, 'MyInt', icon='BLENDER', toggle=True)
        layout.prop(scn, 'MyFloat')
        layout.prop(scn, 'MyBool')
        layout.prop(scn, 'MyEnum')
        layout.prop(scn, 'MyString')
        layout.operator("idname_must.be_all_lowercase_and_contain_one_dot")

#
#    The button prints the values of the properites in the console.
#

class OBJECT_OT_PrintPropsButton(bpy.types.Operator):
    bl_idname = "idname_must.be_all_lowercase_and_contain_one_dot"
    bl_label = "Print props"

    def execute(self, context):
        scn = context.scene
        printProp("Int:    ", 'MyInt', scn)
        printProp("Float:  ", 'MyFloat', scn)
        printProp("Bool:   ", 'MyBool', scn)
        printProp("Enum:   ", 'MyEnum', scn)
        printProp("String: ", 'MyString', scn)
        return{'FINISHED'}

def printProp(label, key, scn):
    try:
        val = scn[key]
    except:
        val = 'Undefined'
    print("%s %s" % (key, val))

#    Registration
bpy.utils.register_module(__name__)
Polling
Uno script, spesso, lavora solo in uno specifico contesto, es. quando un oggetto del tipo correto è attivo. Per es. uno script che manipola i vertici di una mesh, non può fare niente se l'oggetto attivo è un'armatura.
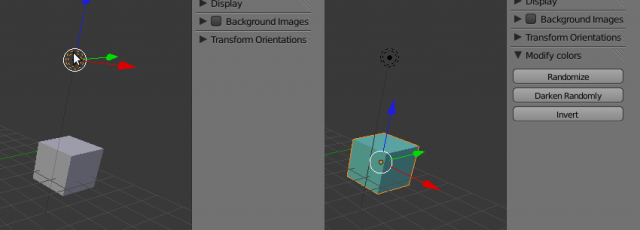
Questo programma aggiunge un pannello che modifica il materiale dell'oggetto attivo. Il pannello si trova nella sezione dell'interfaccia utente (che si apre premendo N), ma è visibile solo se l'oggetto attivo è una mesh con almeno un materiale. Il controllo su quanti materiali ha l'oggetto attivo, è eseguito da poll(). Questa non è una funzione ma piuttosto un metodo della classe, indicata dal comando @classmethod sopra la definizione. Così, qual'è la differenza tra una funzione e un metodo di classe? Non chiedetemelo! Tutto quello che so, è che il codice lavora se c'è @classmethod ma non lavora senza.
#----------------------------------------------------------
# File poll.py
#----------------------------------------------------------
import bpy, random

#
#    Menu in UI region
#
class ColorPanel(bpy.types.Panel):
    bl_label = "Modify colors"
    bl_space_type = "VIEW_3D"
    bl_region_type = "UI"

    @classmethod
    def poll(self, context):
        if context.object and context.object.type == 'MESH':
            return len(context.object.data.materials)

    def draw(self, context):
        layout = self.layout
        scn = context.scene
        layout.operator("random.button")
        layout.operator("darken_random.button")
        layout.operator("invert.button")

#
#    The three buttons
#

class RandomButton(bpy.types.Operator):
    bl_idname = "random.button"
    bl_label = "Randomize"

    def execute(self, context):
        mat = context.object.data.materials[0]
        for i in range(3):
            mat.diffuse_color[i] = random.random()
        return{'FINISHED'}

class DarkenRandomButton(bpy.types.Operator):
    bl_idname = "darken_random.button"
    bl_label = "Darken Randomly"

    def execute(self, context):
        mat = context.object.data.materials[0]
        for i in range(3):
            mat.diffuse_color[i] *= random.random()
        return{'FINISHED'}

class InvertButton(bpy.types.Operator):
    bl_idname = "invert.button"
    bl_label = "Invert"

    def execute(self, context):
        mat = context.object.data.materials[0]
        for i in range(3):
            mat.diffuse_color[i] = 1 - mat.diffuse_color[i]
        return{'FINISHED'}

#    Registration
bpy.utils.register_module(__name__)
Menù drop-down dinamici
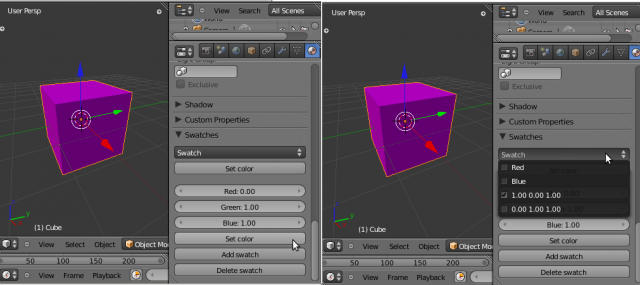
Questo programma aggiunge un pannello con un menù drop-down al pannello dell'interfaccia utente. All'inizio il menù contiene tre voci: red, green, e blue. Ci sono 2 pulsanti con etichetta Set color. Quello superiore imposta il colore dell'oggetto attivo uguale al colore selezionato nel menù, quello inferiore lo imposta al colore speciicato dai tre slider. I colori possono essere aggiunti e cancellati dal menù.
Nota che il polling funziona anche per i pulsanti e il pulsante Set color rimane disabilitato fino a quando l'oggetto attivo non è una mesh con almeno un materiale.
#----------------------------------------------------------
# File swatches.py
#----------------------------------------------------------
import bpy
from bpy.props import *

theSwatches = [
    ("1 0 0" , "Red" , "1 0 0"),
    ("0 1 0" , "Green" , "0 1 0"),
    ("0 0 1" , "Blue" , "0 0 1")]

def setSwatches():
    global theSwatches
    bpy.types.Object.my_swatch = EnumProperty(
        items = theSwatches,
        name = "Swatch")

setSwatches()

bpy.types.Object.my_red = FloatProperty(
    name = "Red", default = 0.5,
    min = 0, max = 1)

bpy.types.Object.my_green = FloatProperty(
    name = "Green", default = 0.5,
    min = 0, max = 1)

bpy.types.Object.my_blue = FloatProperty(
    name = "Blue", default = 0.5,
    min = 0, max = 1)

def findSwatch(key):
    for n,swatch in enumerate(theSwatches):
        (key1, name, colors) = swatch
        if key == key1:
            return n
    raise NameError("Unrecognized key %s" % key)

#    Swatch Panel
class SwatchPanel(bpy.types.Panel):
    bl_label = "Swatches"
    #bl_idname = "myPanelID"
    bl_space_type = "PROPERTIES"
    bl_region_type = "WINDOW"
    bl_context = "material"

    def draw(self , context):
        layout = self.layout
        ob = context.active_object
        layout.prop_menu_enum(ob, "my_swatch")
        layout.operator("swatches.set").swatch=True
        layout.separator()
        layout.prop(ob, "my_red")
        layout.prop(ob, "my_green")
        layout.prop(ob, "my_blue")
        layout.operator("swatches.set").swatch=False
        layout.operator("swatches.add")
        layout.operator("swatches.delete")

#    Set button
class OBJECT_OT_SetButton(bpy.types.Operator):
    bl_idname = "swatches.set"
    bl_label = "Set color"
    swatch = bpy.props.BoolProperty()

    @classmethod
    def poll(self, context):
        if context.object and context.object.type == 'MESH':
            return len(context.object.data.materials)

    def execute(self, context):
        global theSwatches
        ob = context.object
        if self.swatch:
            n = findSwatch(ob.my_swatch)
            (key, name, colors) = theSwatches[n]
            words = colors.split()
            color = (float(words[0]), float(words[1]), float(words[2]))
        else:
            color = (ob.my_red, ob.my_green, ob.my_blue)
        ob.data.materials[0].diffuse_color = color
        return{'FINISHED'}

#    Add button
class OBJECT_OT_AddButton(bpy.types.Operator):
    bl_idname = "swatches.add"
    bl_label = "Add swatch"

    def execute(self, context):
        global theSwatches
        ob = context.object
        colors = "%.2f %.2f %.2f" % (ob.my_red, ob.my_green, ob.my_blue)
        theSwatches.append((colors, colors, colors))
        setSwatches()
        return{'FINISHED'}

#    Delete button
class OBJECT_OT_DeleteButton(bpy.types.Operator):
    bl_idname = "swatches.delete"
    bl_label = "Delete swatch"

    def execute(self, context):
        global theSwatches
        n = findSwatch(context.object.my_swatch)
        theSwatches.pop(n)
        setSwatches()
        return{'FINISHED'}

#    Registration
bpy.utils.register_module(__name__)
Aggiungere un operatore a un menù
I soli operatori incontrati fino ad ora, erano dei semplic pulsanti. In questo programma noi faremo un operatore più complesso, che crea un cilindro ritorto.
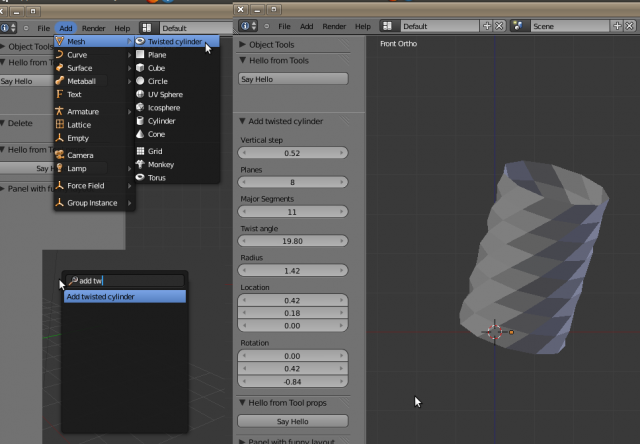
Per richiamre l'operatore, premi Space e scrivi “Add twisted cylinder”; Blender suggerisce i nomi di operatori corrispondenti a quello che stai digitando. Il cilindro ha molte opzioni, che appariranno nell'area Tool Prop (sotto la sezione Tool) appena è stato creato il cilindro. Questo può essere modificato interattivamente e il risultato è mostrato in tempo reale nella view port.
L'ultima parte dello script registra lo script stesso. Invece di premere Space, puoi richiamare lo script dal sottomunù Add » Mesh. Se usiamo append invece di prepend in register(), la voce di menù appare in fondo anziché all'inizio del menù.
#----------------------------------------------------------
# File twisted.py
#----------------------------------------------------------
import bpy, math

def addTwistedCylinder(context, r, nseg, vstep, nplanes, twist):
    verts = []
    faces = []
    w = 2*math.pi/nseg
    a = 0
    da = twist*math.pi/180
    for j in range(nplanes+1):
        z = j*vstep
        a += da
        for i in range(nseg):
            verts.append((r*math.cos(w*i+a), r*math.sin(w*i+a), z))
            if j > 0:
                i0 = (j-1)*nseg
                i1 = j*nseg
                for i in range(1, nseg):
                    faces.append((i0+i-1, i0+i, i1+i, i1+i-1))
                faces.append((i0+nseg-1, i0, i1, i1+nseg-1))

    me = bpy.data.meshes.new("TwistedCylinder")
    me.from_pydata(verts, [], faces)
    ob = bpy.data.objects.new("TwistedCylinder", me)
    context.scene.objects.link(ob)
    context.scene.objects.active = ob
    return ob

#
#    User interface
#

from bpy.props import *

class MESH_OT_primitive_twisted_cylinder_add(bpy.types.Operator):
    '''Add a twisted cylinder'''
    bl_idname = "mesh.primitive_twisted_cylinder_add"
    bl_label = "Add twisted cylinder"
    bl_options = {'REGISTER', 'UNDO'}

    radius = FloatProperty(name="Radius",
            default=1.0, min=0.01, max=100.0)
    nseg = IntProperty(name="Major Segments",
            description="Number of segments for one layer",
            default=12, min=3, max=256)
    vstep = FloatProperty(name="Vertical step",
            description="Distance between subsequent planes",
            default=1.0, min=0.01, max=100.0)
    nplanes = IntProperty(name="Planes",
            description="Number of vertical planes",
            default=4, min=2, max=256)
    twist = FloatProperty(name="Twist angle",
            description="Angle between subsequent planes (degrees)",
            default=15, min=0, max=90)

    location = FloatVectorProperty(name="Location")
    rotation = FloatVectorProperty(name="Rotation")
    # Note: rotation in radians!

    def execute(self, context):
        ob = addTwistedCylinder(context,
            self.radius, self.nseg, self.vstep, self.nplanes, self.twist)
        ob.location = self.location
        ob.rotation_euler = self.rotation
        #context.scene.objects.link(ob)
        #context.scene.objects.active = ob
        return {'FINISHED'}

#
#    Registration
#    Makes it possible to access the script from the Add > Mesh menu
#

def menu_func(self, context):
    self.layout.operator("mesh.primitive_twisted_cylinder_add",
        text="Twisted cylinder",
        icon='MESH_TORUS')

def register():
   bpy.utils.register_module(__name__)
   bpy.types.INFO_MT_mesh_add.prepend(menu_func)

def unregister():
    bpy.utils.unregister_module(__name__)
    bpy.types.INFO_MT_mesh_add.remove(menu_func)

if __name__ == "__main__":
    register()
Un operatore modale
L'esempio seguente è preso direttamente dalla documentazione delle API, così come i prossimi esempi.
Un operatore modale, definisce una funzione Operator.modal che viene esguita e gestisce eventi fino a quando non restituisce {'FINISHED' o {'CANCELLED'. Grab, Rotate, Scale e Fly mode sono esempi di operatori modali. Sono specialmente utili per tool interattivi, your operator can have its own state where keys toggle options as the operator runs.
Quando l'operatore di questo esempio, è richiamato, aggiunge un gestore modale a se stesso con la chiamata a context.window_manager.modal_handler_add(self). Dopo di che, l'oggetto attivo viene spostato attraverso l'asse XY come muoviamo il mouse. Per interrompere, premi il tasto del mouse o Esc.
Il metodo modale viene attivato da 3 tipi di eventi:
- Un movimento del mouse che muove l'oggetto attivo.
- Pressione di LMB
 per confermare e tornare al modo normale. L'oggetto è lasciato nella nuova posizione.
 - Pressione di RMB
 o Esc per annullare e tornare al modo normale. L'oggetto è riportato alla posizione originale.
E' importante che ci sia un sistema per tornare al modo normale. Se la funzione modal() restituisce sempre 'RUNNING_MODAL', lo script sarà bloccato in un ciclo infinito e si dovrà riavviare Blender.
Un operatore modale definisce due metodi speciali chiamati __init()__ e __del()__, che sono richiamati quando le operazioni modali iniziano e finiscono rispettivamente.
Esegui lo script. L'oggetto attivo è mosso nel piano XY quando muovi il mouse. Lo script crea anche un pannello con un pulsante con il quale puoi richiamare l'operatore.
#----------------------------------------------------------
# File modal.py
# from API documentation
#----------------------------------------------------------
import bpy

class MyModalOperator(bpy.types.Operator):
    bl_idname = "mine.modal_op"
    bl_label = "Move in XY plane"

    def __init__(self):
        print("Start moving")

    def __del__(self):
        print("Moved from (%d %d) to (%d %d)" %
            (self.init_x, self.init_y, self.x, self.y))

    def execute(self, context):
        context.object.location.x = self.x / 100.0
        context.object.location.y = self.y / 100.0

    def modal(self, context, event):
        if event.type == 'MOUSEMOVE':  # Apply
            self.x = event.mouse_x
            self.y = event.mouse_y
            self.execute(context)
        elif event.type == 'LEFTMOUSE':  # Confirm
            return {'FINISHED'}
        elif event.type in ('RIGHTMOUSE', 'ESC'):  # Cancel
            return {'CANCELLED'}

        return {'RUNNING_MODAL'}

    def invoke(self, context, event):
        self.x = event.mouse_x
        self.y = event.mouse_y
        self.init_x = self.x
        self.init_y = self.y
        self.execute(context)

        print(context.window_manager.modal_handler_add(self))
        return {'RUNNING_MODAL'}

#
#    Panel in tools region
#
class MyModalPanel(bpy.types.Panel):
    bl_label = "My modal operator"
    bl_space_type = "VIEW_3D"
    bl_region_type = "TOOLS"

    def draw(self, context):
        self.layout.operator("mine.modal_op")

#	Registration
bpy.utils.register_module(__name__)

# Automatically move active object on startup
bpy.ops.mine.modal_op('INVOKE_DEFAULT')
Invoke vs execute
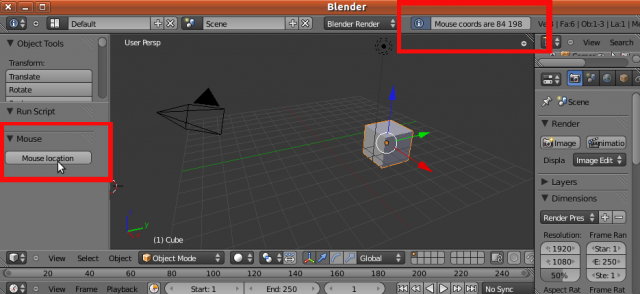
Questo script mostra la differenza tra Invoke e Execute. L'evento invocking è un argomento della funzione Operator.invoke, che imposta le 2 proprietà di tipo intero x e y alla posizione del mouse e chiama la funzione Operator.execute. In alternativa, possiamo eseguire l'operatore ed esplicitamente impostare x e y: bpy.ops.wm.mouse_position(’EXEC_DEFAULT’, x=20, y=66)
Invece di stampare le coordinate del mouse nella console, l'informazione è inviata all'info panel nell'angolo superiore destro. Questo è un buon posto dove mostrare brevi notifiche, perché l'utente non deve guardare in un'altra finestra, tanto più che la console non è visibile in tutte le versioni di Blender. Comunque, messaggi più lunghi, sono difficili da far rientrare nello spazio limitato dell'Info Panel.
#----------------------------------------------------------
# File invoke.py
# from API documentation
#----------------------------------------------------------

import bpy

class SimpleMouseOperator(bpy.types.Operator):
    """ This operator shows the mouse location,
        this string is used for the tooltip and API docs
    """
    bl_idname = "wm.mouse_position"
    bl_label = "Mouse location"

    x = bpy.props.IntProperty()
    y = bpy.props.IntProperty()

    def execute(self, context):
        # rather then printing, use the report function,
        # this way the message appears in the header,
        self.report({'INFO'}, "Mouse coords are %d %d" % (self.x, self.y))
        return {'FINISHED'}

    def invoke(self, context, event):
        self.x = event.mouse_x
        self.y = event.mouse_y
        return self.execute(context)

#
#    Panel in tools region
#
class MousePanel(bpy.types.Panel):
    bl_label = "Mouse"
    bl_space_type = "VIEW_3D"
    bl_region_type = "TOOL_PROPS"

    def draw(self, context):
        self.layout.operator("wm.mouse_position")

#
#	Registration
#   Not really necessary to register the class, because this happens
#   automatically when the module is registered. OTOH, it does not hurt either.
bpy.utils.register_class(SimpleMouseOperator)
bpy.utils.register_module(__name__)

# Automatically display mouse position on startup
bpy.ops.wm.mouse_position('INVOKE_DEFAULT')

# Another test call, this time call execute() directly with pre-defined settings.
#bpy.ops.wm.mouse_position('EXEC_DEFAULT', x=20, y=66)
Una finestra di dialogo popup
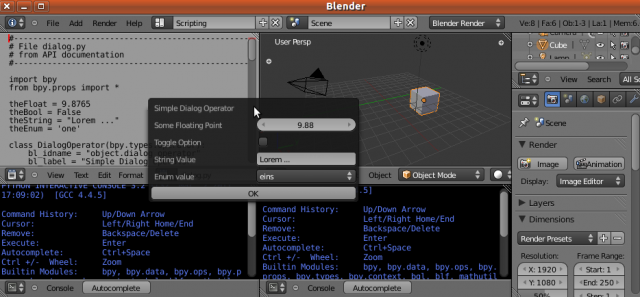
Quando viene eseguito questro script, una finestra popup viene mostrata,quindi puoi impostare alcune proprietà. Dopo che sei uscito, muovendo il mouse fuori dalla finestra, le proprietà sono scritte sia nella finestra Info che nella console.
Nella sottosezione Layout del pannello e altri argomenti abbiamo usato una singola stringa per spedire molti argomenti a un operatore, qui invece usiamo delle variabili globali per lo stesso uso.
<
#----------------------------------------------------------
# File popup.py
# from API documentation
#----------------------------------------------------------

import bpy
from bpy.props import *

theFloat = 9.8765
theBool = False
theString = "Lorem ..."
theEnum = 'one'

class DialogOperator(bpy.types.Operator):
    bl_idname = "object.dialog_operator"
    bl_label = "Simple Dialog Operator"

    my_float = FloatProperty(name="Some Floating Point",
        min=0.0, max=100.0)
    my_bool = BoolProperty(name="Toggle Option")
    my_string = StringProperty(name="String Value")
    my_enum = EnumProperty(name="Enum value",
        items = [('one', 'eins', 'un'),
                 ('two', 'zwei', 'deux'),
                 ('three', 'drei', 'trois')])

    def execute(self, context):
        message = "%.3f, %d, '%s' %s" % (self.my_float,
            self.my_bool, self.my_string, self.my_enum)
        self.report({'INFO'}, message)
        print(message)
        return {'FINISHED'}

    def invoke(self, context, event):
        global theFloat, theBool, theString, theEnum
        self.my_float = theFloat
        self.my_bool = theBool
        self.my_string = theString
        self.my_enum = theEnum
        return context.window_manager.invoke_props_dialog(self)


bpy.utils.register_class(DialogOperator)

# Invoke the dialog when loading
bpy.ops.object.dialog_operator('INVOKE_DEFAULT')

#
#    Panel in tools region
#
class DialogPanel(bpy.types.Panel):
    bl_label = "Dialog"
    bl_space_type = "VIEW_3D"
    bl_region_type = "UI"

    def draw(self, context):
        global theFloat, theBool, theString, theEnum
        theFloat = 12.345
        theBool = True
        theString = "Code snippets"
        theEnum = 'two'
        self.layout.operator("object.dialog_operator")

#
#	Registration
bpy.utils.register_module(__name__)
Una finestra di dialogo per gli errori
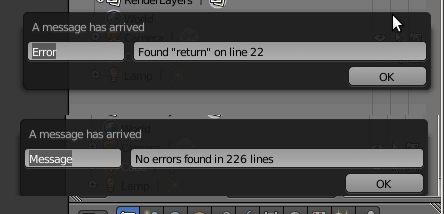
A quanto ne so, Blender non ha nessuna maniera elegante, per notificare all'utente se qualcosa non ha funzionato. Si può stampare un messaggio nella console o nell'Info panel e poi sollevare un'eccezione. Molte applicazioni moderne, invece, aprono un message box e mostrano il messaggio di errore. Il prossimo script usa le API di Blender per creare una finestra di dialogo popup per le notifiche all'utente.
Lo script analizza un file, se trova la parola return, lo script apre una finestra popup per dire all'utente che è stato rilevato un errore e su quale linea. Se la parola non è stata trovata una finestra popup mostrerà il numero di linee analizzate.
Al momento della scrittura, questo script causa un memory leak che rende Blender instabile. Spero che questo bug sarà risolto prima possibile.
#----------------------------------------------------------
# File error.py
# Simple error dialog
#----------------------------------------------------------

import bpy
from bpy.props import *

#
#   The error message operator. When invoked, pops up a dialog
#   window with the given message.
#
class MessageOperator(bpy.types.Operator):
    bl_idname = "error.message"
    bl_label = "Message"
    type = StringProperty()
    message = StringProperty()

    def execute(self, context):
        self.report({'INFO'}, self.message)
        print(self.message)
        return {'FINISHED'}

    def invoke(self, context, event):
        wm = context.window_manager
        return wm.invoke_popup(self, width=400, height=200)

    def draw(self, context):
        self.layout.label("A message has arrived")
        row = self.layout.split(0.25)
        row.prop(self, "type")
        row.prop(self, "message")
        row = self.layout.split(0.80)
        row.label("")
        row.operator("error.ok")

#
#   The OK button in the error dialog
#
class OkOperator(bpy.types.Operator):
    bl_idname = "error.ok"
    bl_label = "OK"
    def execute(self, context):
        return {'FINISHED'}

#
#   Opens a file select dialog and starts scanning the selected file.
#
class ScanFileOperator(bpy.types.Operator):
    bl_idname = "error.scan_file"
    bl_label = "Scan file for return"
    filepath = bpy.props.StringProperty(subtype="FILE_PATH")

    def execute(self, context):
        scanFile(self.filepath)
        return {'FINISHED'}

    def invoke(self, context, event):
        context.window_manager.fileselect_add(self)
        return {'RUNNING_MODAL'}

#
#   Scan the file. If a line contains the word "return", invoke error
#   dialog and quit. If reached end of file, display another message.
#
def scanFile(filepath):
    fp = open(filepath, "rU")
    n = 1
    for line in fp:
        words = line.split()
        if "return" in words:
            bpy.ops.error.message('INVOKE_DEFAULT',
                type = "Error",
                message = 'Found "return" on line %d' % n)
            return
        n += 1
    fp.close()
    bpy.ops.error.message('INVOKE_DEFAULT',
        type = "Message",
        message = "No errors found in %d lines" % n)
    return

# Register classes and start scan automatically
bpy.utils.register_class(OkOperator)
bpy.utils.register_class(MessageOperator)
bpy.utils.register_class(ScanFileOperator)
bpy.ops.error.scan_file('INVOKE_DEFAULT')
目次
- 1 Interfaccia
- 1.1 Pannelli e pulsanti
- 1.2 Layout del pannello e altri argomenti
- 1.3 Pannello delle proprietà
- 1.4 Usare le proprietà della scena per memorizzare informazioni
- 1.5 Polling
- 1.6 Menù drop-down dinamici
- 1.7 Aggiungere un operatore a un menù
- 1.8 Un operatore modale
- 1.9 Invoke vs execute
- 1.10 Una finestra di dialogo popup
- 1.11 Una finestra di dialogo per gli errori
