「Dev:Ref/Requests/Editing2.6」の版間の差分
(相違点なし)
|
2014年9月27日 (土) 23:16時点における版
目次
- 1 Implement edge and face groups in addition to vertex groups
- 2 Add 3d cursor moves to the history (so that we can undo)
- 3 Per Scene Materials And Textures Filtering
- 4 Add World Axis Configuration
- 5 Add Default Units Option In User Preferences
- 6 Add Axis Selection on Simple Deform Modifier
- 7 Colorize Proportional Editing Selection
- 8 Improve "select similar" option
- 9 Bounding Box Transform Widget
- 10 Additional Transform Orientations - "Orient To" and "Point To Cursor"
- 11 Improved Layer Editor and Render Layers
- 12 Grouping for UV Editor
- 13 Multi-Island Transformation Enhancement for UV Editor
- 14 Invert Select Opertion Support in Outliner
- 15 Extrude along spline
- 16 Align to selected face normal
- 17 Rotate/Flip Background Image
- 18 Add/Move to Visible Layers
- 19 Manipulator Orientation - "Active"
- 20 Simple bezier curve editing improvement
- 21 Add some audio features
- 22 When Tab to Edit Mode, hide cameras and lamps
- 23 "WCS" work coordinate systems to save location and rotations to work from
- 24 Transform Widget Functionality Improvement
- 24.1 Repeat Last Command
- 24.2 Layer Name With pop-up window
- 24.3 3D Manipulator Widget in UV Editor Window
- 24.4 Smoothing Angle in 3D View
- 24.5 Text Annotator
- 24.6 Element Selection in Edit Mode
- 24.7 Batch Rendering for Multiple Cameras and Render Layers
- 24.8 Distributed Simulation Baking, "Baking Farm"
- 24.9 Object Modifiers Panel Improvements
- 24.10 Rotoscoping Improvements
- 24.11 Version Updates Notifier
- 25 Highlight Nearest Face,Line, or Vertex
- 26 Suggestion to modify the way the Vertex Group "Select" button functions in edit mode
Implement edge and face groups in addition to vertex groups
There should be support for named groups of edges and faces, not just vertices. The current vertex group controls could use the term "component groups", and the component types could be distinguished by icon.
Nemyax 14:16, 27 September 2014 (UTC)
Add 3d cursor moves to the history (so that we can undo)
Dear blender people, blender is great, but although I'm a beginner, there is something that annoys me and I believe it can be improved.
That thing is when you left click somewhere on the page, it moves the 3d cursor, but we are unable to undo it (without plugins), I find this frustrating, and don't see why I can't do that, what is so special about a 3d cursor move that I can't undo it ?
I was modeling a eye ball with an eye lid following a tutorial on youtube.
It turns out that it was required to have the 3d cursor at the same location for a few operations.
Switching from my browser to blender using the mouse, it was not rare that I accidentally
moved the 3d cursor, and then I was forced to start over again and again.
Not that the process was too long, but hopefully that gives the idea, and maybe helps understanding the little frustration that can come out of that missing native feature.
So, my feature request if I may is that cmd + z allows to undo a 3d cursor move as well as any other action.
--Ling talfi 2014-08-05
Per Scene Materials And Textures Filtering
Would be great to have a filter function, to show at the needs, only the materials and the textures relative to the current scene and even to a specific scene. Renderbob.
Add World Axis Configuration
The Unity 3D game engine uses a Y Up and Z Depth. Blender of course uses a Z Up and Y Depth axis. Though you can export the mesh with the axis modified, the skeleton rig is still not oriented correctly in Unity on import. This is presumably because the export option does not carry down through all the objects correctly. Converting the axis in the joints would potentially be problematic.
It makes more sense to allow the World Axis to be configured with alternative directions, so that all objects and transforms can be matched up with the expected destination software without issues.
Please add the ability to modify the scene's World Axis orientation and also provide a User Preference option for this setting.
--Omniface 2014-05-20
Add Default Units Option In User Preferences
Currently every new project requires that I go set the Units to Metric, so that it is in accordance with the Unity 3D Game Engine. It would be great to have the ability to save the default Unit selection in the User Preferences.
--Omniface 2014-05-20
Add Axis Selection on Simple Deform Modifier
The Simple Deform Modifier automatically selects the a single axis for the pivot, and deforms in a particular direction. If the object you need to deform is not already oriented in the proper directions, using this modifier is not very useful.
By adding a pivot axis selection and a direction axis selection, one could deform the object regardless of the original orientation.
3DS Max accomplishes this by supplying a "Direction" angle, and an "Bend Axis" to select. For example:
http://www.polygonblog.com/wp-content/uploads/2010/04/bending-plane.png
--Omniface 2014-05-20
Colorize Proportional Editing Selection
I'd like to have color on the Proportional Editing option like 3DS Max does with its Soft Selection feature here:
Providing a colorized feedback method can help visualize what the area of effect will be prior to having to start changing the transform of the selected vertices/edges/faces.
--Omniface 2014-05-20
Improve "select similar" option
i watched tutorials of creating twisted meshes in wings3d (e.g. http://www.youtube.com/watch?v=4eWB3KXBuUA) and i tried to recreate these models in blender. one of the most lack of blender for this is, that the "select similar" option is not as powerful/easy/intuitive to use as the "select identical" option in wings3d. or lets better say, blenders "select similar" option has no sub-option to select similar edges, if the selected template contains multiple edges e.g. an edge-loop, and you want to select similar loops (like in video at ~2:20). none of the given sub-options will fit to select similar edge loops. there are other lack in blenders "select similar" that is more easy to do in wings3d with "select identical". wings3d is also open source, so maybe it would be possible to adapt the best of wings3d in blender.
--beta-tester 2013-12-25
Bounding Box Transform Widget
It would be nice to have an option to have a bounding box transform widget (6 faces, 8 corners, similar to SketchUp) where dragging any one face or corner leaves the opposite face or corner fixed in space. Holding a modifier key can opt to mirror the scale about object geometric center, and another key could mirror about the object origin, while still allowing the choice of space reference transform (e.g., global, local, etc). Right now with all transforms principally mirrored about the object origin, I am forced to constantly move the origin from place to place before each direction-specific transform. Having this option will greatly speed my archviz modeling.
--Esaeo 20:46, 10 July 2013 (CEST)
Additional Transform Orientations - "Orient To" and "Point To Cursor"
All to often I find the current Transform Orientation options don't meet my modeling needs, because I need to move an object/face/vertex/edge along an axis that is based on a completely different object/face/vertex/edge.
With the ORIENT TO transform orientation the user would select an object or vertex group to reference, and the transform widget of your current selection would orient itself to match that of the opted object or vertex group's local or normal orientation.
With the POINT TO CURSOR transform orientation the user would position the cursor to wherever he/she wants the selected object's transform widget's Z-axis to point.
With these two new transform orientation options, it would be much easier and more accurate to do transforms relative to neighboring elements.
--Esaeo 20:46, 10 July 2013 (CEST)
Improved Layer Editor and Render Layers
Scene Layers Improvements:
Blender still needs a better scene layers manager, i think a good solution would be a dedicated tab in wich we could, add how many layers we want and name them, also each layer must have properties like, renderable, template, solo, lock.
Render Layers Improvements:
Each Render layer must have independent rendering settings, so we can have the freedom and the comfort to set up rendering for each render layer as we need. so in example: in a layer i need to render a seq. at a certain resolution and certain AA setting, in another one i could need to render a seq. with differents settings, i think this solution could be integrated even via node editor, simply creating a 'render settings node' that contains all the rendering panel options, this will be very comfortable,
Another very good improvement would be a batch rendering option, where we can render multiple output s simultaneously, with of course, independent render settings.
Also a good stuff will be an option, to play a sound and a script, when a rendering finish.
--Renderbob
Grouping for UV Editor
When UV mapping for games, one very often deals with overlapping UVs. As a game artist, having the ability to group selected UVs would shave at least 20% time off my UV mapping process, if not more. Currently the only way to select overlapped islands is to use combination of box and paint select each time one wants to select a different group of overlapped islands. Mirror modifier can help with this only when whole model is mirrored, but as soon as there are a few asymmetrical parts, which is quite often (character hair for example), mirror modifier has to be applied to merge all the objects before starting the process of manually tight packing UVs into 1:1 space. Ability to group UVs isn't some super advanced feature as the functionality already exists in mesh edit mode. It's a feature that should be prioritised as it would make Blender's UVmapper the best one out there. (Ps. "Angle Based" is the current default unwrapping method and the tooltip says it gives better results. In my experience with UV unwrapping (think 60+ models, "Conformal" nearly always gives better result, and should be changed to be the default one.)
--Eagleshadow 17:31, 3 May 2013 (CEST)
Multi-Island Transformation Enhancement for UV Editor
Very useful to adjuct distances between/among islands, by just scaling/rotating their "center point" and "individual point", but not change their initial shape.
Just quite similar to these features:
Now, UV editor just support three of them, which really needs improving.
--Leon Cheung 15:12, 15 February 2013 (CET)
Invert Select Opertion Support in Outliner
Probably a "Ctrl I" support which is the same operation in 3D View?
--Leon Cheung 15:02, 15 February 2013 (CET)
Extrude along spline
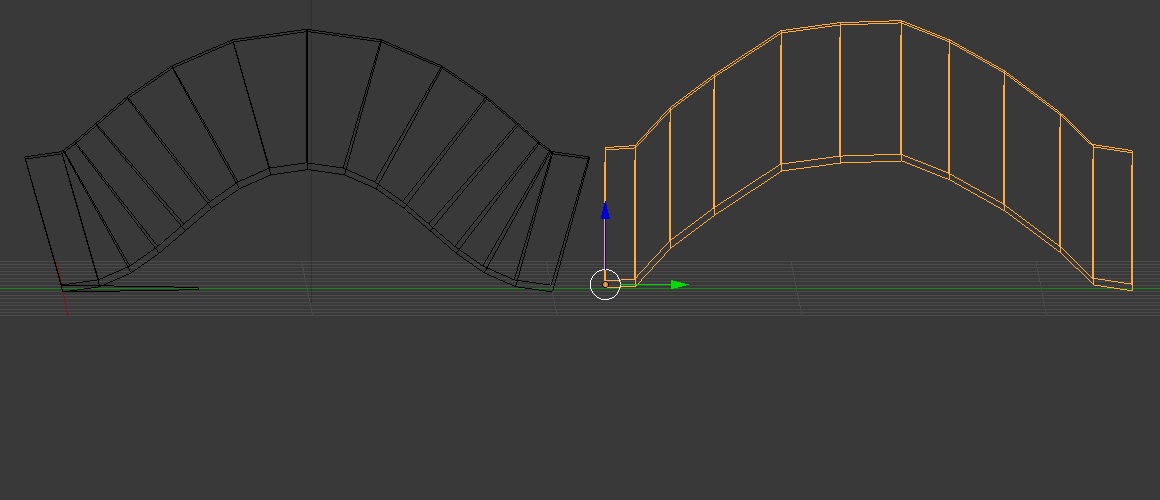
A really simple feature request. Currently when you extrude along a curve the cross sections are perpendicular to the tangent of the curve and there is no way to make them parallel(coplanar) with the bevel shape. The feature could be just a tick box that says something like "bendless" "extrude" or "parallel". This is mainly useful for topology control.
Glib Stepanenko - 11 January 2013
Align to selected face normal
In Edit Mode, it would be very useful to have an option when creating a new primitive to be able to "Align to selected face normal" (similar to "Align to view") in order to get perfect rotation of an object intended to be flush against a face at an odd angle. In edit mode, one would select a face, then use the Add menu to add a primitive. The object would then be created (ideally at the origin of the selected face) and in the options menu, an tick box would be present under the "Align to view" that would enable this feature, thereby aligning the rotation of the new primitive with the normal of the selected face. In theory, vertex normal could additionally be used.
Daniel Queen - 1 August 2012
Rotate/Flip Background Image
It would be extremely helpful to be able to flip and/or rotate the background image without having to bring it into an external editor first.
Sean Booth - 15 June 2012
Add/Move to Visible Layers
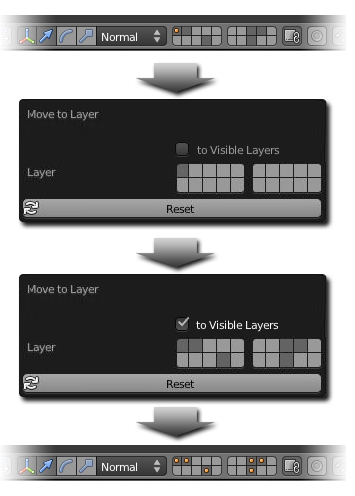
I hope below image can illustrate my idea clear enough.
This idea is for purpose of batch adding or batch moving to multiple visible layers, in order to save lots of "Shift-pressing" work. FYI.
--Leon Cheung 17:03, 10 March 2012 (CET)
Manipulator Orientation - "Active"
When the manipulator is set to "Normal", when two or more faces are selected it averages their normal direction. The "Active" setting would put the manipulator on the active face and align it to it's normal.
Here is how it would look like:
ファイル:Active manipulator orientation.jpg
It's similar to the "Element" setting in modo, which is extremely useful.
Simple bezier curve editing improvement
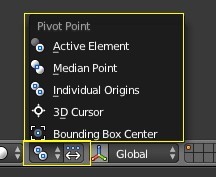
If, when editing a bezier, you rotate one or both of the end handles it would be nice if they rotate around the centre of that control point. This is obviously not suitable in '3d cursor' rotation pivot mode but perhaps in some/all of the other pivot modes. I suppose it is debatable what the appropriate behaviour is in this situation but the way I see it the centre of the 'active element' (perhaps median point too) in this situation is actually the middle handle/control point of the curve to which the selected handle belongs as handles are only there for the benefit of the user and not actually an element of the surface/curve. Besides rotate is currently completely useless on a curves end-handle so it may as well have some function and this is probably a commonly desired action.
Add some audio features
Like the Audaspace author (NexYon) was about to do, please add node-like sound editing and a simple score sequencer. ivano.arrighetta 13:49, 11 Novembre 2011 (GMT+1)
When Tab to Edit Mode, hide cameras and lamps
I want to have a feature that when I tabs to Edit Mode, all lamps and cameras (or selected ones) will be automatically hidden, so that I can concentrate on my edits and don't have to manually hide them. Thanks.
"WCS" work coordinate systems to save location and rotations to work from
It would be very helpful to be able to create and save user defined WCS (work coordinate systems). Each could be named and placed in a list. For example a user could select it from the list and the numpad orientations would work with it in edit mode only.
In this way a user could create a WCS for each hand. They could then easily rotate and change view orientations to edit and place bones relative to the WCS. They could also later return to the exact orientations they had used before. This is a common feature in CAD software and is very helpful in mechanical modeling also.
The WCS are shown large for clarity.
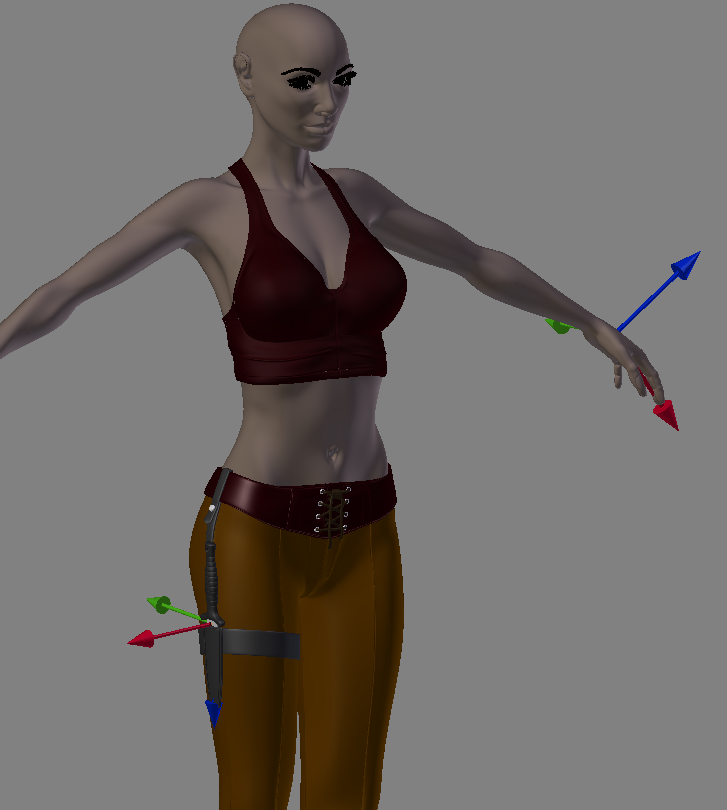
Thanks, Tim 17:37, 24 September 2011 (CEST)
Transform Widget Functionality Improvement
User Preferences option to use Maya-like transform widget functionality. Let users scale on all axis at once, or 2 axis via click dragging on the XYZ widget.
Repeat Last Command
Repeat last command or modifier used hotkey. There are usually repetitive tasks to perform, when a shortcut is not available for some tasks, would be useful to can repeat the last operation performed with a hotkey. In Maya this feature is available with the G and Y keys.
Renderbob
Layer Name With pop-up window
In most of cases, while working with layers, it's more comfortably to can name them.
My request is, or a new layer manager window, like in Maya or in alternative in the following way.
step 1: right click on a layer, in the pop-up menu there will be a Layer Name text field, here we can assign a name to that layer.
step 2: when we mouse over that layer (and others named) a little pop-up rectangle (like the pop-up help one)will appear, showing the layer name assigned.
To reduce the annoying popping-up every time we mouse over a named layer, it would be better to combine the holding of a key (like Alt or Shift) to show the pop-up layer name.
Renderbob
3D Manipulator Widget in UV Editor Window
Actually when manipulating uv's, the only way to transate, rotate and scale them is using the shortcut keys for transformations: G, R ,S. It would be very nice if will be introduced the manipulator widget also, to interact with more feeling with uv's transformations.
Renderbob
Smoothing Angle in 3D View
When selecting the smooth shading mode for a mesh, there's not a smoothing angle option to set how the smoothness will affects the faces, visible directly in 3D view. This feature is available in the Object Data Panel, but it affects only the rendering, well the same option for 3D view would be much appreciated. The Edge Split modifier do that, but i found that when applying it to a mesh, then the vertices are splitted, this become a problem when exporting the mesh to other formats or in general when continuing editing that mesh into blender itself.
Renderbob
Text Annotator
In most cases, when modeling a complex object or a complex scene, there is the need to assign some text annotation for an object and/or a material etc. Well, would be very useful to integrate in the properties panel, a Text Annotator, maybe called 'Notes' under the Object Tab and under the Material Tab, for first, but i think that it can be useful under the Scene Tab, the Rendering Tab and the Object Data also.
Renderbob
Element Selection in Edit Mode
The 'Element Select' in the Edit Mode menu, so one can choose directly from the edit mode menu a whole sub-mesh. (that feauture is already available in uv mapping mode, and is called islands) Another very imporant stuff would be the 'Smooth Angle Preservation' for joined meshes, in fact when joining meshes having different smoothing angles, these informations get lost and the result is a non uniform smoothed mesh.
Renderbob
Batch Rendering for Multiple Cameras and Render Layers
This feauture will help speed up the production process. In a Typical situation a scene needs various renderings from different points of view. So the way to do it is to place a camera for each view, then in the rendering phase, the user must manually select each camera and then starts the rendering, too much loss of time... I imagine that in the Rendering Panel, in the Output tab, on the top of the directory output, an 'add directory output' button, that let the user choose where to store another still image or animation rendered from another camera and maybe another render layer. In a few words, the user hits the 'add directory output', a new tab will appear with at least these options: 1.Add Camera 2.Select Render Layer (optional) 3.Choose Output Directory. 4.Mute Camera (Switch on/off this camera for rendering) Of course when multiple cameras are selected for rendering, it's necessary a 'Batch Render' Button that automate and distribute the rendering task for each camera. Obviously the 'Batch render' could share the rendering options, with the main rendering set up, and can even integrate an override function for more flexibility. With the 'per Camera' and 'per Layers' overrides, in example, the user can choose, individual rendering options for each output, like antialising etc.
Renderbob
Distributed Simulation Baking, "Baking Farm"
As for rendering, even for baking, a 'Baking Farm' or 'Ditributed Baking' feauture, can be a very useful stuff, for speeding up complex or huge simulations.
Renderbob
Object Modifiers Panel Improvements
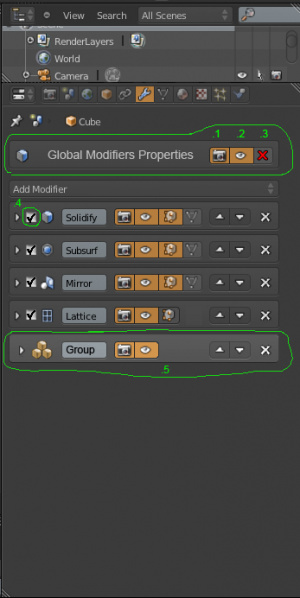
A series of improvements for the Object Modifiers Panel. 1: Restrict Rendering Visibility for all the modifiers in the object. 2: Restrict Viewport Visibility for all the modifiers in the object. 3: Delete all the Modifiers in the object. 4: Selection checkbox for the 'Group Modifiers' Function (Ctrl+G in the modifiers panel) 5: Group of Modifiers (a group can contain any number of modifiers)
Renderbob
Rotoscoping Improvements
Hi there, recently i've had to make a rotoscoping work in a video footage. Here are my suggestion to improve this feature using the rotobezier tool. Actually this feauture works only in manual mode, so for each relevant frame, the user have to manually adjust the curve vertices to match the position for the rotoscoped object/character. This is a big loss of time, and in complex scenes became a frustrating operation. My idea is to use the power of the tracking feautures, applied to the rotobezier tool. Exaclty, this must be like this: the curve vertices used by the rotobezioer tool, must became tracking points, so when the object/actor moves, then the curve tracking/points, keep on following it, exactly like tracking feauture does. For more accuracy, the spline can be setted up with high density of vertices and in linear mode (without handles) because with bezier curves driven by handles the auto rotoscoping could be inaccurate. Of course the auto rotoscoping feauture, have to set keyframes automatically for each movement of the tracking vertices. I hope this will be considered as a future development feauture, because is a very useful and cool stuff for blender artists. For an example of how it could works, take a look at the 'Rotobrush' (rotoscoping brush) feauture in Adobe After Effects CS5 and latest versions.
Renderbob
Version Updates Notifier
A tooltip that notifies new stable and (optional) beta release available.
Renderbob
Highlight Nearest Face,Line, or Vertex
faces, lines, and vertices highlight when the cursor is close enough to sellect them, as well as highlighting loops if Alt is pressed.
motomangp
Suggestion to modify the way the Vertex Group "Select" button functions in edit mode
If you create a mesh, for example a UV sphere, and add a vertex group, you can then go into Weight Paint mode and paint on the vertex group. However, vertex groups are set up in such a way that the "Select" button in the Vertex Groups section of the Object Data panel in Edit Mode will select *all* vertices in a group, regardless of their weight. This means that if you create an empty vertex group, go into Weight Paint mode, and paint on it with the weight set to "0.000," nothing will appear to change in Weight Paint mode, but clicking the aforementioned "Select" button in Edit Mode will select all the vertices with a weight of 0 and none of the vertices that are "not in" the group (where, in practice, these are almost always the same thing).
My suggestion, then, would be to make the "Select" button select all vertices in the group whose weight is greater than or equal to the current value of the "Weight" slider. This would allow for much greater control while editing, while still retaining the original functionality as an option (by setting the "Weight" slider to 0 and then clicking "Select"). This way, you could easily select all vertices that have a weight of at least, for example, 0.500.
WChargin
