「Extensions:2.6/Py/Scripts/Import-Export/MilkShape3D MS3D」の版間の差分
(→Installation) |
細 (1版 をインポートしました) |
(相違点なし)
| |
2018年6月29日 (金) 04:52時点における最新版
| UI location | File → Import-Export → MilkShape3D (.ms3d) | ||
|---|---|---|---|
| Usage | to import:
to export:
| ||
| Version | 2.72.2 | Author(s) | Alexander Nussbaumer |
| Blender | 2.72.2 | License | GPL |
| Category | Import-Export | Distribution | Release |
| Note(s) | this add-on is conform with v1.8.4 of MilkShape3D fileformat | ||
| File name | contained files:
|
|---|---|
| Current version download | add-on is included in blender 2.66 and newer or as separate files: http://git.blender.org/gitweb/gitweb.cgi/blender-addons.git/tree/HEAD:/io_scene_ms3d/ |
| Python modules | bmesh, bpy, bpy_extras, codecs, collections, io, math, mathutils, os, struct, sys, time |
目次
About
this add-on allows you to import ms3d files to Blender and export ms3d from Blender.
at import time, all properties of the ms3d model will be stored to separate MS3D-panels in blender to have nearly 100% control of the available raw data. same for export. the exporter will only respect the data, that are stored in these MS3D-panels, to have absolute control, what will be stored in output file. that gives you the chance to tweak the output to your purpose and have all the features of ms3d, that blender does not handle or handle in an other way. but that means, you have to fill these MS3D-panels with proper values by hand. if your exported model does not look like as expected, check your MS3D-panels - specially the "MS3D-Material" panel.
History
(Click here, to see full history in GIT)
Example Video
(Click here if the video controls do not embed, for you.)
Manual
Installation/Enable AddOn
- open add-on dialog tab
- to enable the add-on,
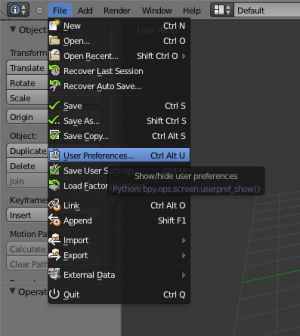
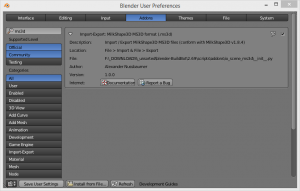
- go to "File → User Preferences → Addons", to open the "Addons"-tab of the "Blender User Preferences"-dialog.
- check if add-on is enabled
- check, if the add-on is already enabled in blender
- to do that, enable ALL "Supported Level" on the left, to ensure, that all add-on will be respected to search results. ("Official", "Community", "Testing")
- than, type in "ms3d" to the search box on the top left.
- enable/activate ms3d add-on
- now you should see the "MilkShape3D MS3D format (.ms3d)" add-on item in the list of the "Addons"-tab. to check the version of that add-on, you can enlarge the item to see the details, by clicking the tiny triangle on the left of the item. but the more important thing is to enable and activate the add-on. you have to check the check-box on the right upper side of that item.
- make add-on to default
- now the add-on should be installed and enabled. but if you close blender, at the next time the add-on is disabled again, as long as you does not save that state as blender default. to do that, click "Save as Default"-button on the bottom of the
- "Addons"-tab of the "Blender User Preferences"-dialog.
Import MS3D-file
the importer will place the imported model to the location of the 3D-cursor.
the model will be grouped - it contains a 3D-Empty, the Mesh-Object and the Armature-Object if it contains a bone-system and an animation. the Mesh-Object and the Armature-Object will have the 3D-Empty as parent.
- place 3D-cursor
- in the 3D-view, you have to place the 3D-cursor to the location, where the imported ms3d model will be placed
- open import dialog
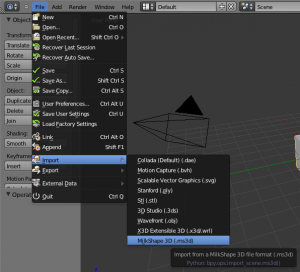
- go to "File → Import → MilkShape3D (.ms3d)".
- change options (optional)
- check, enable and select import options. (see import options)
- choose import file
- choose the ms3d file you want to import.
- start import
- click the "Import MS3D"-button. after few seconds, depending on the complexity of the imported model, you will see the imported model at the location of the 3D cursor in the 3D view.
- at the end of import process, there is a tiny overall import report on the "system console".
Import Options
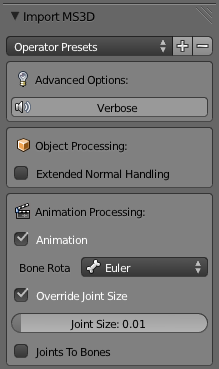
there are some options available to tweak the import process a bit
Advanced Options
- Verbose
- this option shows the content of the ms3d file to the "system console" during importing. all items and properties, that are parsed by the importer will be shown.
- note: that will very slow down the import process. on large models, the output buffer of the console should be big enough, otherwise you will only see the last parts of the output. you are be able to redirect the console output to a text file if you start blender with redirect standard output to text file - this can be handy to debug issues.
Object Processing
- Extended Normal Handling
- if enabled, additional vertices will be created, when vertices are at same location but has different normals.
- (in most cases it is not necessary to enable this option)
Animation Processing
- Animation
- if you want to import animation, enable that check-box (default). if you only need the geometry of the model, you can disable this option.
- Bone Rotation Mode
- here you have the choice of "Euler" and "Quaternion".
- "Euler" is the default settings, because this is the format as it is stored in the ms3d file as well. but euler animation has the issue of "gimbals-lock" problem, that means in special situations the animation between key-frames can rotate your model in an unexpected way. in blender you have an option to solve that, but this option is only available for "Euler" rotations.
- "Quaternion" the rotation does not have the "gimbals-lock" problem at design time - but because of the underlying format of ms3d rotation, you will import that "gimbals-lock" problem to your quaternion rotations as well.
- Override Joint Size
- if the joint representation in blender is too small or too big, you can enable this option, to override the size value. the size, stored in the ms3d file, will be than ignored.
- Joint Size
- the joint size, that will be used, instead of the value, stored in the ms3d file.
- Joints To Bones
- changes the length of the bones - maybe the bones will look better - use this only for bones created in blender from scratch! (where the joints are aligned along their bones).
Import via Script
bpy.ops.import_scene.ms3d(
        filepath="model.ms3d",
        verbose='NONE', # !!! v0.96: False (True/False); since v0.97: 'NONE' ('NONE'/'NORMAL'/'MAXIMAL')
        use_animation=True,
        rotation_mode='EULER',
        use_joint_size=False,
        joint_size=0.01,
        use_joint_to_bones=False,
        use_extended_normal_handling=False,
        #filename_ext=".ms3d",
        #filter_glob="*.ms3d"
        )
Export MS3D-file
the exporter will export the active_object.
the exporter respects only the values of the MS3D-Panels - important specially for the MS3D-Material.
if the model has an armature modifier, it will be taken, for exporting bone system and animation.
- select mesh object
- the exporter will export only the active mesh object.
- select the mesh object you want to export in the 3D-view or in the outliner.
- be sure that the object you want to export is selected as the active object.
- open export dialog
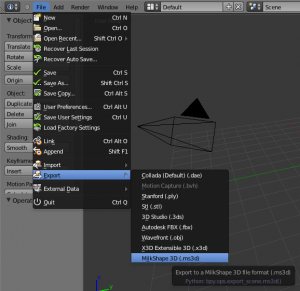
- go to "File → Export → MilkShape3D (.ms3d)".
- if that export option is disabled, check your selection.
- change options (optional)
- check, enable and select export options. (see export options)
- choose export file
- choose the ms3d file name you want to export to.
- be careful, the exporter will override existing files without any warning.
- start export
- click the "Export MS3D"-button. after few seconds, depending on the complexity of the model to be export, you will jump back to the normal view to blender.
- at the end of export process, there is a tiny overall export report on the "system console".
Export Options
there are some options available to tweak the export process a bit
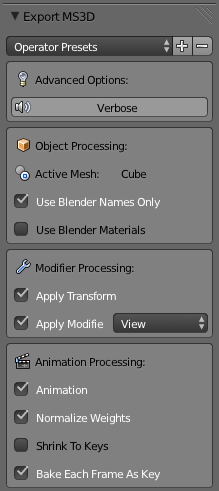
Advanced Options
- Verbose
- this option shows the content of the ms3d file to the "system console" during exporting. all items and properties, that are stored by the exporter will be shown.
- note: that will very slow down the export process. on large models, the output buffer of the console should be big enough, otherwise you will only see the last parts of the output. you are be able to redirect the console output to a text file if you start blender with redirect standard output to text file - this can be handy to debug issues.
Object Processing
- Use Blender Names Only
- if enabled, names of ms3d panels are ignored. (names of bones will always be taken from blender, to ensure consistent)
- Use Blender Materials
- if enabled, on export the blender material definition will be taken - otherwise only the ms3d-material properties are used.
- (you will loose the more precise information of ms3d material panel, if you enable that option)
Modifier Processing
- Apply Transform
- if enabled, applies location, rotation and scale to the mesh on export (non destructive)
- Apply Modifier
- if enabled, applies modifiers to the mesh on export (non destructive)
- in case of Animation on Animation Processing panel is enabled, armature modifiers will not be applied to the model geometry to not malformed the animation.
- View
- takes and applies modifiers, that are visible for view (preview)
- Render
- takes and applies modifiers, that are visible for render
Animation Processing
- Animation
- if you want to export animation, enable that check-box (default). if you only need the geometry for the model, you can disable this option.
- Normalize Weights
- if enabled, all vertex weights in a vertex-group will be normalize to 100%.
- Shrink To Keys
- if enabled, the animation will shrink to region from first available keyframe to last available keyframe.
- (handy when exporting animations from NLA-tracks with more strips, where some strips are muted)
- Bake Each Frame As Key
- if enabled, the exporter will generate a key at each frame.
- if disabled, the exporter will take only the keyframes.
Note
MilkShape3D can handle only up to 3 weights per vertex!
in case of more defined weights in blender, the exporter will skip the less weighty weights |
Export via Script
bpy.ops.export_scene.ms3d(
        filepath="model.ms3d",
        verbose='NONE', # !!! v0.96: False (True/False); since v0.97: 'NONE' ('NONE'/'NORMAL'/'MAXIMAL')
        use_blender_names=True,
        use_blender_materials=False,
        apply_transform=True,
        apply_modifiers=True,
        apply_modifiers_mode='PREVIEW',
        use_animation=True,
        normalize_weights=True,
        shrink_to_keys=False,
        bake_each_frame=True,
        #check_existing=False,
        #filename_ext=".ms3d",
        #filter_glob="*.ms3d",
        )
MS3D - Panels in Blender
to have full control over the details of ms3d file features, the add-on provide custom properties and expose them on the MS3D-Panels to have access to the raw data.
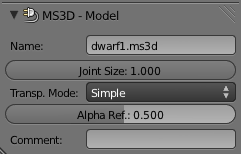
MS3D - Model
this panel is on the mesh object property panel. all properties on that panel are only for ms3d. they do not correspond or interact with any blender property.
- Name
- is the name of the imported model file.
- it does not correspond or interact with any blender property.
- this property is ignored by the exporter.
- Joint Size
- is the joint size of the imported model.
- it does not correspond or interact with any blender property.
- its value will be exported as it is.
- Transparency Mode
- is the mode, how MilkShape3D will handle transparency of texture images.
- it does not correspond or interact with any blender property.
- its value will be exported as it is.
- Alpha Ref.
- is the value, how MilkShape3D will handle alpha channel of texture images.
- it does not correspond or interact with any blender property.
- its value will be exported as it is.
- Comment
- is the comment of the model. each model can have a comment.
- it does not correspond or interact with any blender property.
- its value will be exported as it is. if it is empty, it will be not exported.
MS3D - Material
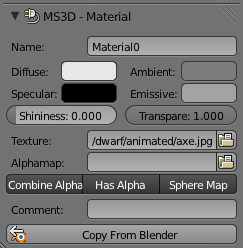
this panel is on the mesh material property panel. if you create a model from scratch, use only this ms3d material panel to work with material. the exporter will ignore blender material properties.
- Name
- is the original name of the imported material of model.
- it does not interact with blender property.
- if it is empty, the exporter will take the blender name of the material.
- Diffuse
- is the RGBA value if the diffuse of the ms3d material.
- this property will interact in one way to blender diffuse color. it will copy the RGB values to blender diffuse each time you change this ms3d diffuse. (only in this way, in the opposite way it is not working - so it is better you use only the ms3d material panel to change that value, to keep in sync)
- its value will be exported as it is.
- Ambient
- is the RGBA value if the ambient of the ms3d material.
- it does not interact with any blender property.
- its value will be exported as it is.
- Specular
- is the RGBA value if the specular of the ms3d material.
- this property will interact in one way to blender diffuse color. it will copy the RGB values to blender specular each time you change this ms3d specular. (only in this way, in the opposite way it is not working - so it is better you use only the ms3d material panel to change that value, to keep in sync)
- its value will be exported as it is.
- Emissive
- is the RGBA value if the emissive of the ms3d material.
- this property will interact in one way to blender emit value. it will copy the average of the RGBA values to blender emit each time you change this ms3d emissive. (only in this way, in the opposite way it is not working - so it is better you use only the ms3d material panel to change that value, to keep in sync)
- its value will be exported as it is.
- Shininess
- this property will interact in one way to blender shininess property. it will copy the double of value to blender shininess each time you change this ms3d shininess. (only in this way, in the opposite way it is not working - so it is better you use only the ms3d material panel to change that value, to keep in sync)
- its value will be exported as it is.
- Transparency
- this property will interact in one way to blender alpha property. it will copy the double of value to blender alpha each time you change this ms3d transparency. (only in this way, in the opposite way it is not working - so it is better you use only the ms3d material panel to change that value, to keep in sync)
- its value will be exported as it is.
- Texture
- is the file name of the material texture image.
- it does not interact with any blender property.
- its value will be exported as it is.
- Alphamap
- is the file name of the material alpha map image.
- it does not interact with any blender property.
- its value will be exported as it is.
- Flags
- here are some known flags available you can enable or disable.
- it does not correspond or interact with any blender property.
- its value will be exported as it is.
- Comment
- is the comment of the ms3d material. each ms3d material can have a comment.
- it does not correspond or interact with any blender property.
- its value will be exported as it is. if it is empty, it will be not exported.
- Copy From Blender
- by pressing this button, you will be able to copy properties of blender material to MS3d - Material Panel
- (MS3D- and Blender- properties differs in some details - see also Export option 'Use Blender Materials')
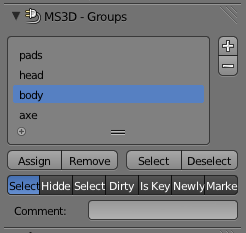
MS3D - Groups
this panel is on the mesh data property panel.
it is only enabled during edit mode of the mesh, when face selection mode is selected.
in MilkShape3D you have to create groups, to be able to assign materials to faces. one group can be assigned to only one material.
you can put faces to groups.
in blender it is not necessary to define ms3d groups. the exporter will automatically define groups corresponding on the face material. but if you need control about the naming of the groups, you have to assign faces to ms3d groups. the material to that a group will be assigned to will be automatically figured out by the contained faces - if you accidentally put faces with different materials to one group, the exporter will generate additional groups for these materials. those automatically groups will have a comment to display the reason of its existence.
the handling of creating, assigning and selecting is very similar to the blender internal vertex groups.
- Flags
- there are some known flags available you can enable or disable.
- it does not correspond or interact with any blender property.
- its value will be exported as it is.
- Comment
- is the comment of the ms3d group. each ms3d group can have a comment.
- it does not correspond or interact with any blender property.
- its value will be exported as it is. if it is empty, it will be not exported.
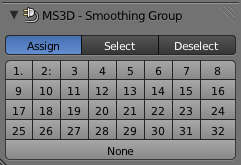
MS3D - Smoothing Group
this panel is on the mesh data property panel.
it is only enabled during edit mode of the mesh, when face selection mode is selected.
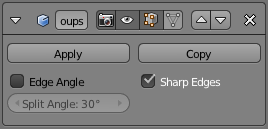
in MilkShape3D it is possible to define smoothing groups to split a contiguous area of faces into different smoothing groups. blender does not have this feature in a direct way. the add-on will adapt that feature by combining an edge-split modifier with sharpen edges around the defined area. at design time, if the model does not have that modifier already, the add-on will add it automatically as soon you assign faces to a smoothing group, by using this panel. the add-on also changes the visibility of sharpen edges in the 3D-view.
do not rename that automatically added edge-split modifier or the add-on will add a new one each time you assign faces to smoothing groups.
the edge-split modifier itself is not used by the exporter - it exists only to make smoothing groups more visible to the user.
for orientation purpose you will see on some buttons of smoothing groups one ('.') or two (':') dots behind the smoothing group number.
- '.' means, this smoothing group has faces assigned to it.
- ':' means, this smoothing group is in the current face selection.
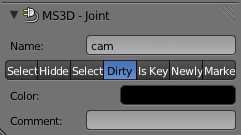
MS3D - Joint
this panel is on the armature bone property panel.
each bone in blender represents a joint for MilkShape3D.
the vertices and its weights will be stored (at import time) and taken (at export time) to/from the blender vertex groups and its blender vertex weights .
the exporter can handle up to 3 different weights per vertex, in case a vertex is influenced by more than one bone.
Note
MilkShape3D can handle only up to 3 weights per vertex!
in case of more defined weights in blender, the exporter will skip the less weighty weights |
- Name
- is the original name of the imported joint of model.
- warning: the names of the ms3d joints are very important to define the relationship between the joins (who is parent of). if you create a model from scratch, it is better to leave this property empty. than the exporter will take the bone names of blender - these will do the same job and will guaranty the consistence of bone relationship.
- it does not interact with blender property.
- Flags
- here are some known flags available you can enable or disable.
- it does not correspond or interact with any blender property.
- its value will be exported as it is.
- Color
- in MilkShape3D you can define a color to each joint.
- it does not correspond or interact with any blender property.
- its value will be exported as it is.
- Comment
- is the comment of the ms3d joint. each ms3d joint can have a comment.
- it does not correspond or interact with any blender property.
- its value will be exported as it is. if it is empty, it will be not exported.
Additional Information
Implemented Features
Importer / Exporter
| MS3D Data | MS3D Nested Data | Blender Equivalent | Import | Export |
| .vertices | ||||
| .vertex: | Mesh Vertex | done |
done
| |
| .bone_id: | Vertex Group | done |
done
| |
| .reference_count: | Mesh Face | done |
done
| |
| .flags: | on hold |
on hold
| ||
| .bone_ids: | Vertex Weight | done |
done
| |
| .weights: | Vertex Weight | done |
done
| |
| .extra: | (not exposed to UI) | done |
done
| |
| .triangles | ||||
| .vertex_indices: | Mesh Face | done |
done
| |
| .vertex_normals: | Mesh Vertex | done |
done
| |
| .s: | Mesh UV | done |
done
| |
| .t: | Mesh UV | done |
done
| |
| .group_index: | Mesh Layer, MS3D-Groups | done |
done
| |
| .smoothing_group: | Mesh Layer, MS3D-Smoothing Group | done |
done
| |
| .flags: | on hold |
on hold
| ||
| .groups | ||||
| .name: | MS3D-Groups | done |
done
| |
| .triangle_indices: | Mesh Face | done |
done
| |
| .material_index: | Mesh Face | done |
done
| |
| .flags: | MS3D-Groups | done |
done
| |
| .comment: | MS3D-Groups | done |
done
| |
| .materials | ||||
| .name: | Material, MS3D-Material | done |
done
| |
| .ambient: | Material, MS3D-Material | done |
done
| |
| .diffuse: | Material, MS3D-Material | done |
done
| |
| .specular: | Material, MS3D-Material | done |
done
| |
| .emissive: | Material, MS3D-Material | done |
done
| |
| .shininess: | Material, MS3D-Material | done |
done
| |
| .transparency: | Material, MS3D-Material | done |
done
| |
| .mode: | MS3D-Material | done |
done
| |
| .texture: | Material, MS3D-Material | done |
done
| |
| .alphamap: | MS3D-Material | done |
done
| |
| .comment: | MS3D-Material | done |
done
| |
| .joints | ||||
| .name: | Bone, MS3D-Joints | done |
done
| |
| .parent_name: | Bone, MS3D-Joints | done |
done
| |
| .rotation: | Bone | done |
done
| |
| .position: | Bone | done |
done
| |
| .rotation_keyframes: | Armature | done |
done
| |
| .translation_keyframes: | Armature | done |
done
| |
| .color: | MS3D-Joints | done |
done
| |
| .comment: | MS3D-Joints | done |
done
| |
| .animation_fps | Scene | done |
done
| |
| .current_time | Scene | done |
done
| |
| .number_total_frames | Scene | done |
done
| |
| .comment | MS3D-Model | done |
done
| |
| .joint_size | MS3D-Model | done |
done
| |
| .transparency_mode | MS3D-Model | done |
done
| |
| .alpha_ref | MS3D-Model | done |
done
|
--Beta-tester 12:07, 12 July 2012 (CEST)
