「Extensions:2.6/Py/Scripts/System/Addon Registry」の版間の差分
(Interface image + root certificates + update all button) |
細 (1版 をインポートしました) |
(相違点なし)
| |
2018年6月29日 (金) 06:12時点における最新版
| UI location | User Preferences > Addons | ||
|---|---|---|---|
| Usage | Install new addons in one click | ||
| Version | 0.1.2 | Author(s) | Jonathan Giroux (Bloutiouf) |
| Blender | >= 2.70 | License | MIT License |
| Category | System | Distribution | Extern |
| File name | addon_repository.py |
|---|---|
| Current version download | Latest version on Github |
| Links | Github |
|---|
目次
[非表示]
Installation
Addon
- Download the file https://raw.githubusercontent.com/Bloutiouf/blender-addon-registry/master/addon_registry.py
- In Blender, go to File > User preferences... (Ctrl+Alt+U)
- Click on Addons at the top
- Click on Install from File... at the bottom
- Select the file you have just downloaded and click on Install from File... at the upper right corner
- Enable the addon by ticking the rightmost box
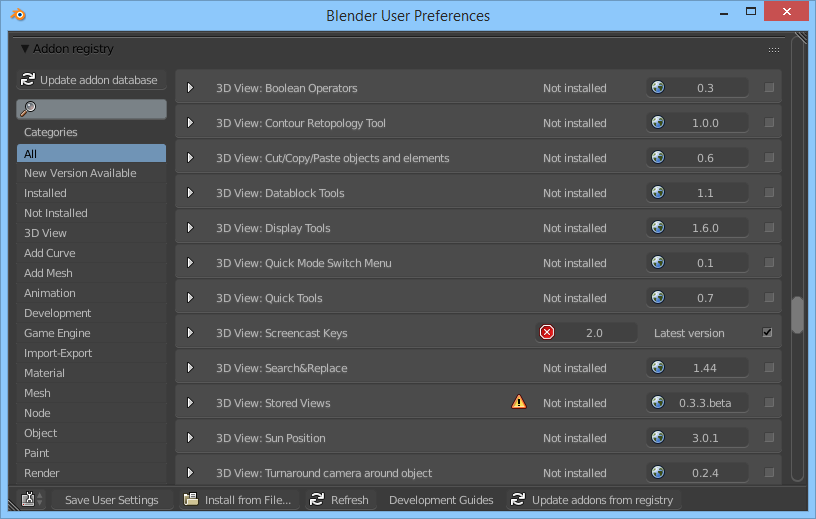
The addon registry now appears below the regular addon panel. Just scroll down!
Root certificates
Python in Blender does not ship with root certificates, which is unfortunate because the registry is served over HTTPS. Without these certificates, connection errors will show up.
- Download the cacerts from https://github.com/jcgregorio/httplib2/tree/master/python3/httplib2
- Rename the file to cacert.pem and move it into
Blender installation path /VERSION/python/lib/site-packages/requests
No need to restart Blender.
Usage
The panel is very similar to the regular addon panel. It displays addons and their information that are recorded in the registry.
The button ![]() version displays the latest version available, if the addon is not installed or is not up-to-date. Click on it to download and install the addon.
version displays the latest version available, if the addon is not installed or is not up-to-date. Click on it to download and install the addon.
The button ![]() version displays the installed version available, if any. Click on it to remove the addon.
version displays the installed version available, if any. Click on it to remove the addon.
Addons may be bundled together in the same archive file, i.e. they will be installed together. In this case, the icon ![]() appears, and the bundled addons are shown when you expand the addon box.
appears, and the bundled addons are shown when you expand the addon box.
Once installed, the addons appear in the regular addon panel as well. They can be enabled or disabled from both panels.
On the lower right corner, the button ![]() Update addons from registry updates the addon database, then updates all addons that have a newer available version.
Update addons from registry updates the addon database, then updates all addons that have a newer available version.
Installation directory
Addons are installed in scripts/addons_extern, meaning that they will appear in the category ![]() Testing. This is to remind you that they may harm your computer.
Testing. This is to remind you that they may harm your computer.
Updating an addon which was installed in scripts/addons or scripts/addons_contrib also moves it to scripts/addons_extern.
- Windows 7: C:\Users\USERNAME\AppData\Roaming\Blender Foundation\Blender\VERSION\scripts\addons_extern
- Windows XP: C:\Documents and Settings\USERNAME\Application Data\Blender Foundation\Blender\VERSION\scripts\addons_extern
- Mac OS X: /Applications/blender.app/Contents/MacOS/VERSION/scripts/addons_extern
- Linux: /home/USERNAME/.config/blender/VERSION/scripts/addons_extern
7-Zip
By default, only the zip archives can be extracted. By installing 7-Zip or one of its ports, all common formats are recognized.
Windows
- Download and install 7-Zip: http://www.7-zip.org/download.html
- Add 7-Zip's installation path to your PATH: http://www.computerhope.com/issues/ch000549.htm
Mac OS X
Not tested, please send me feedback!
- Download and install Keka 1.0.5: http://www.kekaosx.com/
- Add an
alias 7z="/Applications/Keka.app/Contents/Resources/keka7z"by following this guide: http://computers.tutsplus.com/tutorials/speed-up-your-terminal-workflow-with-command-aliases-and-profile--mac-30515
Linux
Not tested, please send me feedback!
Chances are that p7zip is available in your package manager. Otherwise:
- Download and install p7zip: http://sourceforge.net/projects/p7zip/files/
- You use Linux, you don't need any installation advice
Publishing addons to the registry
If you want to add, update, or remove an addon on the registry, or for anything else, please create an issue.
This project is experimental. Maybe one day, the Blender team will integrate this into their main branch and free Blender users from years of using an outdated addon system. Therefore, I haven't bother to make a real publication system with a web interface. When they will integrate it, we'll discuss about such a system.
The addon database is actually a regular file served from GitHub, that I handle with a custom CLI tool explained below.
Private registry
You may want to create a private registry, for instance inside your company to serve private addons. You can!
Blender side
The addon tries to load the configuration file .addon_registry from the scripts/addons directory (not scripts/addons_extern). This is a regular JSON file. The default value is at the bottom of addon_registry.py.
It is not recommended to edit addon_registry.py as it can be updated as well.
Bundle addon_registry.py and .addon_registry together into a zip file that you will give to your colleagues. They have to install this zip using the procedure described at the top of this document. They will then have access to your private registry.
Registry side
git clone https://github.com/Bloutiouf/blender-addon-registry.git
cd blender-addon-registry
The database is a regular JSON file. Its URL or file path (e.g. network drive) is given in .addon_registry.
CLI commands manage the database. The tool is written in Node.js, so you need to install it.
If you are behind a corporate proxy, you will have to configure the proxies. Set the environment variables HTTP_PROXY and HTTPS_PROXY, and configure npm:
npm config set proxy http://10.10.1.10:3128
npm config set https-proxy http://10.10.1.10:1080
Then installed the dependencies:
npm install
The tool is called with node . command args.... You can:
add url|path ...
list
remove name ...
The Node.js module exports the corresponding functions, although I don't know why you would use it:
exports.addons
exports.add(url, [options], callback)
exports.list([options], callback)
exports.remove(name, [options], callback)
License
Copyright (c) 2014 Bloutiouf aka Jonathan Giroux
