利用者:Benjycook/GSOC/Manual
目次
User Manual
Motion Capture Addon
GSoC 2011 Project - Benjy Cook
Introduction
The Motion Capture Tools add-on, as it's name suggests, has many varied and different tools for the artist who wants to work with motion capture data. At the heart of the system, is the retargeting tool, which allows artists to transfer animations from the imported mocap armature to their own rig. In addition, there are tools for stitching 2 animations together, converting heavily sampled fcurves to beziers, detecting loops in an animation, having the animation follow a path, and more.
The suggested workflow
- Import -> Fix Axis, Rescale or Clean Noise
- Define hierarchy -> Define special "feet" bones -> Retarget
- Apply Post-Retarget Fixes -> Use extra tools
Preprocessing
Importing
The addon does not directly deal with importing of motion capture data. There are a few other addons that deal with this, such as the BVH and C3D import addons. There are various tools outside of Blender that can help create or modify motion capture data, such as BVH Hacker and Brekel, which creates BVH files from Microsoft's Kinect (R). As a general rule, retargeting and the other tools can accept any Blender armature whose bones are animated.
Fix Axis
Often, especially with BVH files, the armature imports in such a way that it is pointing towards the wrong axis. This is because that some 3d pacakges use the Z axis as the "forward" axis, while Blender uses the Y axis. This button will correct this issue by rotating the armature to the correct way.
Rescale
For convience, when both armatures are selected, this button scales the performer object down to roughly the size of the end user rig. This is recommended for retargeting, mainly because it makes defining hiearchies easier, because you can see both armatures clearly in the 3d window.
Clean Noise
While many motion capture systems perform a denoising operation on the data before exporting it to a file, some noise may remain. This noise is often charachterized by "bad frames" or jumps, where the armature suddenly "goes crazy" for a frame or two. This button cleans this type of "impulse" noise without effecting the "good" parts of the animation too much. You can use this operation repeatedly, but more than once or twice is not recommended, because it might start effecting the rest of the animation.
Limit DOF’s (Degree of Freedom)
This operator analyzes the range of motion of the performer armature (i.e. the max/min rotations of each bones) and applies matching constraints to the end user armature. If you plan to use IK, for example, you can use this to leverage the information regarding the subject to prevent impossible or visually disturbing poses. It is particularly useful to do this when you plan to retarget an entire mocap session - most libraries/session files contain a “range of motion” clip where the actor was stretching or the markers were being calibrated. Thus you can do this once, and enjoy knowing physically impossible poses cannot be posed in the armature. There is also a “remove DOF constraints” operator, which does as its name indicates.
Retargeting
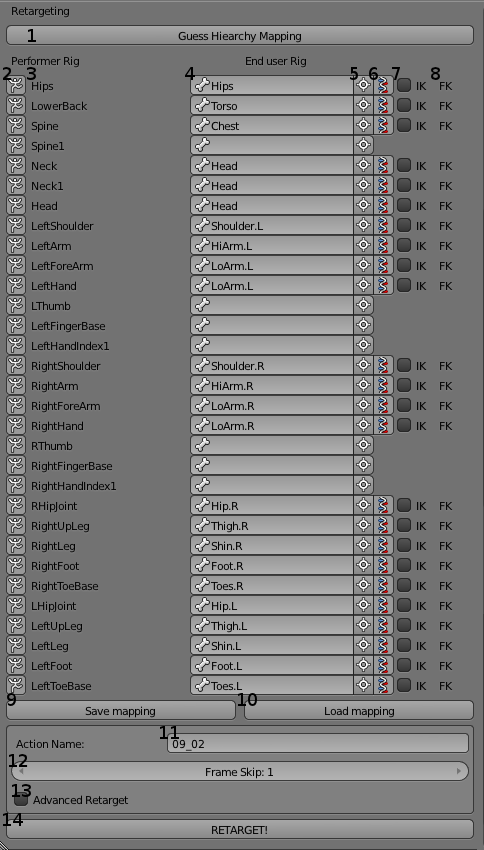
- Guess Hierarchy Mapping
- Mark this bone as a "foot" bone
- Name of Performer bone
- Auto search field for End User bones
- Fill in the field with the currently selected End User bone
- Fix deformation twist
- Auto-create IK chain, with this bone as the final bone in the chain
- IK status of this bone
- Save mapping to End User armature
- Load mapping from previously saved settings
- Desired action/NLA tracks Name
- Frame Skip, step amount to use for faster retargeting
- Advanced Retargeting Mode
- Retarget!
Define Hierarchy
The first step of retargeting. The system needs to know the relation between the two armatures; that is, which bones correspond to which in each armature. It is highly recommended to turn on the "Names" display option in the Armature settings window. There are a few ways to do this:
- Use the "auto-guess" [1] feature: If the armatures are similar (or even identical), then this feature can guess the hierarchy mapping, at least partially. If you use it, it's a good idea to take a look at the results to ensure it performed correctly.
- Manual mapping
- Manually select the bones. Once the armatures are selected, the UI opens up a list of all the bones in the Performer armature. Next to each of these bones is the "Select" button [5], which sets the mapping to that performer bone to the currently selected bone in the end user skeleton (while in Pose/Edit modes).
- Type the bone. [6] You can also simply type in the first few letters or the whole name of the end user bone you wish to set for the performer bone (uses Blender's UI "Property Search"/Autocomplete feature).
It is possible to create One-To-One or Many-To-One mappings. For example, you can retarget the shoulder bone to the other shoulder bone, and also retarget the shoulder bone to both the shoulder and the forearm, if you wish. This is useful, because often motion capture armatures have more bones than end user rigs (i.e. 3 neck bones instead of 1).
If you are unhappy with the retarget, the first step is to check the hierarchy mapping. With the complex names that rigs often have, it is easy to make a mistake. Also, it might be a good idea to try a slightly different configuration.
"Special" bones
Some bones need to be marked in a different way from the rest, for certain features in the retargeting to work well. Retargeting without marking these will still work, but it will be harder to modify and the translation in space won't be copied over.
"Feet" bones
In order to copy over the movement of the entire armature/root bone present in the performer, the system needs to know which bones are the "feet". What is a foot bone? Any bone that is planted on the floor when the armature moves forward. Usually this is a foot bone (hence the name), but occsionally, it can be other limbs (i.e. crawling or handstand animations, hence the quotation marks). Without marking at least one of these (but 2 is better, e.g. Left Foot and Right Foot), the location movement will not be retargeted. If you marked these bones [2], the retargeted animation should have minimal footskate (see Note). However, if the original animation contains foot skate, it won't fix this (You can do this in the next phase of retargeting). If you see a noticable amount of footskate that wasn't on the performer, try marking different bones (like the toe bones, or maybe both the feet and the toes).
A word on foot skate
TODO
|
Twisted bones
(Not available for Advanced Retargeting)
Motion capture files can come from a variety of sources, and each end user rig is different. Sometimes, after retargeting, the armature will look good, but when you look at the associated deformed mesh, you see "twists" in the armature. Marking this [6] for bones that display the behavior will fix the issue, but you will need to retarget again.
IK
(Not available for Advanced Retargeting)
If you mapped a performer bone to an enduser bone that is part of an IK chain, you'll notice that it recieves the label "In an IK Chain". If it's the bone that has the IK constraint (i.e the last bone in the chain) it will get the label "IK" [8]. If you wish to add IK to an FK rig, you can just mark the IK check box [7], and it will add a chain up to the root, excluding. Only bones marked by "IK" can benefit from the full range of Post-Retarget Fixes.
Retargeting
Before Retargeting, it's recommended you press "Save Mapping" [9] and save the blend file so you don't lose all your hard work mapping! Also, if you import another performer animation from the same motion capture session, you can press "Load Mapping" [10] and it will reload the mappings you saved. Some rigs are very complex - Sintel, Mancandy, Rigify, etc. They contain multiple bone layers, constraints and drivers. If your end user rig is like this, the retarget button will automatically mark "Advanced Retargeting" [13], which is a slightly different process than regular retargeting. In addition, you can choose a "step" [12] value for the retargeting. This is identical to the step value in rendering, meaning that instead of retargeting every frame in the animation, you can "skip" frames. A value of 2 will skip "every other one", a value of 3 will retarget every 3rd frame, etc. This is very useful if you want to quickly preview a retarget, as it considerably speeds up the retargeting process while giving the user a decent idea of the final result, even at values such as 5 or 10. There is also a Name field [11], allowing you to give a chosen name to the retargeted animation. The system will use this name to create the associated actions, etc. If you're not using "Advanced Retargeting", you can just press retarget [14] and watch the magic happen. If Advanced Retargeting is marked, there is a little bit more work left to do.
Advanced Retargeting
When Advanced Retargeting gets marked, rotation and location constraints are created on the end user bones, with the targets set according to the mapping. Thus, you get immediate feedback regarding how the retarget will look. Usually, something will "be off" and not look right. The best way to fix this is to change the settings on the constraints. The first thing you should try is changing the target and owner space settings in the constraint. For both "World" is set as a default, but often "Local" or "Local with Parent" performs better. Each retarget is different in this respect, so their are no real tips for this process. Sometimes setting an invert, or unchecking some axis' helps as well. When you are pleased with the look, press Retarget [14] and the constraints will be baked and removed.
A word on stride_bone
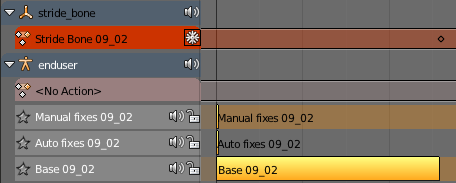
When retargeting, the root’s bone displacement (i.e. movement in the world) is transfered to a new empty object, called stride_bone. This is useful for future operations, use in the Game Engine, etc. If you do not want to use the stride_bone, you may want to copy the fcurves from it onto the armature’s root. Know however, that this will break such advanced tools as animation stitching and path editing.
|
A word on the NLA system
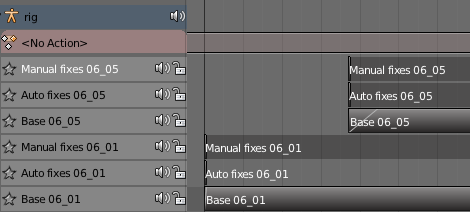
Once you retarget an animation, 3 NLA tracks are created for the end user armature, linked to 3 actions. The bottom one is “Base Mocap”, which contains the retargeted animation. The middle one is “Auto Fixes”, which contains the post-retarget fixes after they have been baked. The top one contains the “Manual Fix” track. This is a very useful track. Its blend mode is set to “Add” which means that any keyframing done on this action is applied in addition to the lower layers. For example, if after the retarget, the user’s arms are more to the side than normal for that charachter, you can simply keyframe a small rotation to the shoulder bones, without losing the keyframes the shoulders have from the retarget. Simply enter Tweak mode on the Manual Fixes strip (with Tab, with the strip selected), and insert “visual” keyframes. If you wish to use some of the more advanced post-retarget features, such as fixes or animation stitching, it is recommened not to change the NLA strip/track settings. Once you are done (or if you’re not interested to begin with), simply use the NLA Bake Operator (Spacebar while mousing over the NLA window, and search for it). This will bake the entire strip to a single action. |
Post-Retargeting
Post-Retarget Fixes
If some of your bones have IK constraints (and your rig is relatively simple), you can use the Post-Retarget Fixes. These allow you to modify the animation at a high level, fixing some issues that retargets suffer from. There are four types:
- Distance
- Maintain Position
- Maintain Position at frame (Freeze)
- Stay Above (Floor)
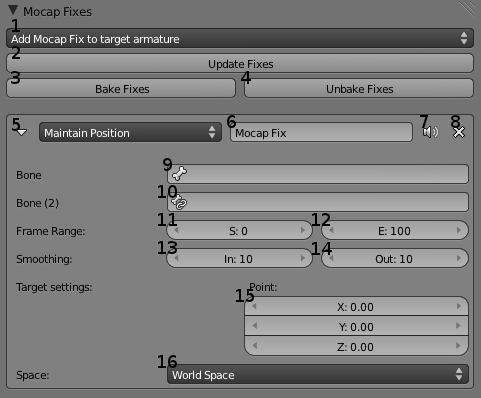
- Add a new Fix
- Update Fixes
- Bake Fixes to relevant NLA track
- Unbake Fixes and reactivate them for modification
- Type of Fix
- Name of Fix
- Active/Mute the Fix. Fixes get toggled by baking/unbaking automatically.
- Delete the Fix
- Target Bone
- Secondary target bone (Distance and Maintain Position Fixes)
- Frame where Fix starts
- Frame where Fix ends
- Amount of frames to smooth into the Fix ("Fade in")
- Amount of frames to smooth out of the Fix ("Fade out")
- Target settings (for Maintain Position constraint)
- Space/Axis system of Fix
Settings for all types
- Name
- Pretty self explanatory...
- Active
- Use this to deactivate/activate the fix.
- Bone
- Which bone you wish to change. It must have an IK constraint.
- Frame Range
- On which range you wish the fix to be active.
- Smoothing
- How many frames should be used to blend in and out of the fix, if ;you used a frame range that is smaller than the entire animation.
Distance
Use this fix if you wish to have a bone maintain a certain amount of distance from another bone. This is useful if in the original animation the subject was carrying an object (like a box), and due to the retarget the arms are at an incorrect distance. Simply set the amount of distance you wish (in Blender units). Interestingly, if you set a distance of 0 (or very small), the two bones will touch. This can be useful, for example, having 2 hands clasp together.
Maintain Position
This fix has many uses. It constrains the selected bone to a certain point in space. You can choose between World, Local (Armature) and another bone's space. This last option is interesting, because you can have a bone stay in the same place compared to another one. For example, to keep the subject hands in front of it's head, next to the leg, etc.
Maintain Position at Frame
This fix "freezes" the selected bone, having it maintain it's position (in either World or Local space) on the start frame, for the entire range. While useful for some issues, this fix really shines when there are small amounts of footskate in the animation. Simply set the start frame to the first frame in the foot plant, the end frame where the foot should start to lift, while setting the space to World.
Stay Above
This fix accepts a single mesh object as a target [15a]. Once set, the chosen bone will always remain “above” (according the world Z axis) the mesh. This is useful mainly for feet bones needing to stay above an uneven floor. The offset settings [15b] allows the user to set the desired distance from the floor, which is needed so the deformed mesh, which surrounds the bone, doesn’t cross the floor either.
Update Fixes
Some fixes, mainly the point (when using a 2nd bone as a parent) and stay above types, require a short amount of calculation when activated. If you cause “external” changes (outside the fix interface) to the armature or any of the targets (e.g. move the stay above’s target mesh), you need to press “Update Fixes” to recalculate all applied fixes (similar to driver’s “Update Dependencies”).
|
Advanced Features / Other Tools
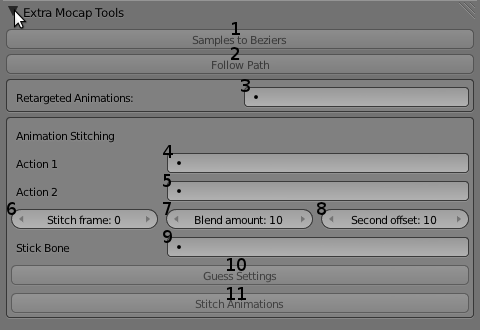
- Samples To Beziers
- Follow Path
- Reload previously retargeted animations to the NLA stack
- First action to stitch
- Second action to stitch
- Frame on which stitch occurs
- Amount of frames to blend between the animations
- Start frame for second animation
- Bone that shouldn't move during stitch
- Auto-Guess the above settings
- Stitch the animations
Samples to Beziers
This operator uses a high quality algorithm to convert sampled/baked keyframe data to simpler, sparser Bezier curves. It assigns to all curves that effect the same property (e.g. a bone’s rotation) keyframes on the same frame, reflecting the way human animators work. Note that using this operator early in the workflow is usually counter-productive, due to that face that many other operations use baking/sampling and thus you will have to do this again at some point. I recommended this as the last step, after baking the entire NLA stack to a single action / using this animation in production.
Retargeted Animations Field
The Advanced Mocap Tools panel contains a field called “Retargeted Animations”. If you have retargeted more than one animation to this armature, you can switch the entire NLA stack associated with each animation here. Switching actions without using this can cause issues if you plan on using the other tools at a later date.
Path Editing
Certain animations, such as walk cycles, benefit from the ability to manipulate the subject’s root movement in world space along a curve. To use this feature, select the curve you wish the animation to follow, the armature’s stride_bone and it will set the curve’s properties to have the armature follow the curve, while maintaining the original root movement’s charachter. Note that this works best if the curve’s length is close to the original distance that the subject traveresed. If it isn’t, you’ll see footskate. If the footskate is small, try using the Maintain Position at Frame post-retarget fix. If it’s large, changing the curve length is recommended. Alternatively, you can set the Fcurve extrapolation to cyclic (especially if you used the auto loop tool) and have the subject do a few cycles to match the curve length.
Curve Length
Theoretically, this issue with curve length could be fixed automatically, but requires calculating the curve’s length, which is a surprisingly non-trivial mathematical problem. It may be available in the future
|
Animation Stitching
In the advanced mocap tools panel, you can select 2 retargeted animations from the drop down panels. Pressing the Stitch Animations button will create the neccesary NLA tracks to blend between the two. There are a few options that can be accessed from here:
- Stitch Frame
- On which frame you want the blend between the two animations.
- Blend amount
- How many frames should the blend be, i.e. length of margin on the seam where the first animation morphs into the second one.
- Second Offset
- Often, you’ll want to blend into the second animation not on it’s first frame, but on some later frame. This value sets on which frame (relative to the second animation, not the whole scene’s) the second animation should start on.
- Stick Bone
- When blending animations, it is often important to mark one bone as “immovable”. That is, the blend should “pivot” around a single bone that moves the least. For example, a foot bone when blending from a run to a jump (otherwise all the bones will blend around the armature’s center, which leads to artifacts and footskate). This field allows you to choose this bone. If left empty, it will use the root bone.
- Guess Settings
- Warning: Experimental. This button attempts to guess the best values for the above settings. I’ve had decent success with it, at least setting good starting values which can then be tweaked a bit.
Thanks
Thank you for using my Addon, and reading through all of this :)
I would like to thank Ton Roosendaal, Campbell Barton (ideasman_42), Tom Musgrov (LetterRip), Martin Poirier (theeth) and Joshua Leung (Aligorith) for their continued support and development of Blender, as well as personal guidance and mentoring during this project.
Thomas Larsson from MakeHuman and Benjamin Tolputt from Bent Solutions for wonderfully detailed feedback and suggestions, and Google's support via the Google Summer of Code program, 2011. Also my other fellow Pepper branch buddies, neXyon, Moguri and Phabtar, for never asking me to merge the branch :D
Work on this addon is continuing. Please report bugs to the bf-extensions bug tracker, or email me suggestions at benjytcook (gmail).
