利用者:Sculptorjim/Materials/Materials Header Panel
| 2.6 Work in Progress | |
| Please don't edit 2.6 manual "Material" pages until further notice. (sculptorjim, 01/01/2013) |
Materials Header Panel
Mode: All Modes
Panel: Shading/Material Context → Material
Materials can be linked to objects and Object's data in the materials panel, of the Shading/Material context. Here is where you can manage how materials are linked to objects, meshes, etc. and activate a material for editing in the rest of the panels.
Context
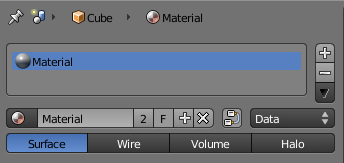
At the top of the material menu a list of icons explains the context in which the material is being edited. In the example above, the material Material is linked to the object Cube which is linked to the scene Scene.
By toggling the pin symbol on the left side on and off, Blender can be told to display only the selected material or to follow context.
Material slots
With a material linked or created, one or several material slots can be created and further options become available:
- + sign
-
- Add a new material slot or copy the one selected
- - sign
-
- Remove selected material slot
- Down arrow
-
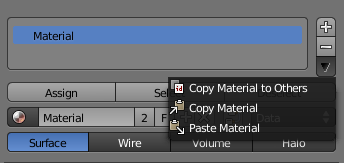
- Copy and paste the selected material slot
Multiple materials
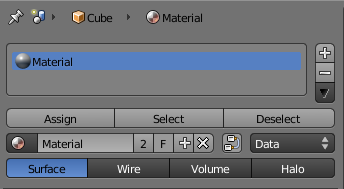
Meshes can handle having more than one material. Materials can be mapped on a per-face basis, as detailed on the Multiple Materials page. In edit mode, the following tools appear:
- Assign
- Assign the material in the selected material slot to selected vertices
- Select
- Select vertices assigned to the selected material slot
- Deselect
- Deselect vertices assigned to the selected material slot
Material naming and linking
- Material's name field
- click into this field to rename your material
- Number of users (number field)
- The number of objects or object's data that use the material. This material is linked between the various objects, and will update across all of them when edited. Clicking this number will make a 'single user copy', duplicating the material, with it linked only to the active object/object's data.
- F (Fake user)
- Gives the material a 'fake user', to keep the material datablock saved in the .blend file, even if it has no real users.
- Plus sign
- Add a new material.
- X sign
- Remove link to this material.
- Nodes
- Designates this material to be a material node noodle, and not from the Material/Ramps/Shaders settings.
- Datablock links
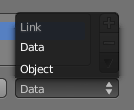
- The Link pop-up menu has two choices, Data and Object. These two menu choices determine whether the material is linked to the object or to the data, (in this case) the mesh (or curve, nurbs, etc.). The Data menu item determines that this material will be linked to the mesh's datablock which is linked to the object's datablock. The Object menu item determines that the material will be linked to the object's data block directly.
- This has consequences of course. For example, different objects may share the same mesh datablock. Since this datablock defines the shape of the object any change in edit mode will be reflected on all of those objects. Moreover, anything linked to that mesh datablock will be shared by every object that shares that mesh. So, if the material is linked to the mesh, every object will share it.
- On the other hand, if the material is linked directly to the object datablock, the objects can have different materials and still share the same mesh. Short explanation: If connected to the object, you can have several instances of the same obData using different materials. If linked to mesh data, you can't.
Material type
These toggles tell Blender where this material fits into the Render Pipeline, and what aspects of the material are to be rendered.
- Surface
- Render object as a surface
- Wire
- Render the edges of faces as wires (not supported in ray tracing)
- Volume
- Render object as a volume. See Volumes
- Halo
- Render object as halo particles. See Halos
Material Properties Overview
The usage of each section of the material properties are detailed in the next section.
Surface and Wire materials
Surface material types are the most common materials. They represent objects with a defined surface.
Wire materials simply turn all of an object's edges into rods, which then become renderable, but uses the same shading options as surface materials.
Preview
This is a preview of the current material mapped on to one of several objects.
- Flat Plane
- Sphere
- Cube
- Monkey
- Strands
- Large Sphere with Sky
Diffuse
- Diffuse shading simulates light hitting a surface and bouncing off in a very wide angle. You can set the color of the diffuse shading, and set what model is used for the diffuse calculation.
Specular
- Specularity simulates reflections of light sources, that are often sharp, bright spots. You can set the color of the specular shading, and set what model is used for the specular calculation.
Shading
- Emit
-
- Adds extra illumination, as if the material is glowing.
- Ambient
-
- Sets the global amibient light the material receives
- Translucency
-
- Amount of shading on the back side that shows through. Use to simulate thin objects, like leaves or paper.
- Shadeless
-
- This disables the calculation of any shading, so only color information is visible. This is essentially makes it a "surface shader"
- Tangent Shading
-
- Use the material's tangent vector instead of the normal for shading — for anisotropic shading effects (e.g. soft hair and brushed metal). This shading was introduced in 2.42, see also settings for strand rendering in the menu further down and in the Particle System menu.
- Cubic Interpolation
-
- Use cubic interpolation for diffuse values, for smoother transitions between light areas and dark areas
Transparency
Set options for objects in which light can pass through
Mirror
Here you can set options for materials that are reflective
Subsurface Scattering
Subsurface scattering simulates semi translucent objects in which light enters, bounces around, then exits in a different place. Examples are candles, human skin, cheese, etc.
Strand
These settings are used when rendering the material on fur or hair
Options
- Traceable
-
- Allows material to calculated raytracing, for reflections and refractions.
- Full Oversampling
- Forces material to render full shading and textures for all Anti-Aliasing Samples.
- Sky
-
- Renders material with no alpha, replacing the background with the sky
- Use Mist
- Uses Mist with this material.
- Invert Z Depth
-
- Renders materials faces with an inverted Z buffer.
- Z Offset
-
- If using Invert Z Depth, this is an artificial offset to z values.
- Light Group
-
- Limit material's lighting calculation to a specific light group
- Exclusive
-
- Material uses light group exclusively
- Face Textures
-
- Replaces object's base color with color from face assigned image textures.
- Face Textures Alpha
- Replaces object's base alpha value with alpha from face assigned image textures.
- Vertex Color Paint
-
- Replaces object's base color with vertex colors.
- Vertex Color Light
-
- Adds vertex color as additional light.
- Object Color
- Modulate the result with a per object color.
Shadow
- Receive
-
- Allows the material to receive shadows cast by other objects
- Receive Transparent
-
- Allows material to receive transparent shadows cast by other transparent objects.
- Cast Only
-
- Causes objects with the material to only cast a shadow, and not appear in renders.
- Casting Alpha
-
- Sets the Alpha of shadow casting. Used for irregular and deep shadow buffering.
- Shadows Only
-
- Renders shadows as materials alpha value, making materials transparent, except for shadowed areas.
- Shadow Only Type
- Set the type of shadows used when Shadows Only is enabled
- Shadow and Distance
- Shadow Only
- Shadows and Shading
- Cast Buffer Shadow
-
- Allows material to cast shadows from buffer lamps.
- Buffer Bias
-
- Factor to multiply shadow buffer by.
- Auto Ray Bias
-
- Prevents raytraced shadow errors on surfaces with smooth normals
- Ray Bias
-
- Shadow raytracing bias value to prevent terminator artifacts on shadow boudary.
- Cast Approximate
-
- Allow material to cast shadows when using Approximate Ambient Occlusion}}
Volume Material
Volume materials represent volumes of tiny particles, like clouds or smoke. They are very different from standard materials, but are detailed in the Volume Page.
Halo Material
Halo materials renders each of the objects points as glowing dots. This is a useful material for simulating particle effects or lens flares. They are detailed on the Halo Page.


