Doc:2.6/Manual/Data System/Linked Libraries
Page status (reviewing guidelines)
Copy
This page is a copy of the same page in 2.4 manual, need to be updated
|
Linked Libraries Overview
Blender is able to “reach in” to other .blend files and pull in whatever you want. In this way, Blender supports reuse of your Blender data. For example, if you have a library .blend file that has a really neat material used in it, you can, from your current .blend file, Append that material into your current .blend file. This saves you from manually re-creating all the different settings.
General Procedure
Mode: All Modes
Hotkey: ⇧ ShiftF1
Menu: File → Append or Link
The main menu in Blender is located in the Info window (by default the header located at the top of your screen). From that menu, all you have to do is use File → Append or Link, or press ⇧ ShiftF1 in your active window. The active window will change to a File Browser (the Window type icon looks like a manila folder) selector window. Use this window to navigate your hard drive and network-mapped drives through folders and subfolders to find the .blend file that has the object you want to reuse. When you click on a .blend file (indicated by the orange square box next to its name), Blender will go into that file and show you the list of datablock types within it: Scenes, Objects, Materials, Textures, Meshes, etc. Clicking on any one of them will display the specific instances of that type.
Folder and File Organization
We suggest creating a folder called /lib or on Linux systems, /usr/share/blender with appropriate access rights so that all users can share library blend files. Under that library, create a set of folders for each kind of thing you might want to access and re-use later on, such as materials, textures and meshes. Create subfolders under each of those as your library grows. For example, under the meshes folder, you might want to create folders for people, spaceships, furniture, buildings, etc. Then, when you have a .blend file that contains a chair mesh, for example, all you have to do is copy that file into the furniture folder.
Appending library objects into your current project
The following procedure appends an object with all its linked data, such as mesh data, materials, textures, …, to the current .blend file.
- Select File → Append or Link.
- Locate and select the file that contains the object you want to append (often a “library” file).
- Navigate to the Object section of the file.
- Select one object from the list using LMB
 , multiple objects via RMB
  , and/or a range of objects by dragging RMB
  .
. - Repeat the above for each kind of object you wish to append or link. Parents and armatures (all modifier objects) must be selected separately.
- Set desired options that are shown in the header (At Cursor, Active Layer, …).
- LMB
 on Load Library or press ↵ Enter or MMB
  directly on the data to append.
Of course, you can append or link many other things besides objects: all the ObData - cameras, curves, groups, lamps, materials, meshes, etc. - and even an entire scene… Note that there is a big difference between adding the object and the object data, such as mesh. If you append a Mesh datablock, you are only bringing in the data about that particular instance of mesh, and not an actual object instance of the mesh that you can see.
In the File Browser window header, use Append (button enabled by default) if you want to make a local independent copy of the object inside your file. Select Link if you want a dynamic link made to the source file; if anyone changes the object in the source file, your current file will be updated the next time you open it.
Click Load Library to append or link the object into your current .blend file.
Some more loading option buttons (in the File Browser header) include:
- AutoSel
- When an object is loaded, it is not active or selected; it just plops into your .blend file. Often, right after loading, you will want to do something with it, like scale it or move it. Enable this button and the imported object will be selected, just as if you magically RMB
 -clicked on it. This button saves the step of finding the object and selecting it.
- Active Layer
- Blender has 20 layers to divide up a large scene, and each object resides on some layer(s). By default, an object is loaded into your file directly into the layer(s) it resides on in the source file. To only load the object to the current active layer that you are working on, enable this button.
- At Cursor
- By default, an object is loaded into your file at the location it is at in the source file. To reposition the object to your cursor when it loads, enable this button.
| Finding What was Loaded | |
| If the loaded object is not visible, consider using At Cursor or AutoSel. If you use AutoSel, remember there are Snap tools to put your cursor on the object (⇧ ShiftS4 (Cursor -> Selection)), and Center your view on it (C (View → Align View → Center View to Cursor)). Note that these tools do not work if the object is on an unselected layer, since objects on unselected layers are invisible. |
Reusing Objects (Meshes, Curves, Cameras, Lights, …)
Let’s suppose you created a wheel in one .blend file and want to reuse it for your current project. The physical model of the wheel would be a mesh, and probably comprised of a tire and rim. Hopefully you named this mesh something reasonable, like, oh, I don’t know, “Wheel”. The wheel may be colored and thus have some materials assigned to it (like rubber and chrome).
Once you navigate to the file, select the “Wheel” (in the Objects datablocks) and it will be imported into your current file. You can import a copy of it, or merely link to it.
| Linking | |
| If you link to it, and later modify it in the source file, it will be shown “as-is” (modified) in your current file the next time you open it up. |
Other artists have released their models to the public domain, and friends may share models simply by posting or emailing their .blend files to each other. Keeping these files, as well as your past projects, in a library directory on your PC/server will save you from ever having to reinvent the wheel.
When selected, linked objects are outlined in Cyan. Normal selected objects are outlined in pink.
Notice that you cannot move a linked object! It resides at the same position it has in the source file. To move/scale/rotate the object, turn it into a proxy.
| Using Appended/Linked Mesh Data | |
|
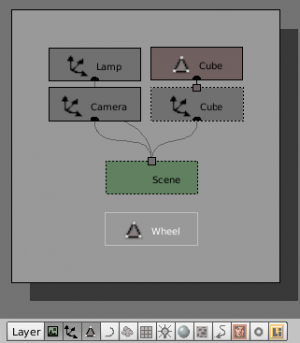
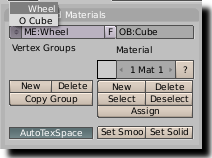
When Appending or Linking certain resources such as mesh data, it may not be instantly visible in the 3D Viewport. This is because the data has been loaded into Blender but has not been assigned to an object, which would allow it to be seen. You can verify this by looking in the Outliner window and switching it to OOPS Schematic view (you may need to have the Displays Scene datablock button selected in its header). In the OOPS Schematic picture you can see that “ To allow the newly loaded |
If you link a Group, even if the Group itself is one object, it will be outlined in orange when selected, and you will be able to Transform it (loc/rot/scale).
Reusing Material/Texture Settings
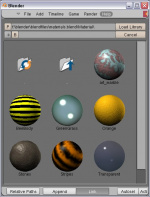
Some materials, like glass or chrome, can be very tricky to get “just right”. The Blender Foundation has released, for example, a Materials CD, which is available for free to download from their site. Using the .blend files on that CD, you can import common materials, like glass, chrome, wood and bananas. This feature saves you a lot of time, as it often means you don’t have to be fiddling with all the little buttons and sliders just to re-create a material. I call out the Banana material because it is a great example of using simple procedural materials with a ColorRamp, and a procedural texture, to give a very realistic look. When you navigate to the file, and select Materials, the browser will show you a sphere sample of that material to help you visualize the texture that goes with the name. For more information on using the Image Browser, see the release notes.
Blender Extension: Library
There is also a fantastic Python script called Blender Library that over-arches all of your files and allows you to construct a master library. This script displays a preview and helps you organize your Blender work. Highly recommended; search www.blendernation.com for “Blender Library”, it is also stored on the Blender Wiki Scripts section.
|
Reusing Node Layouts
To reuse noodles (node layouts), open the original (source) file and create a Group for the set of nodes that you think you want to reuse. When you want to import that node group into your current file, LMB ![]() on File → Append or LMB
on File → Append or LMB ![]() on File → Link from the Info window header (or press F1 for Append or CtrlAltO for Link), and navigate to the file. When you dive into the file, there will be a NodeTree option. LMB
on File → Link from the Info window header (or press F1 for Append or CtrlAltO for Link), and navigate to the file. When you dive into the file, there will be a NodeTree option. LMB ![]() on it and the list of node groups in that file will be listed. LMB
on it and the list of node groups in that file will be listed. LMB ![]() on the one you want and then LMB
on the one you want and then LMB ![]() .
.
[Verse]
Verse is an amazing OpenSource collaboration tool that integrates with Blender. Verse enables multiple people to work on, link, and share objects and modifications in Blender files in real time.
|
Proxy Objects
A proxy is a legal stand-in or substitute for the real thing. In Blender, when you make a linked copy (described above), you cannot edit the object; all you have is a link to it. You cannot add to it or change it, because its source is in another file that is not open.
When working in a team environment, you may want more flexibility. For example, if modeling a car, you may have one person working on the shape of the car (its mesh), but another working on available color schemes (its materials). In this case, you want to grant the painter a Proxy of the object and allow him/her to modify the material settings. More commonly, you will have a character being animated by a team of animators; they can define poses, but cannot change the character’s colors or armature, only use what is defined by the master rigger.
The important aspect of a proxy object is that it allows you to edit data locally, but also allows specific data to be kept restricted. Data that’s defined as restricted will always be restored from the library (typically on file reading or undo/redo steps). This restriction is defined in the referenced library itself, which means that only the library files can define what’s allowed to change locally.
For poses, you can control this by indicating bone layers as being restricted. A restricted layer is shown with a black dot in it. Use CtrlLMB ![]() on a button to restrict or unrestrict that layer.
on a button to restrict or unrestrict that layer.
Mode: Object Mode
Hotkey: CtrlAltP
To make a proxy object for yourself, establish a link to the source object as described above. With that linked copy selected (RMB ![]() ) and in view (you can see it in the 3D View), press CtrlAltP and confirm the Make Proxy dialog. The object will be named with the original name plus a “
) and in view (you can see it in the 3D View), press CtrlAltP and confirm the Make Proxy dialog. The object will be named with the original name plus a “_proxy” suffix. You may now move and modify the proxy. When selected, it will look like a local object (outlined in orange).
You can then edit unrestricted data. For most objects, this includes the location and rotation. You can also animate the object’s location using Ipo curves. For mesh objects, the shape of the mesh is restricted, so you cannot define shape keys. When you reload your file, Blender will refresh your file with any changes made to the original restricted data, but will not reset your changes (unless the owner has).
Armatures and Multiple instances
Development of this feature is a work in progress; in Blender 2.43 and CVS (as of 29 April 2007), a proxy object controls all instances of a group. It is not yet possible to have one proxy per group instance. In particular, it is not yet possible to have one proxy armature per group instance. One partially effective remedy to use file append rather than file link for multiple instance duplication. File append will not be updated with update to the origination file.
If you are using a POSIX compliant file system, you can work around the one proxy object per group limitation with the cheap hack documented at Linked Lib Animation Madness.


