Extensions:2.6/Py/Scripts/Modeling/Inset-Polygon
| UI location | View3d > Tools, when in Edit Mesh mode | ||
|---|---|---|---|
| Usage | Select a face or faces, hit the Inset button, adjust the inset amount, height, and whether or not to do it as a region in the parameters section | ||
| Version | 0.3 | Author(s) | Howard Trickey |
| Blender | 2.57 | License | GPL |
| Category | Mesh | Distribution | Release |
| Note(s) | Uses the 'straight skeleton' algorithm to inset, which handles cases when edges meet - at which point new polygon(s) are formed and insetting can continue. | ||
| File name | mesh_inset/__init__.py, geom.py, model.py, offset.py, triquad.py |
|---|---|
| Current version download | https://svn.blender.org/svnroot/bf-extensions/trunk/py/scripts/addons/mesh_inset/ |
| Python modules | math |
| Warning | This is a beta version. |
|---|---|
| Links | Author's web page github project |
| Release Log | https://github.com/howardt/HWTPYVEC/blob/master/README |
| Known Issues | Doesn't yet properly propagate UVs. Re-triangulates/quadrangulates the interiors after insetting, which may not be what you want. Some special cases of simultaneous edge meetings don't work yet. Doesn't understand mesh modifiers (e.g., mirror). Need to adjust what is selected after operation. Region inset doesn't work, at least not well, if region isn't approximately flat. |
Purpose
This addon makes 'inset polygons', which you get when you advance the edges of the polygon inwards at a constant rate. Sometimes when you do that, an advancing edge shrinks to nothing, or edges hit an advancing concave corner. The algorithm tries to do the right thing when this happens: one or more new polygons may form at that point, and insetting cane continue inside those new polygons.
You can either inset a single polygon or you can treat groups of polygons connected together as a single region, forming a complicated polygon (that may include holes) to be insetted as a unit.
In addition to insetting, it is often useful to raise or lower the inset polygon (perpendicular to the inset plane), so a parameter to do that is included also.
Here is an example of how a region on a plane, containing a hole, can be inset using this tool:

And here is what happens when the 'region' option is unchecked:

Installation
- Find your blender installation's addons directory (something like 2.57/scripts/addons under wherever you installed blender
- If you downloaded a zip file:
- Copy the attached zip file there and then run unzip filename; it will create a mesh_inset subdirectory
- If you downloaded the individual .py files that make up the addon:
- Make a mesh_inset subdirectory of addons and copy all the files there
- If you downloaded a zip file:
- Start Blender, go to user Preferences, and enable Mesh: Inset Polygon
Usage
Enter mesh edit mode on a mesh object, and select one more more faces.
There should be an 'Inset' button in the Tool Panel for 3D View. Click it, and some Inset Options will appear at the bottom of the panel:
- Scale: choose either Percent or Absolute; 'percent' means that amounts are a percentage of the amount for a full inset, while 'absolute' means that the amounts are in Blender units
- Amount: the distance to move the edges inward
- Height: the distance to move the inset polygons upward
- Region: if checked, treat all selected faces as a region to be inset, otherwise inset each face individually
How it Works
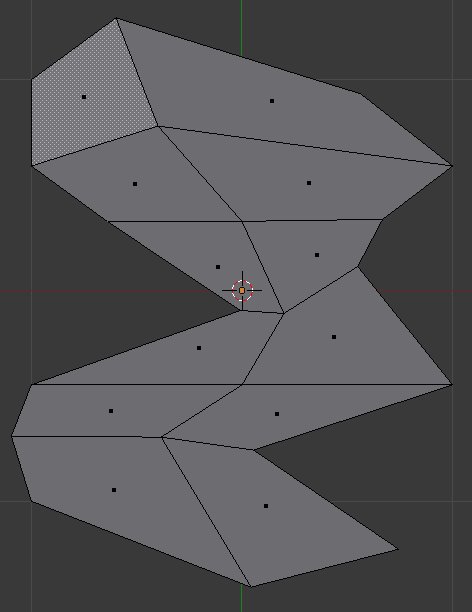
The method used is described on the Straight Skeleton wikipedia page. Consider this starting polygonal region:
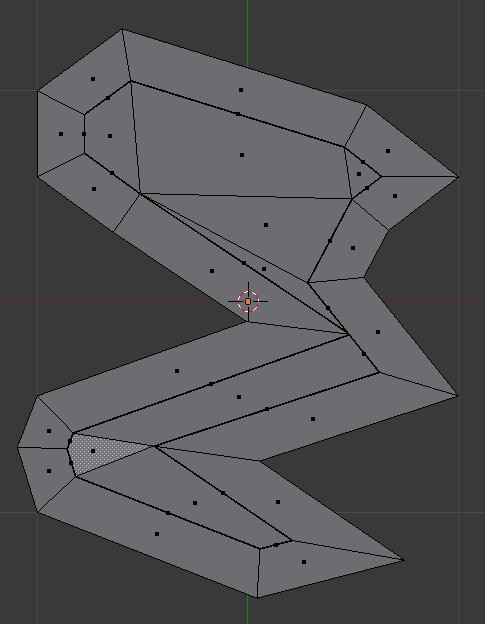
As the edges move inward at a constant speed, two kinds of events can happen. One is that an advancing corner can hit an advancing edge, as seen on the right part of this picture:
When this happens, the inset polygon splits into two.
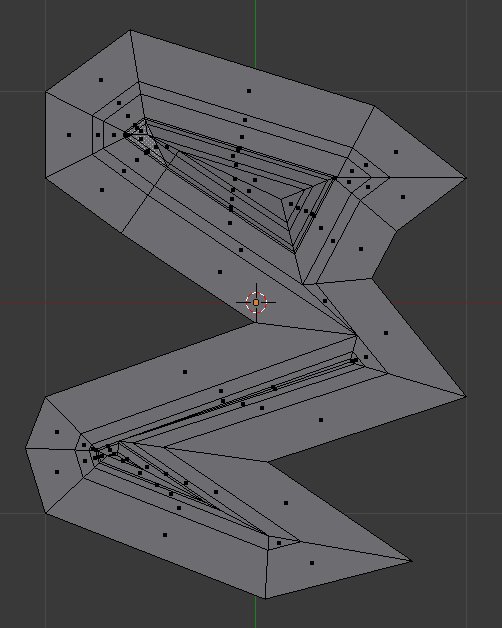
The other is that an advancing edge can shrink to a point. When the whole process continues until the end, you get something like this:
One cool thing about this algorithm is that if you move upwards or downwards (perpendicular to the inset plane) at a constant speed, you form 'roofs' with a fixed pitch.


