Doc:2.6/Manual/Render/Cycles/Bake
Render Baking
Refer to Blender main Render page for general baking guidelines: http://wiki.blender.org/index.php/Doc:2.6/Manual/Render/Bake
Cycles uses the render settings (samples, bounces, ...) for baking. This way the quality of the baked textures should match the result you get from the rendered scene.
The baking happens into the respective active textures of the object materials. The active texture is the last selected Image Texture node of the material nodetree. That means the active object (or the selected objects, when not baking 'Selected to Active') needs a material, and that material needs at least an Image Texture node, with the image to be used for the baking. Note, the node doesn't need to be connected to any other node. The active texture is what projection painting and the viewport use as a criteria to which image to use. This way after the baking is done you can automatically preview the baked result in the Texture mode.
Options
Bake Mode
Combined
Bakes all materials, textures, and lighting except specularity and SSS.
Ambient Occlusion
Bakes ambient occlusion as specified in the World panels. Ignores all lights in the scene.
Shadow
Bakes shadows and lighting.
Normals
Bakes normals to an RGB image.
- Normal Space
- Normals can be baked in different spaces:
- World space
- Normals in world coordinates, dependent on object transformation and deformation.
- Object space
- Normals in object coordinates, independent of object transformation, but dependent on deformation.
- Tangent space
- Normals in tangent space coordinates, independent of object transformation and deformation. This is the default, and the right choice in most cases, since then the normal map can be used for animated objects too.
- Normal Swizzle
- Axis to bake into the red, green and blue channel.
For materials the same spaces can be chosen as well, in the image texture options, next to the existing Normal Map setting. For correct results, the setting here should match the setting used for baking.
UV
Bakes colors of materials and textures only, without shading.
Emit
Bakes Emission, or the Glow color of a material.
Environment
Bakes the environment as seen from the center of the object.
Diffuse Color/Direct/Indirect
Bakes the diffuse pass of a material. Diffuse Color is a property of the surface and independent of sampling refinement.
Glossy Color/Direct/Indirect
Bakes the glossiness of a material. Glossy Color is a property of the surface and independent of sampling refinement.
Transmission Color/Direct/Indirect
Bakes the transmission of a material. Transmission Color is a property of the surface and independent of sampling refinement.
Subsurface Color/Direct/Indirect
Bakes the subsurface pass of a material. Subsurface Color is a property of the surface and independent of sampling refinement.
Additional Options
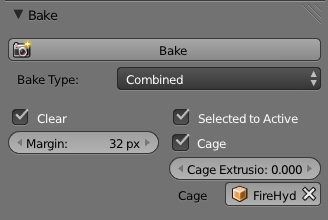
- Margin
- Baked result is extended this many pixels beyond the border of each UV "island," to soften seams in the texture.
- Clear
- If selected, clears the image before baking render.
- Select to Active
- Bake shading on the surface of selected objects to the active object. The rays are cast from the lowpoly object inwards towards the highpoly object. If the highpoly object is not entirely involved by the lowpoly object, you can tweak the rays start point with Ray Distance or Cage Extrusion (depending on whether or not you are using cage). For even more control you can use a Cage Object.
Memory Usage
There is a CPU fixed memory footprint for every object used to bake from. In order to avoid crashes due to lack of memory the highpoly objects can be joined before the baking process. The render tiles parameter also influence the memory usage, so the bigger the tile the less overhead you have, but the more memory it will take during baking (either in GPU or CPU).
|
- Cage
- Cast rays to active object from a cage. A cage is a ballooned-out version of the lowpoly mesh created either automatically (by adjusting the ray distance) or manually (by specifying an object to use). When not using a cage the rays will conform to the mesh normals. This produces glitches on the edges, but it's a preferable method when baking into planes to avoid the need of adding extra loops around the edges.
- Ray Distance
- Distance to use for the inward ray cast when using selected to active. Ray distance is only available when not using Cage.
- Cage Extrusion
- Distance to use for the inward ray cast when using Selected to Active and Cage. The inward rays are casted from a version of the active object with disabled Edge Split modifiers. Hard splits (e.g., when the Edge Split modifier is applied) should be avoided because they will lead to non-smooth normals around the edges.
- Cage
- Object to use as cage instead of calculating the cage from the active object with the Cage Extrusion.
Cage
When the base mesh extruded doesn't give good results, you can create a copy of the base mesh, and modify it to use as Cage. Both meshes need to have the same topology (number of faces and face order).
|
