利用者:Ichthyostega/docs/2DStabilization
目次
2D Stabilization
The 2D video stabilization is a feature built on top of Blender's image feature tracking abilities: we use some tracking points to remove shakiness, bumps and jerks from video footage. Typically, image stabilization is part of a 2D workflow to prepare and improve footage prior to further processing or modeling steps. This page helps to understand how it works, introduces related terms and concepts, describes the available interface controls in detail and finally gives some hints about usage in practice.
Typical usage scenarios of the stabilizer
- fix minor deficiencies (shaky tripod, jerk in camera movement)
- poor man’s steadycam (when a real steadycam was not available, affordable or applicable)
- as preparation for masking, matching and rotoscoping
It is not uncommon for 2D stabilization to have to deal with somewhat imperfect and flawed footage.
How it works
To detect spurious movement in a given shot, we'll assume a simplified model about this movement. We then try to fit the movement of tracked features with this simplified model to derive a compensation. Of course, this works only to the degree our model is adequate -- yet in practice, this simplified approach works surprisingly well even with rather complicated shots, where our basic assumption was just an approximation of much more elaborate movements.
This simplified model underlying the 2D stabilization as implemented here assumes movement by an affine-linear transform:
- the camera is pushed up/down/sideways by some translation component
- the image is then tilted and scaled around a pivot point (rotation centre)
To compensate movement according to this simplified model, the 2D stabilizer proceeds in two steps. First we try to detect the translation offset from the weighted average of all translation tracking points. After compensating this translation component, we then use additional rotation/scale tracking points to detect rotation around a given pivot point. Again, we detect rotation and scale changes through a weighted average of all the rotation/scale tracking points given.
In the current version, the pivot point is anchored to the weight center of the translation tracking points. So effectively the detected translation is already factored out.
In some cases this is not optimal, especially when tracks have gaps or do not cover the whole duration of the footage -- we plan further options to better control the pivot point in future releases.
Stabilization tracks
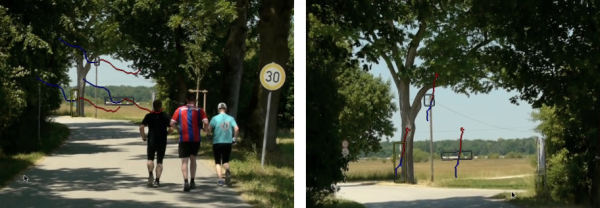
Thus, as foundation for any image stabilization, we need tracked image features to derive the movements. These tracking points or "tracks" can be established with Blender's image feature tracking component. [LINK]. The right choice of points to track is somewhat tricky, yet crucial for successful image stabilization. Often, we're here because we'll have to deal with imperfect footage. In such cases, the averaging of tracks helps to work around image or tracking errors at some point. Moreover, when the footage contains perspective induced movements, symmetrically placed tracking points above and below the horizon can be used to cancel out spurious movement and get stabilization to the focal area in between.
Tracks can be added in two groups
- first of all is the list of tracks to be used to compensate for jumps in the camera location. From all the tracking points added to this group, we calculate a weighted average. We then try to keep this average location constant during the whole shot. Thus it is a good idea to use tracking markers close to and centered around the most important subject
- a second selection of tracks is used to keep the rotation and scale of the image constant. You may use the same tracks for both selections. But usually it is best to use tracking points with large distance from the image center, and symmetrically, on both sides, to capture the angular movements more precisely. Similar to the "location" case, we calculate an average angular contribution and then try to keep this value constant during the whole shot.
Footage, image and canvas
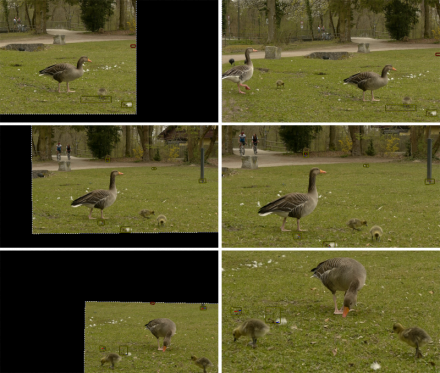
When talking about the movement stabilization of video, we have to distinguish several frames of reference. The image elements featured by the footage move around irregularly within the footage's original image boundaries -- this is the very reason why we're using the stabilizator. When this attempt at stabilization was successful, the image elements can be considered stable now, while in exchange the footage's image boundaries have taken on irregular movement and jump around in the opposite way. This is the immediate consequence of the stabilizator's activity.
Since the actual image elements, i.e the subject of our footage can be considered stable now, we may use these as a new frame of reference: we consider them attached to a fixed backdrop, which we call the canvas. Introducing this concept of a "canvas" helps to deal with deliberate movements of the camera. And beyond that, it yields an additional benefit: It is very frequent for the pixels of video footage to be non square. Thus we have to stretch and expand those pixels, before we're able to preform any sensible rotation stabilization. Thus the canvas becomes, by definition, the reference for an undistorted display of the image contents.
But when the camera was moved intentionally, we have to consider yet another frame of reference beyond the canvas: namely the frame (or cadre) of the final image we want to create. To understand this distinction, let's consider a hand-held, panning shot to the right: Since our camera was turned towards the right side, the actual image contents move towards the left side within the original image frame. But let's assume the stabilizer was successful with "fixing" any image contents relative to the canvas -- which in turn means, that the original image boundaries start to move irregularly towards the right side, and the contents of the image will begin to disappear gradually behind the left boundary of the original image. After some amount of panning, we'll have lost all of our original contents and just see an empty black image backdrop. The only solution to deal with that problem is to move the final image frame along to the right, thus following the originally intended panning movement. Of course, this time, we do want to perform this newly added panning movement in a smooth and clean way.
To allow for such a compensation and to reintroduce deliberate panning, or tilting and zoom of the resulting image, the stabilizator offers a dedicated set of controls: expected position, expected rotation and expected scale. These act like the controls of a virtual camera filming the contents we've fixed onto the canvas. By animating those parameters, we're able to perform all kinds of deliberate camera movements in a smooth fashion
the "dancing" black borders
As explained above, when we succeed with stabilizing the image contents, the boundaries of the original footage start to jump around in the opposite direction of the movements compensated. This is inevitable -- yet very annoying, since due to the irregular nature of these movements, these "dancing black borders" tend to draw away attention from the actual subject and introduce an annoying restlessness. Thus our goal must be to hide those dancing borders as good as possible. A simple solution is to add a small amount of zoom. Sometimes we'll also need to animate the parameter "expected position" in order to keep the image centered as good as we can -- this helps to reduce the amount of zoom necessary to remove those annoying borders.
The Autoscale function can be used to find the minimal amount of zoom just sufficient to remove those black borders completely. However, if the camera jumps a lot, the autoscale function often zooms in too much, especially since this calculation aims at finding a single, static zoom factor for the whole duration of the footage. When this happens, you'll typically get overall better results with animating both the zoom factor and the expected position manually.
Controls of the 2D stabilizator
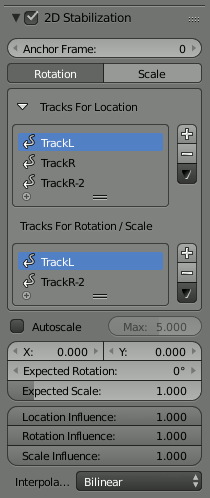
To activate the 2D stabilizer, you need to set the toggle in the panel, and additionally you need to enable "Display Stabilization" in the Display panel.
Anchor Frame
- Reference point to anchor stabilization: other frames will be adjusted relative to this frame's position, orientation and scale. You might want to select a frame number where your main subject is featured in an optimal way.
Stabilization Type
- Rotation
- In addition to location, stabilizes detected rotation around the rotation pivot point, which is the weighted average of all location tracking points.
- Rotation
- Scale
- Compensates any scale changes relative to center of rotation.
- Scale
Tracks For Stabilization
- Location
- List of tracks to be used to compensate for camera jumps, or location movement.
- Location
- Rotation/Scale
- List of tracks to be used to compensate for camera tilts and scale changes.
- Rotation/Scale
Autoscale
- Finds smallest scale factor which, when applied to the footage, would eliminate all empty black borders near the image boundaries.
- Max
- Limits the amount of automatic scaling.
- Max
Expected Position X/Y
- Known relative offset of original shot, will be subtracted, e.g. for panning shots
Expected Rotation
- Rotation present on original shot, will be compensated, e.g. for deliberate tilting.
Expected Scale
- Explicitly scale resulting frame to compensate zoom of original shot.
Influence
- The amount of stabilization applied to the footage can be controlled. In some cases you may not want to fully compensate some of the camera's jumps. Note: these "* influence" parameters do control only the compensation movements calculated by the stabilizer, not the deliberate movements added through the "expected *"-parameters.
Interpolate
- The stabilizer calculates compensation movements with sub pixel accuracy. Consequently, a resulting image pixel needs to be derived from several adjacent source footage pixels. Unfortunately, any interpolation causes some minor degree of softening and loss of image quality.
- Nearest
- No interpolation, use nearest neighboring pixel. This setting retains most of the original image's sharpness. The downside is we also retain residual movement below the size of one pixel, and compensation movements are done in 1 pixel steps, which might be noticeable as irregular jumps.
- Bilinear
- Simple linear interpolation between adjacent pixels.
- Bicubic
- Highest quality interpolation, most expensive to calculate
- Nearest
Stabilization Workflow
Depending on the original footage's properties, achieving good stabilization results might be simple and easy, or it might require some work, dedication and careful planning. This section covers some practical considerations to help improving the results.
the simple case
Whenever the camera is basically fixed, or at least almost stationary, and the footage is crisp and without motion blur, perfect stabilization is easy to achieve. This might be the case when a tripod was used, but wind or vibrations on the floor (e.g. on a stage) caused some minor shakes. Shoulder camera shots done by an experienced operator also frequently fall into that category.
- Use as few points as possible. Start with a single point right on the main subject.
- Track this single point as accurate as possible. Beware of movements and shape changes of the tracked feature. Proceed in small increments (e.g. 50 frames), zoom in and readjust the target point manually when it drifts away. Another option might be to use a larger target area for tracking; since we're tracking only a single point, the slower tracking speed might be acceptable.
- After enabling the basic (location) stabilization, consider if you really need rotation stabilization. Often, some minor, slow swinging movements are not really noticeable and do not warrant the additional time and quality loss caused by rotation and scale stabilization.
- For rotation, start with one extra point, well spaced but preferably still attached to the main subject.
- Consider to fix some slow residual motion by manually animating the "expected *" parameters, before you even think at adding more tracking markers. Because it is often not worth the effort.
- If you need to add more points, the most important goal is to achieve symmetry. Place location tracking points symmetrically above and below the horizon. Place rotation tracking points into diagonally opposed direction, always centered around the main focal area.
avoid problematic footage
The 2D stabilizer can not work miracles; some flaws simply can not be fixed satisfactory. Notorious issues are motion blur, rolling shutter, pumping autofocus and moving compression artifacts. Especially if you do succeed with basic stabilization, such image flaws become yet the more noticeable and annoying. When on set or on location, it might be tempting to "fix matters in postpro". Resist that deception, it rarely works out well.
- prefer a short exposure time to avoid motion blur. While motion blur is good to render filmed movements more smooth and natural, it seriously impedes the ability to track features precisely. As a guideline, try to get at least 1/250 s
- prefer higher frame rates. The more temporal resolution the stabilizer has to work on, the better the results. If you have the option to choose between progressive and interlaced modes, by all means use interlaced and de-interlace the footage to the doubled frame rate. This can be done with the
yadiffilter of FFmpeg: use the mode 1 (send_field). - beware of rolling shutter. Avoid fast lateral movements. If you can, prefer a camera which produces less rolling shutter. Also, using a higher frame rate reduces the amount of rolling shutter; another reason to prefer interlaced over progressive for the purpose at hand.
- switch off autofocus. Better plan your movement beforehand, set a fixed focus and rely on depth-of-field through using a small aperture. Pumping movements might not be so noticeable to the human observer, but the feature tracking tends to slide away on defocused image elements; fixing this manually after the fact may cause a huge waste of time.
- increase the lighting level, at least use a higher sensitivity. This helps to set a fast shutter speed plus a small aperture. Better lighting and good exposure also help to reduce the impact of compression artifacts. If you can, also select a codec with less data reduction, better color space etc. Inevitably, we're loosing some quality through the interpolation necessary for stabilization. Plus we're loosing some quality due to color space conversion.
elaborate movements
When the footage builds on elaborate intended movement of the camera, the process of stabilization becomes more involved -- especially when there is a shift in the main area of interest within the shot. When working with many tracks and fine grained animation, it is easy to get into a situation where additional manipulations actually decrease the quality, while it might be hard to spot and locate the root cause of problems. Recommendation is to proceed systematically, starting from the general outline down to tweaking of specific aspects.
- Understand the nature of the movements in the shot, both the intended and the accidental.
- Track some relevant features for location.
- Establish the basic location stabilization. This includes the decision, which feature to use for what segment of the shot. Work with the track weights to get an overall consistent movement of the weight center, in accordance with the inherent focus of the shot.
- Define the panning movements of the virtual camera (through animation of the "expected position" parameter)
- Add tracking for rotation and zoom stabilization
- Fine tuning pass: Break down the whole duration of the shot into logical segments to define the intended camera movement. Then refine those segments incrementally step by step, until the overall result looks satisfactory
animating stabilization parameters
Animating some parameters over duration of the shot is often necessary, at least to get the final touch, including control of the scale factor to hide the dancing black borders. Unfortunately there is a known limitation in the current version: it is not possible to open the generic animation editors (F-curve and dope sheet) for animation data beyond the 3D scene. So, while it is possible to set key frames right within the UI controls of the stabilizer (either through pressing the ´I´ key or with the help of the context menu), it is not possible to manipulate the resulting curves graphically. The only way to readjust or remove a misguided keyframe is to locate the timeline to the very frame and then use the context menu of the animated UI control. (Hint: the color of the UI control changes when you've located at precisely the frame number of the keyframe)
irregular track setup
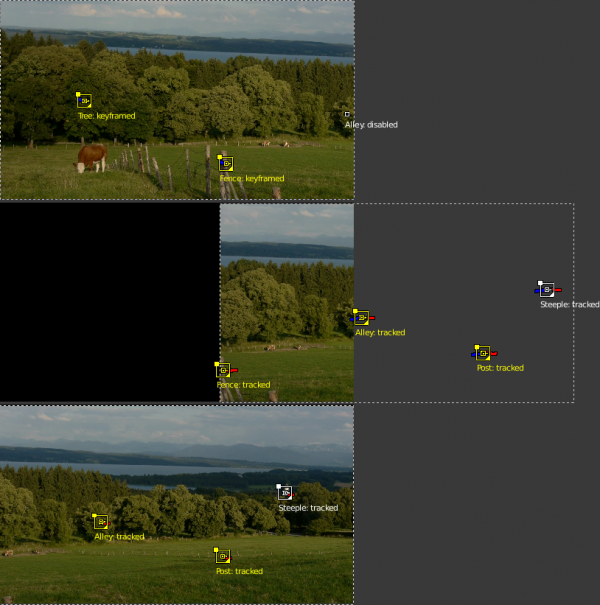
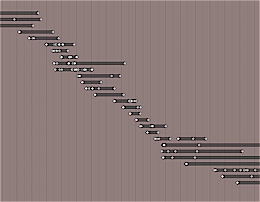
It might not be possible to track a given feature over the whole duration of the shot. The feature might be blurred or obscured; it might even move out of sight entirely, due to deliberate camera movement. In such a situation, we need another tracked feature to take on it's role, and we need some overlap time to get a smooth transition without visible jump.
The stabilizer is able to deal with gaps and partial coverage within the given tracks. However, the basic assumption is that each track covers a single, fixed reference point whenever there is any usable / enabled data. Thus, you must not "re-use" a given track to follow several different points, rather you should disable and thus end one track, when tracking this feature is no longer feasible. You may include gaps, when a tracking point is temporarily disabled or unavailable, but you should start a new track for each distinct new feature to be tracked.
Each track contributes to the overall result by the degree controlled through its stab_weight parameter. It is evaluated on a per frame base, which enables us to control the influence of a track by animating this stab_weight. You may imagine the overall working of the stabilizer as if each tracking point "drags" the image through a flexible spring: When you turn down the stab_weight of a tracking point, you decrease the amount of "drag" it creates. Sometimes the contribution of different tracks has to work partially counter each other. This effect might be used to cancel out spurious movement, e.g. as caused by perspective. But when, in such a situation, one of the involved tracks suddenly goes away, a jump in image position or rotation might be the result. Thus, whenever we notice a jump at the very frame where some partially covered track starts or ends, we need to soften the transition. We do so by animating the stab_weight gradually down, so that it reaches zero at the boundary point. In a similar vein, when we plan a "handover" between several partially covered tracks, we define a cross-fade over the duration where the tracks overlap. But even with such cross-fade smoothing, some residual movement might remain, which then needs to be corrected with the "expected position" or "expected rotation" parameters. It is crucial to avoid "overshooting" movements in such a situation -- always strive at setting the animation keyframes onto precisely the same frame number for all the tracks and parameters involved.
