利用者:Lukasstockner97/GSoC 2016/User Documentation
目次
User Documentation for the Cycles Denoiser
The denoiser is a new feature for Cycles that I implemented as my GSoC project.
It's purpose is to remove remaining noise from rendered images while preserving more details than a compositor setup could. To do so, it collects additional information during rendering, which can either be used to denoise tiles right after they are rendered, or to denoise the image later after the rendering is completed.
Basic Image Denoising
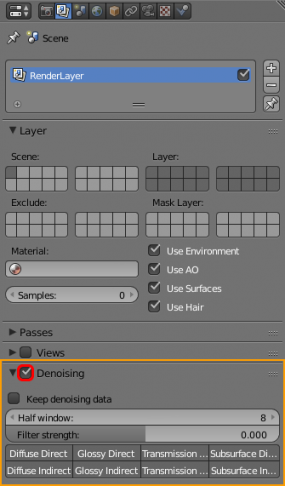
The simplest way to use the Denoiser is to go into the Render Layer tab in the Properties Editor and activate the Checkbox in the Denoising Panel. No other option needs to be changed.
- When rendering on the CPU, tiles will be denoised as soon as they and all their neighbors are rendered.
- When rendering on a CUDA-capable GPU, tiles will be denoised as soon as they are finished, without waiting for neighbors.
- Denoising with OpenCL is not supported yet.
Additional Options
- Half Window: This option changes how many pixels are used for denoising. Increasing it helps to remove splotchy artifacts at low sample counts, but also increases the time needed for denoising.
- Filter Strength: This option allows to tune the strength of the filter. Increasing it helps to get rid of remaining noise in highly detailed regions, but might lose detail there.
- Passes: Deselecting a pass here will cause Cycles to ignore that pass during denoising. Doing so can help preserve detail since the direct passes often contain most of the detail, but the indirect passes are a lot noisier.
Denoising after Rendering
It is possible to collect the needed data during rendering, but not execute the denoiser itself yet. This allows to denoise later, possibly using different setting and/or a different device (for example, if the scene doesn't fit into GPU memory, it might still be possible to use the GPU for denoising after rendering on the CPU).
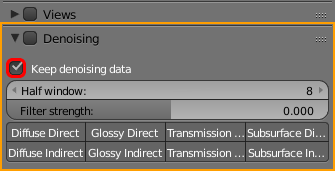
To do so, enable "Keep denoising data" in the Denoising panel in the Render Layer tab. You do not need to enable the denoising checkbox itself - enabling both will denoise while rendering, but still allow you to denoise again later.
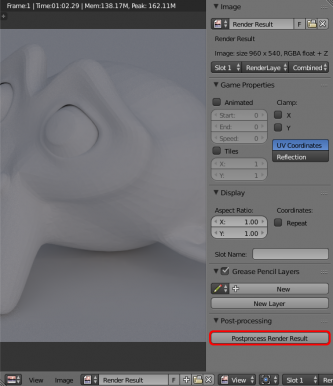
When you view a Render Result in the Image Editor that was rendered with "Keep denoising data" enabled, the "Postprocess Render Result" button in the post-processing panel will be available. Click on it to start denoising - there will be no progress bar, but you can see the image being denoised.
Advanced: Denoising with Cycles Standalone
It's also possible to denoise rendered images with the Cycles Standalone version. To do so, first render the image with "Keep denoising data" enabled, and save the result as a Multilayer EXR (Half Float is enough precision and helps to keep storage requirements down, EXRs with denoising info tend to be very large).
Then, for the denoising itself, you need a Cycles Standalone binary that was built from the version inside Blender's repository (intern/cycles/app/), *not* from the Cycles Standalone Repository. That is not included in regular builds, and how to build it yourself is beyond the scope of this documentation. If you have questions, just ask me (lukasstockner97) on IRC in #blendercoders.
The basic syntax for denoising is "cycles --samples <samples> --denoise <input.exr> <output.exr>", where <samples> is the number of samples used to render the image.
Additional options:
- "--half-window <hw>" sets the half window option, just like it works in Blender
- "--device cuda" uses CUDA for denoising
- "--output-half" allows to write output data with high dynamic range - by default, everything is first converted to regular 24bit images, even when saving as exr
- "--tile-width <width> --tile-height <height>" changes the tile size - for CPUs, the default should be fine, for CUDA, I'd recommend 512x512 or higher since memory is no big concern for denoising.
Advanced: Cross-Frame denoising
Standalone Denoising also allows to use information from multiple frames for denoising. This helps to reduce flickering and generally results in a smoother image, at the cost of longer computation times.
To use it, first render all your frames as Multilayer EXRs with denoising data, and save them with filenames that contain a running counter (like "ShotA_001.exr", "ShotA_002.exr"...).
Then, instead of using one frame as the input file, replace the frame counter with "%Xd", where X is the number of digits (in the example above, the input filename would be "ShotA_%3d.exr").
Also, you need two additional command line options:
- "--frame-range <start> <end>", which specifies which frames are used for denoising. Don't use too many here - if you use N frames for denoising, it will take about N times as long. I'd recommend 2 additional frames before and after, for a total of 5 frames.
- "--denoise-frame <frame>", which specifies the main frame that's being denoised.
Current Issues and Limitations
Right now the denoiser still has a few limitations. My goal is to fix all of them in the future, of course.
- When using a low sample count, you might see weird spots in smooth areas (see the image for an example). To get rid of those, use Correlated Multi-Jittered Sampling instead of Sobol.
- When using Branched Path Tracing, Glossy and Glass shaders with a Roughness that's lower than 0.075 will be overblurred.
- When using low sample counts, Normal/Bump Mapping might cause noise to be visible in the output.
- When using Denoising after Rendering, no progress bar is shown and sometimes tiles might not be highlighted.
- When using CPU rendering with small tiles, some work in the feature prefiltering might still be duplicated. For higher denoising speed, use larger tiles (around 32x32).
- Enabling "Save Buffers" might cause Blender to hang/crash in combination with Denoising.
- Using multiple GPUs for CUDA denoising is untested and most likely will not work.
- The Cycles Standalone Denoising is very early in development, the workflow will most likely be improved significantly.
- Denoising can not be used for baking yet.
- The Denoise data passes can not be used in the compositor (it's not clear whether that should be possible, though).


