Doc:2.6/Manual/Render/Performance/Netrender
Description
Networks in Blender rendering
Goals
- Transparency
- Flexibility
Instructions
Since version 2.6, the rendering system must be enabled in the user preferences, User Preferences-> Addons. .
GUI
Master
On a same machine start a master server.
- Start Blender, selected renderer by network located in the menu drop down from the top of the window of the information (next to "scene").
- (Make sure that you have selected rendering mode) Select master (Master) as operating mode.
- optionally specify the IP address of the interface of listening as well as the port. Let su [default] if you want that the server is listening on all interfaces of the network for the specified port.
- Press Start (it will open a window of empty rendering). The line of the render state will display the server actions.
- The master (Khadijapandu) guide to the stop by pressing ESC, as cancel a normal rendering.
Web interface Master
At startup, the master will also present a web interface that provided more information on slave machines and monitors.There are currently two web interface. The former can be accessed using the URL following http [s] :/ / master_ip_address:master_port. The new is based on the jquerty and development can be accessed the URL following url scheme http [s] :/ / master_ip_address:master_port/html/newui. All information regarding the new interface is located in the following link here.
(Slave(s))
On other machines, made throw slaves
- Start Blender, then to the rendering engine use made by network.
- (Make sure you have selected rendering parameter) Select slave like mode of operation.
- in Option specify the IP address of the master and the port leave [by default] server if you want that slaves automatically detect the master.
- Press on "Start"(Il ouvrira une fenêtre vide de rendu).The render status bar will display the actions the slave.
- The slave is running to stop by pressing ESC. as the cancellation of a normal rendering.
Client
On other machines, made throw slaves
- Start Blender. Confirm your render settings (size, etc.).
- Save the file (it sends the last saved file at this point).
- Select Network Render as Render Engine.
- Select Client as mode of operation.
- Do one of the following:
- Specify the IP address of the master server as well as the port.
- Press the Refresh button underneath the address to automatically detect the Master server from its broadcast.
- Press Send Job to dispatch the animation job to the Master server.
- Whenever you want, Render the Animation (Ctrl-F12) to gather the finished frames. Finished frames will "appear" automatically, while it will pause on ongoing frames.
- You can also hit Render on any frame of the animation and it will fetch the result from the Master.
- In the simplest example, you can just press "Animation on network" and wait for the frames to come in. Total render time should be close to inverse proportional to the number of slaves (minus transfer times).
It is possible to run Master, Client and slave on one System.
Command Line
- Configure master as described previously. Instead of clicking "Start Service" save the file (i.e.: master.blend).
- Do the same with the slave setting (i.e.: slave.blend).
- Use background rendering to start the master and slaves like so:
- blender -b master.blend --addons netrender -a -noaudio -nojoystick
- blender -b slave.blend --addons netrender -a -noaudio -nojoystick
- Master and Slaves can be stopped with Ctrl-C (it is recommended to stop the Slaves before the Master).
The option --addons netrender ensures that the network render addon is loaded. The options -noaudio -nojoystick are optional. They're only there to prevent some warnings.
Extra
Full multilayer render results are used, so the final results should be exactly the same as a local render. You don't have to specify this as the output in the original file; it's done on the slaves automatically.
Testers are invited to contact theeth via IRC (#blendercoders) or by email.
Settings
The Render Engine drop-down is located in the Info window at the top of the Blender window. This is where you select Network Render to access NetRender features.
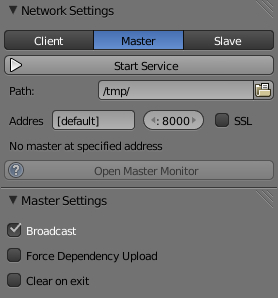
Master
- Network Settings
- Start Service: Starts the Master Server.
- Path: Where the Master will save job files, results, logs and others. It will create a new directory there of the form master_<pid> where <pid> is the process ID of the Master server. In the root of the folder, a file named "blender_master.data" will be saved to enable resuming a master later.
- Server Address: Address of the network interface that the Master will listen on. [default] means listen on all available network interfaces.
- Port: Port that the Master will listen on.
- SSL: Use SSL (https) for connections with slaves and clients. When that option is enabled, two new fields become visible to specify the SSL certificate and key. You can use a self-signed certificate or a certificate provided by a third party like comodo, or verisign. In that case if there is a chain of trust you can put it in the same file as the certificate but the certificate must be put first. The certificate, the chain of trust and key must be provided as PEM files.
- Open Master Monitor: Open a browser to the Web-based Master monitor. Enabled when the Master is running.
- Master Settings
- Broadcast: Broadcast the Master's Address and Port on its local network (every 10s).
- Force Dependency Upload: Forces clients to upload dependency files to the master, instead of using existing local files even if they match client files.
- Clear on exit: Remove the directory created in Path when the Master is stopped. Turning on this option prevents resuming a master later if the process is stopped for any reason.
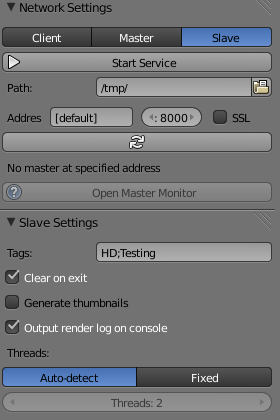
Slave
- Network Settings
- Start Service: Start the Slave node.
- Path: Where the Slave will save job files, results and logs. It will create a new directory there of the form slave_<id> where <id> is the Slave ID assigned by the Master server.
- Server Address: Address on which the Master listens.
- Port: Port on which the Master listens
- Refresh: Listen to the Master's broadcast to determine its Address and Port (can take up to 20s).
- Open Master Monitor: Open a browser to the Web-based Master monitor. Enabled when the Master's address is valid.
- Slave Settings
- Tags: Semi-colon separated list of tags assigned to the slave. A slave will only be assigned a job if it has at least all of that job's tags.
- Clear on exit: Remove the directory created in Path when the Slave is stopped.
- Generate thumbnails: Create thumbnails of the render result on the Slave (they are otherwise created on demand by the Master).
- Output render log on console: Also output logs from the rendering subprocess to the standard output and not just to render log sent to the master.
- Threads: How many threads the Slave should use for rendering.
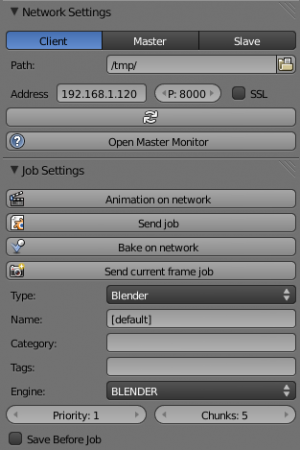
Client
- Network Settings
- Path: Where the Client will save its temporary render result file.
- Server Address: Address on which the Master listens.
- Port: Port on which the Master listens.
- SSL: Use SSL (https) to communicate with the Master.
- Refresh: Listen to the Master's broadcast to determine its Address and Port (can take up to 20s).
- Open Master Monitor: Open a browser to the Web-based Master monitor. Enabled when the Master's address is valid.
- Job Settings
- Animation on network: Sends the current file as a job to the Master and waits for results (other than the rendering taking place elsewhere, this works like a normal Render Animation).
- Send job: Sends the current file as a job to the Master. The returned job ID becomes the current job ID.
- Bake on network: Sends a baking job with all modifiers using a point cache or particle systems in the scene,
- Send current frame job: Sends the current file as a job to the Master with the current frame to be rendered only. The returned job ID becomes the current job ID.
- Name: Name of the job. [default] uses the name of the blend file.
- Category: Category of the job, Optional. Jobs on the Master are also balanced by Categories.
- Tags: Semi-colon separated list of tags assigned to the job. A job will only be assigned to a slave if its tag list contains all of the job's own tags.
- Engine: Render engine to use for rendering this job.
- Priority: Priority of the job. The Priority level is a multiplier that makes the Master count the job as if it were X jobs (i.e.: balancing between a priority 1 and a priority 2 job will make them take 33% and 66% of the workload respectively).
- Chunks: How many frames are dispatched to a Slave as part of a chunk of a job.
- Save Before Job: Forces the current file to be saved to disk before being dispatched as a job.
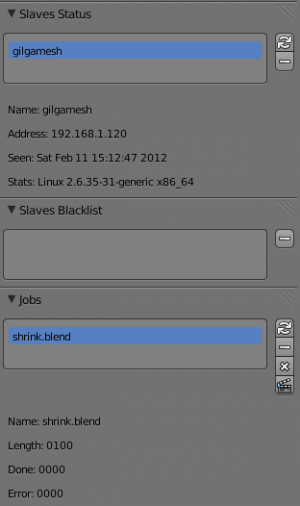
- Slaves Status
- List: List of all Slaves connected to the Master.
- Refresh: Refresh the Slaves information from the Master
- Remove: Move the selected Slave to the Blacklist.
- Slaves Blacklist
- List: List of all Blacklisted Slaves.
- Remove: Remove the selected Slave from the Blacklist.
- Jobs
- List: List of all jobs on the Master.
- Refresh: Refresh the jobs information from the Master.
- Remove: Remove a job from the Master.
- Remove All: Remove all jobs from the Master.
- Get Results: Get all available frames from the selected job. Results are downloaded as multilayer EXR into the current output directory.
Physics Baking Jobs
Physics baking is a recently added feature in Netrender. It supports dispatching baking jobs for each point cache used in a scene (on a modifier or particle system).
Each point cache is baked individually on a slave; bake ordering and dependencies are not currently supported.
Results can only be downloaded as a zip file from the job's page on the web interface. You then have to unzip it and put the results in the blendcache folder associated with your file and turn on disk cache for modifiers and particle systems that you baked (this step should be done automatically at some point).
The text outputted when baking a point cache is not terribly well-suited for being piped to a log and not very informative, so you won't get a whole lot of information from the job's log file. Changing this would require some change to the baking code directly.
Baking other type of physics (like fluids) should eventually be supported.
Version Control Jobs
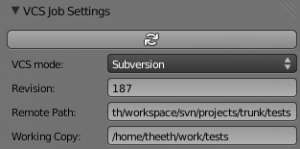
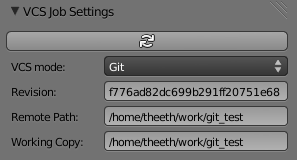
Using VCS (version control system) as a job type enables you to bypass the usual dependency system used by netrender and rely on a versioning system instead. For more organized productions, this is usually a good idea as it minimizes dependency errors, disk space used and job dispatch time.
Currently, the only two version control systems supported are Subversion (svn) and Git. Adding new ones is relatively easy and will be done when requested.
After selecting a VCS, you have to specify three system-specific settings:
- Revision: string used to identify a specific version. (svn: revision, git: commit hash).
- Remote path: remote path where the files can be downloaded from (svn: server url, git: remote repository path from which the slaves can checkout). All job files must be in that folder or one of its subfolders.
- Working copy: working copy root folder. Where the remote files will be downloaded. This is kept between jobs to prevent download of the same file more than once and will only change when jobs require a new revision of specific files from the version control system.
The Refresh button will try to guess those settings to the best of its knowledge.
Notes and Known Bugs
- No shared network space is required between nodes.
- You can dispatch many different files; all results can be retrieved independently. (Save the file after the dispatch if you want to close it and retrieve later.)
- There is very little network error management, so if you close the master first, stuff will break. Same if you enter an invalid address.
- Issue with many dependencies with the same file name: https://projects.blender.org/tracker/index.php?func=detail&aid=25783&group_id=9&atid=498
Yes, I know the current workflow is far from being ideal, especially from a professional render farm point of view. I expect Matt to whip me and suggest better stuff. Optimally, I'd like if users could just press "Anim on network", it would automatically dispatch to the network and wait for results, like a local render. All "pro" features should be optional.
Load Balancing
Primary balancing is performed by calculating usage of the cluster every 10s for each job, averaged over time. The next job dispatched is the one with lowest usage (the one that is using the least number of slaves). The priority of a job acts as a divisor, so a job of priority 2 would use a percentage of the cluster as if it were 2 jobs and not just one (i.e.: a job of priority 1 and one of priority 2 sharing slaves will use respectively 33% and 66% of the processing power). On top of that, there's a set of exceptions and first priority rules:
Exceptions
- A single job cannot use more than N% of total slaves, unless it's the only job. That prevents a slow job from starving faster ones. This is set at 75% for now, but should be customizable.
First Priorities (criteria)
- Less than N frames dispatched (prioritize new jobs). The goal of this is to catch errors early.
- More than N minutes list last dispatch. To prevent high-priority jobs from starving others.
To do
- Send job from memory
- Don't depend on render engine choice for visibility
- "Expert" render manager
- Better defined communication protocol
- The option to calculate simulations (cloth, smoke, ...) on a node which would then send point cache to server for dispatch to render
- Pack textures on upload
- Dispatch single frame as tiles
Technical Details
Out of date, read the code and put info here.
Feature List
- support paths instead of files
- client-server-slave: restrict job to specific nodes
- client-server-slave: view node machine stats
- client-server-slave: reporting error logs back to manager (all
stdoutandstderrfrom nodes) - Cancel jobs
- Restart error frame
- Disable crash report on windows
- Dispatch more than one frame at once (a sequence of frames)
- Blacklist slave that errors on frame after reset
- Multiple paths on job announce
- Delay job until all files accounted for
- Frame range restrictions (ie: send point cache files only when needed for the range of frames)
- Send partial logs to master
- TODO: Set slaves to copy results on network path
- TODO: client-master: archive job (copy source files and results)
- TODO: master-slave: restrict jobs based on specs of slaves.
API Feature Wishlist
This is a list of blender code I would need to make netrender better. Some of them are bugs, some are features that should (hopefully) eventually be there.
- API access to jobs, to be able to run masters and slaves in the background as well as render job notifiers on the client.
- Render result from multilayer image in memory
- Render and load tiles in render results

