Community:Science/Robotics/Yarp Camera Example
目次
Using VideoTexture to export the video from a camera
Overview
This is an extension of a previous example posted in this web page. In the example Robotics:Yarp_Python_Simulator_Example a secondary viewport is created to show what is being captured by the camera object parented to the robot. Then the OpenGL function glReadPixels is used to scan the region of the screen where the secondary viewport is located.
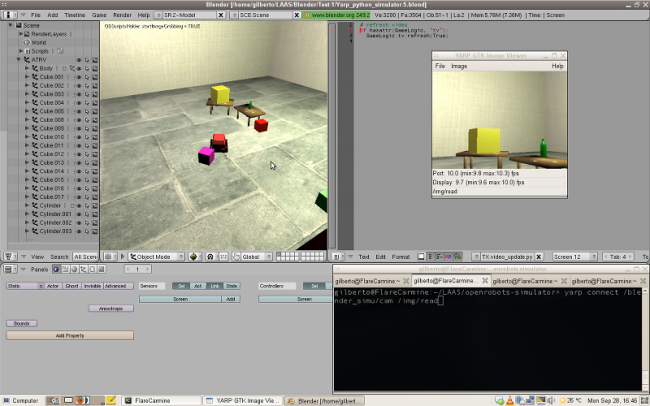
A more robust solution is to use Blender's VideoTexture module to render the scene from the camera into a texture, and use the image rendered directly. Here is a screenshot of the results:
Pre-requisites
This new example is mostly based on the previous one Robotics:Yarp_Python_Simulator_Example, including all the procedures necessary to setup and use YARP. It is also based on the explanation of VideoTexture [1].
Description
Basically the only changes to the previous example are two new python scripts, as explained for using VertexTexture, and a change to the "image_grabber_yarp" script.
Initially it is necessary to create an object, where the video from the camera will be "projected". Add a new plane (I call it Screen) and place it anywhere on the scene. It has to be in one of the active layers, otherwise the video update will not work. Give a material to the plane, including an image texture. The image is not important, but there must be one specified, or again VideoTexture won't work.
Following the instructions for VideoTexture, create a Python Controller to be executed once when the GE is started. This script will link the output of the camera to the texture on the Screen plane:
import VideoTexture

contr = GameLogic.getCurrentController()
scene = GameLogic.getCurrentScene()
obj = scene.objects['OBScreen']
tvcam = scene.objects['OBCameraRobot']

if not hasattr(GameLogic, 'tv'):
	matID = VideoTexture.materialID(obj, 'IMplasma.png')
	GameLogic.tv = VideoTexture.Texture(obj, matID)
	GameLogic.tv.source = VideoTexture.ImageRender(scene,tvcam)
This gets references to the camera we want to use (in the example, the one parented to the robot) and the Screen object. It then initializes the VideoTexture and links it to the appropriate objects.
NOTE: Initially I was trying to limit the size of the texture captured, and I was using something like:
GameLogic.tv.source.capsize = [512,512]
This gave me duplicated images when projecting the texture. Simply removing that line, the problem was solved.
Now, add another Python Controller linked to an Always Sensor set to repeat constantly. Put this script in it.
if hasattr(GameLogic, 'tv'):
  GameLogic.tv.refresh(True)
Finally, to capture the video images and send them through a YARP port, the "image_grabber_yarp" script changes to this:
import Blender, yarp, Rasterizer
import array
import struct

from Blender.BGL import *
from middleware.yarp import YarpBlender

def decode_image (image_string):
	"""	Remove the alpha channel from the images taken from Blender.
		Convert the binary images to an array of integers, to be
		passed to the middleware """
	image_buffer = []
	length = len(image_string)

	# Grab 4 bytes of data, representing a single pixel
	for i in range(0, length, 4):
		rgb = GameLogic.structObject.unpack(image_string[i:i+3])
		image_buffer.extend ( rgb )

	return image_buffer


sensor = GameLogic.getCurrentController().sensors['imageGrabbing']

# Create an instance of the Struct object, to make the unpacking more efficient
GameLogic.structObject = struct.Struct('=BBB')

ok = sensor.positive

# execute only when the 'grab_image' key is released
# (if we don't test that, the code get executed two time,
# when pressed, and when released)
if ok:
	#retrieve the YARP port we want to write on
	p = YarpBlender.getPort('/blender_simu/cam')

	# extract VideoTexture image
	if hasattr(GameLogic, 'tv'):
		imX,imY = GameLogic.tv.source.size
		buf = decode_image (GameLogic.tv.source.image)

	# Convert it to a form where we have access to a memory pointer
	data = array.array('B',buf)
	info = data.buffer_info()

	# Wrap the data in a YARP image
	img = yarp.ImageRgb()
	img.setTopIsLowIndex(0)
	img.setQuantum(1)
	img.setExternal(info[0],imX,imY)

	# copy to image with "regular" YARP pixel order
	img2 = yarp.ImageRgb()
	img2.copy(img)

	# Write the image
	p.write(img2)
The main distraction here is the different image formats used by YARP and Blender. The image returned by VertexTexture is a string with the pixels in binary format in RGBA, meaning 4 bytes per pixel. YARP's image object is an array of integers, described in RGB. So the python struct.unpack function is used here.
I create a struct object with the format that will be used for unpacking the binary data. Then every time the image is captured, the decode_image function is called. It takes 3 bytes (RGB) and unpacks them, and ignores the fourth byte (Alpha) of every pixel. Unpacking converts them to an array, as needed to give to yarp.
The rest is done exactly as in the previous example.
Here is the blend file for the example:
