Doc:2.6/Manual/Modifiers/Deform/Simple Deform
Simple Deform Modifier
Mode: All modes
Panel: Modifiers
Description
The Simple Deform modifier allows easy application of a simple deformation to an object (meshes, lattices, curves, surfaces and texts are supported).
Like most of the deform modifiers, the deform functions are applied to the “computed vertices”, i.e. to the real geometry of the object at the time the modifier is calculated, and not to the original vertices/control points. This means you can increase the level of detail of the deform effect by first inserting a Subdivision Surface modifier (for meshes), or raising the Preview Resolution settings (for curves/surfaces/texts).
Using another object, it’s possible to define the axis and origin of the deformation, allowing application of very different effects.
Options
- Mode
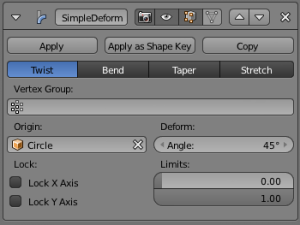
- This drop-down list defines the deform function applied, among four available:
- Twist – Rotates around the Z axis.
- Bend – Bends the mesh over the Z axis.
- Taper – Linearly scales along Z axis.
- Stretch – Stretches the object along the Z axis (negative Factor leads to squash).
- Vertex Group
- The name of the vertex group that indicates whether and how much each vertex is influenced by the deformation.
- Origin
- The name of an object that defines the origin of deformation (usually an empty). This object can be:
- Rotated to control the axis (as it is its Z axis that is now used as “guide”).
- Translated to control the origin of deformation.
- Scaled to change the deform factor.
Note
When the object controlling the origin (the one in the Origin field) is a child of the deformed object, this creates a cyclic dependency in Blender’s data system (the DAG – “dependency graph”?). The workaround is to create a new empty and attach both objects to it.
|
- Factor
- The amount of deformation. Can be set to negative.
- Limits
- These settings allow you to set the lower and upper limits of the deformation (they are proportional values, from 0.0 to 1.0). Obviously, the upper limit can’t be lower than lower limit.
- Lock X Axis/Lock Y Axis (Taper and Stretch modes only)
- These controls whether the X and/or Y coordinates are allowed to change or not. Thus it is possible to squash the X coordinates of an object and keep the Y coordinates intact.
