Doc:2.6/Manual/Render/Post Process/Motion Blur
Motion Blur
Blender's animations are by default rendered as a sequence of perfectly still images. This is unrealistic, since fast-moving objects do appear to be 'moving', that is, blurred by their own motion, both in a movie frame and in a photograph from a 'real-world camera'. To obtain such a Motion Blur effect, Blender can be made to render the current frame and some more frames, in between the real frames, and merge them all together to obtain an image where fast-moving details are 'blurred'.
The Human Eye
Our brains process about 15 images from each eye in parallel each second. My brain cognates those images together and I perceive motion by comparing the two. If something is moving fast enough, I perceive it to be a blur (either because my rods have some latency in reacting to light, or my brain, in overlaying and differencing the images, somehow merges them in a mix sort of fashion). The POINT IS, I perceive a motion blur.
In Film
To keep us from seeing jumpy motion pictures, we simply doubled the frame rate to 30 frames per second (fps) (24 fps EU). So, the shutter is basically open for a 30th of a second and the film is exposed to the world for that length of time. As things moved in the real world during that time, the film exposure caused the image of the moving thing to be physically blurred or smeared on that frame. When developed and shown, we physically see an image that is blurred. The POINT IS, I see a blurred image.
In CG
In CG, when a frame is rendered, the computer knows exactly where everything should be, and renders it as such. From frame to frame, an object is location A in frame 1, and location B in frame 2. When we show you these two frames at speed (30 fps), the image appears jumpy to us, because somewhere between the eyeballs and the film, there isn't that same blurring as in the real world and film, and we can tell.
Motion Blur in Blender
So, how can we make a blurry CG image? Blender has two ways to achieve Motion Blur:
Sampled Motion Blur
This method is slow, but produces better results. It can be activated in the motion blur section in the render options panel.
- Motion Samples
- Set the number of samples to take for each frame.
- Shutter
- Time Taken in frames between shutter open and close.
Vector Blur
- Vector Blur is faster but sometimes has unwanted side-effects - which can be avoided, though. Vector blur is a process done in compositing, by rendering the scene without any blur, plus a pass that has movement information for each pixel. This information is a vector map which describes a 2d or 3d direction and magnitude. The compositor uses that data to blur each pixel in the given direction.
Examples
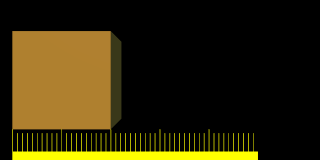
To better grasp the concept, let's assume that we have a cube, uniformly moving 1 Blender unit to the right at each frame. This is indeed fast, especially since the cube itself has a side of only 2 Blender units.
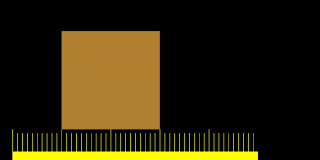
Image 1 shows a render of frame 1 without Motion Blur; Image 2 shows a render of frame 2. The scale beneath the cube helps in appreciating the movement of 1 Blender unit.
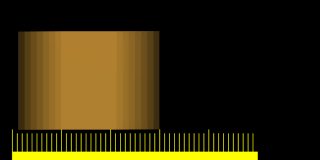
Image 3 on the other hand shows the rendering of frame 1 when Motion Blur is set and 8 'intermediate' frames are computed. Shutter is set to 0.5; this means that the 8 'intermediate' frames are computed on a 0.5 frame period starting from frame 1. This is very evident since the whole 'blurriness' of the cube occurs half a unit before and half a unit after the main cube body.
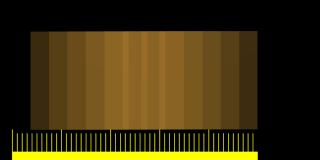
Image 4 and Image 5 show the effect of increasing Bf values. A value greater than 1 implies a very 'slow' camera shutter.
Better results than those shown can be obtained by setting 11 or 16 samples rather than 8, but, of course, since as many separate renders as samples are needed, a Motion Blur render takes that many times more time than a non-Motion Blur one.
Hints
If Motion Blur is active, even if nothing is moving in the scene, Blender actually 'jitters' the camera a little between an 'intermediate' frame and the next. This implies that, even if Anti-Aliasing is off, the resulting images have nice Anti-Aliasing. MBLUR-obtained Anti-Aliasing is comparable to Anti-Aliasing of the same level, but is generally slower.
This is interesting since, for very complex scenes where a level 16 Anti-Aliasing does not give satisfactory results, better results can be obtained using both Anti-Aliasing and MBlur. This way you have as many samples per frame as you have 'intermediate' frames, effectively giving oversampling at levels 25, 64, 121, 256 if 5,8,11,16 samples are chosen, respectively.


