Doc:2.6/Manual/Physics/Cloth
Cloth Simulation
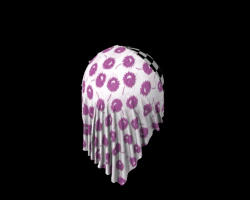
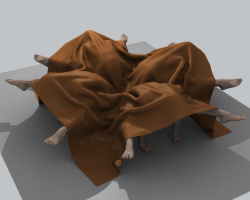
Cloth simulation is one of the hardest aspects of CG, because it is a deceptively simple real-world item that is taken for granted, yet actually has very complex internal and environmental interactions. After years of development, Blender has a very robust cloth simulator that is used to make clothing, flags, banners, and so on. Cloth interacts with and is affected by other moving objects, the wind and other forces, as well as a general aerodynamic model, all of which is under your control.
Description
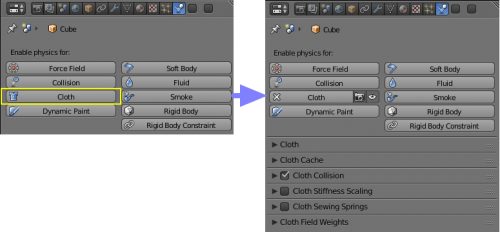
A piece of cloth is any mesh, open or enclosed, that has been designated as cloth. The Cloth panels are located in the Physics context and consist of three panels of options. Cloth is either an open or closed mesh and is mass-less, in that all cloth is assumed to have the same density, or mass per square unit.
Cloth is commonly modeled as a mesh grid primitive, or a cube, but can also be, for example, a teddy bear. However, Blender’s Soft Body system provides better simulation of closed meshes, Cloth is a specialized simulation of fabrics.
Once the object is designated as Cloth, a Cloth modifier will be added to the object’s modifier stack automatically. As a modifier then, it can interact with other modifiers, such as Armature and Subdivision Surface. In these cases, the ultimate shape of the mesh is computed in accordance with the order of the modifier stack. For example, you should smooth the cloth after the modifier computes the shape of the cloth. However, you edit the Cloth settings only in Cloth panels of the Physics contex.
You can Apply the cloth modifier to freeze, or lock in, the shape of the mesh at that frame, which removes the modifier. For example, you can drape a flat cloth over a table, let the simulation run, and then apply the modifier. In this sense, you are using the simulator to save yourself a lot of modeling time.
Results of the simulation are saved in a cache, so that the shape of the mesh, once calculated for a frame in an animation, does not have to be recomputed again. If changes to the simulation are made, you have full control over clearing the cache and re-running the simulation. Running the simulation for the first time is fully automatic and no baking or separate step interrupts the workflow.
Computation of the shape of the cloth at every frame is automatic and done in the background; thus you can continue working while the simulation is computed. However it is CPU-intensive and depending on the power of your PC and the complexity of the simulation, the amount of CPU needed to compute the mesh varies, as does the lag you might notice.
Don’t jump ahead
If you set up a cloth simulation but Blender has not computed the shapes for the duration of the simulation, and if you jump ahead a lot of frames forward in your animation, the cloth simulator may not be able to compute or show you an accurate mesh shape for that frame, if it has not previously computed the shape for the previous frame(s).
|
Common cloth workflow
A general process for working with cloth is to:
- Model the cloth object as a general starting shape.
- Subdivide enough the cloth object mesh for respectively smooth cloth dynamics and view with W > Special > Subdivide (and if need with Subdivision Surface modifier).
- Designate the object as a “cloth” in the Physics context of the Properties window.
- Model other collision objects that will interact with the cloth. Ensure the Collision modifier these collision objects is last on the modifier stack, after any other mesh deforming modifiers.
- Enlarge enough Quality: Steps value for improving simulation.
- Light the cloth and assign materials and textures, UV-unwrapping if desired.
- If desired, give the object particles, such as steam coming off the surface.
- Run the simulation and adjust options to obtain satisfactory results. The timeline window’s controls are great for this step.
- Optionally age the mesh to some point in the simulation to obtain a new default starting shape.
- Make minor edits to the mesh on a frame-by-frame basis to correct minor tears (example, Shading: Smooth for smooth view of the cloth).
Creating Cloth Simulations
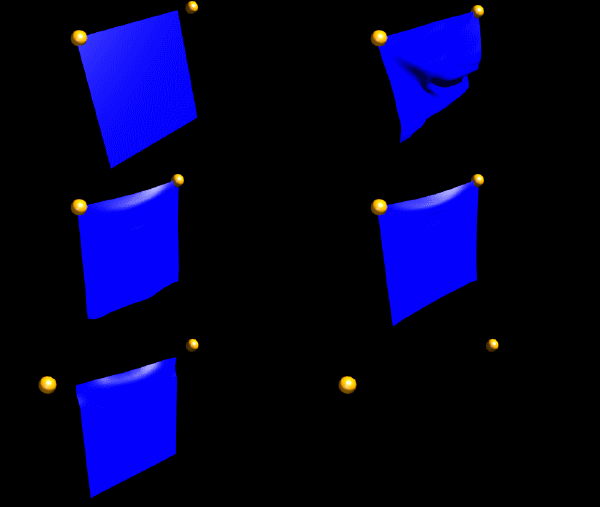
For creating cloth simulations click on "Cloth" button in the Physics context of the Properties window. Set up for the kind of cloth you are simulating. You can choose one of the presets to have a starting point.
As you can see, the heavier the fabric, the more stiff it is and the less it stretches and is affected by air.
Options and settings
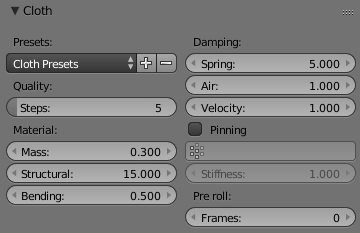
Cloth Panel
- Presets:
- Contains a number of predefined Cloth Presets (e.g. settings presets) and allows you to add your own.
- Now available are the ones:
- Cotton
- Denim
- Leather
- Rubber
- Silk
- Quality:
-
- Steps
- Set the number of simulation steps per frame. Higher values result in better quality, but is slower.
- Material:
-
- Mass
- The mass of the cloth material.
- Structural
- Overall stiffness of the cloth.
- Bending
- Wrinkle coefficient. Higher creates more large folds.
- Damping:
-
- Spring
- Damping of cloth velocity. Higher = more smooth, less jiggling.
- Air
- Air normally has some thickness which slows falling things down.
- Velocity
- Damp velocity to help cloth reach the resting position faster (1.0 = no damping, 0.0 = fully dampened).
- Pinning
- Enable/disable pinning of cloth vertices to other objects/positions.
- The first thing you need when pinning cloth is a Vertex Group. There are several ways of doing this including using the Weight Paint tool to paint the areas you want to pin (see the Weight paint section of the manual).
- Once you have a vertex group set, things are pretty straightforward — all you have to do is enable the Pinning of cloth checkbox in the Cloth panel and select which vertex group you want to use, and the stiffness you want it at.
- Vertex Group field
- Allows select the Vertex Group for pinning of vertices.
- Stiffness
- Sets pin (target position vertex) spring stiffness. You can leave the stiffness as it is; the default value of 1 is fine.
- Pre roll:
-
- Frames
- Start simulation a number of frames earlier to let the cloth settle in.
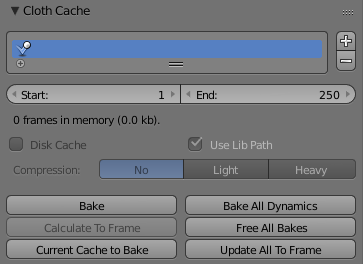
Cloth Cache and baking
Cache settings for cloth are the same as with other dynamic systems. See Particle Cache and Soft Body Cache for details.
Settings
- Caches list
- Allows to use multiply caches and manage the ones — add, remove and rename caches.
- + and - buttons
- Add and remove respectively caches.
- Start/End
- First and last frame of the simulation. Always valid, not only for baking.
- Disk Cache
- Save cache files to disk. Blend file must be saved first.
- Use Lib Path
- Use this files path when library linked into another file.
- Compression
- Compression method to be used
- No
- No compression.
- Light
- Fast but not so effective compression.
- Heavy
- Effective but slow compression.
- Bake
- Calculates the simulation and protects the cache. You need to be in Object mode to bake.
- Free Bake
- Clears the cache.
- Calculate to Frame
- Bake physics to current frame
- Current Cache to Bake
- Bake from Cache.
- Bake All Dynamics
- Bake all physics
- Free All Bakes
- Free all baked caches of all objects in the current scene
- Update All To Frame
- Update cache to current frame
If you haven’t saved the blend file the cache is created in memory, so save your file first or the cache may be lost.
Interactive editing the cached simulation
The cache contains the shape of the mesh at each frame. You can edit the cached simulation, after you've baked the simulation and go to Particle Edit mode for cloth.
See more details here.
Cloth Collisions
Common workflow
In most cases, a piece of cloth does not just hang there in 3D space, it collides with other objects in the environment. To ensure proper simulation, there are several items that have to be set up and working together:
- The Cloth object must be told to participate in Collisions.
- Optionally (but recommended) tell the cloth to collide with itself.
- Other objects must be visible to the Cloth object via shared layers.
- The other objects must be mesh objects.
- The other objects may move or be themselves deformed by other objects (like an armature or shape key).
- The other mesh objects must be told to collide and deflect the cloth object.
- The blend file must be saved in a directory so that simulation results can be saved.
- You then Bake the simulation. The simulator computes the shape of the cloth for a frame range.
- You can then edit the simulation results, or make adjustments to the cloth mesh, at specific frames.
- You can make adjustments to the environment or deforming objects, and then re-run the cloth simulation from the current frame forward.
Collision Settings
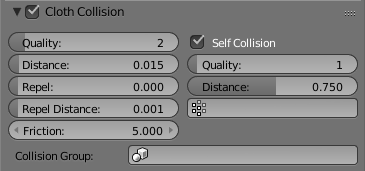
Now you must tell the Cloth object that you want it to participate in collisions. For the cloth object, locate the Cloth Collision panel, shown to the right:
- Quality
- A general setting for how fine and good a simulation you wish. Higher numbers take more time but ensure less tears and penetrations through the cloth.
- Distance
- As another object gets this close to it (in Blender Units), the simulation will start to push the cloth out of the way.
- Repel
- Repulsion force to apply when cloth is close to colliding.
- Repel Distance
- Maximum distance to apply repulsion force. Must be greater than minimum distance.
- Friction
- A coefficient for how slippery the cloth is when it collides with the mesh object. For example, silk has a lower coefficient of friction than cotton.
- Collision Group
- Allows limit collider to set here the Group.
Self-collisions
Real cloth cannot permeate itself, so you normally want the cloth to self-collide.
- Enable Self Collisions
- Click this to tell the cloth object that it should not penetrate itself. This adds to simulation compute time, but provides more realistic results. A flag, viewed from a distance does not need this enabled, but a close-up of a cape or blouse on a character should have this enabled.
- Quality
- For higher self-collision quality just increase the Quality and more self collision layers can be solved. Just keep in mind that you need to have at least the same Collision Quality value as the Quality value.
- Distance
- If you encounter problems, you could also change the Min Distance value for the self-collisions. The best value is 0.75; for fast things you better take 1.0. The value 0.5 is quite risky (most likely many penetrations) but also gives some speedup.
- Vertex Group field
- Allows set vertex group to define vertices which are not using during self collisions.
Regression blend file: Cloth selfcollisions.
Cloth Stiffness Scaling
- Structural Stiffness:
-
- Vertex Group field
- Defines a vertex croup to control over structural stiffness.
- Max
- Maximum structural stiffness value.
- Bending Stiffness:
-
- Vertex Group field
- Defines a vertex croup to control over bending stiffness.
- Max
- Maximum structural bending value.
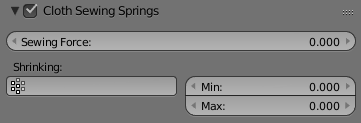
Cloth Sewing Springs
- Sewing Force
- Maximum sewing force.
- Shrinking:
-
- Vertex Group field
- Vertex croup to shrinking cloth.
- Min
- Min amount to shrink cloth by.
- Max
- Max amount to shrink cloth by.
External Force Infuence on the Cloth
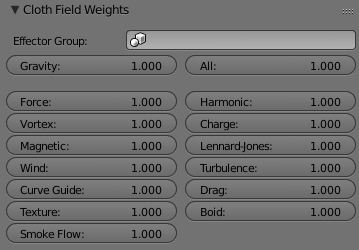
As other physics dynamics systems, Cloth simulation also are influenced external force effectors.
Tips
Suppose you have two objects: a pair of Pants on layers 2 and 3, and your Character mesh on layers 1 and 2. You have enabled the Pants as cloth as described above. You must now make the Character “visible” to the Cloth object, so that as your character bends its leg, it will push the cloth. This principle is the same for all simulations; simulations only interact with objects on a shared layer. In this example, both objects share layer 2.
To view/change an object’s layers, RMB ![]() click to select the object in Object mode in the 3D view. M to bring up the “Move Layers” popup, which shows you all the layers that the object is on. To put the object on a single layer, LMB
click to select the object in Object mode in the 3D view. M to bring up the “Move Layers” popup, which shows you all the layers that the object is on. To put the object on a single layer, LMB ![]() click the layer button. To put the object on multiple layers, ⇧ ShiftLMB
click the layer button. To put the object on multiple layers, ⇧ ShiftLMB ![]() the layer buttons. To remove an object from a selected layer, simply ⇧ ShiftLMB
the layer buttons. To remove an object from a selected layer, simply ⇧ ShiftLMB ![]() the layer button again to toggle it.
the layer button again to toggle it.
Mesh Objects Collide
If your colliding object is not a mesh object, such as a NURBS surface, or text object, you must convert it to a mesh object. To do so, select the object in object mode, and in the 3D View header, select Object → Convert To (AltC), and select Mesh from Curve/Meta/Surf/Text from the popup menu.
Cloth - Object collisions
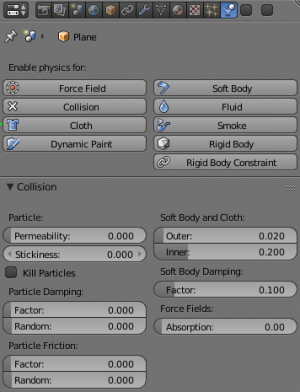
The cloth object needs to be deflected by some other object. To deflect a cloth, the object must be enabled as an object that collides with the cloth object. To enable Cloth - Object collisions, you have to enable deflections on the collision object (not on the cloth object).
In the Properties window Physics context in the Collision panel (shown to the right) after the activation collisions for an object appear their common options and settings of the colliding with other scene objects, include physics dynamics systems (particle system, softo body, cloth, fluid, rigid body).
Note, dynamics system in Blender have additionaly their specific settings for collisions.
Mesh Object Modifier Stack
The object’s shape deforms the cloth, so the cloth simulation must know the “true” shape of that mesh object at that frame. This true shape is the basis shape as modified by shape keys or armatures. Therefore, the Collision modifier must be after any of those.
Troubleshooting
If you encounter some problems with collision detection, there are two ways to fix them:
- The fastest solution is to increase the Min Distance setting under the Cloth Collision panel. This will be the fastest way to fix the clipping; however, it will be less accurate and won’t look as good. Using this method tends to make it look like the cloth is resting on air, and gives it a very rounded look.
- A second method is to increase the Quality (in the first Cloth panel). This results in smaller steps for the simulator and therefore to a higher probability that fast-moving collisions get caught. You can also increase the Collision Quality to perform more iterations to get collisions solved.
- If none of the methods help, you can easily edit the cached/baked result in Particle Edit mode afterwards.
- My Cloth is torn by the deforming mesh - he “Hulks Out”: Increase its structural stiffness (Structar setting, Cloth panel), very high, like 1000.
Subdivision Surface modifier
A bake/cache is done for every subsurf level so please use the equal subsurf level for render and preview.
|
Examples
To start with cloth, the first thing you need, of course, is some fabric. So, let's delete the default cube and add a plane. I scaled mine up along the Y axis, but you don’t have to do this. In order to get some good floppy and flexible fabric, you’ll need to subdivide it several times. I did it 8 times for this example. So ⇆ Tab into Edit mode, and press W → Subdivide, and set Number of Cuts parameter on the Tool Shelf to 8.
Now, we’ll make this cloth by going to the Physics context. Press the Cloth button. Now, a lot of settings will appear, most of which we’ll ignore for now.
That’s all you need to do to set your cloth up for animating.
Smoothing of Cloth
Then, your cloth is probably looking a little blocky. In order to make it look nice and smooth like the picture you need to add a Subdivision Surface modifier in the Modifiers context and click on Shading: Smooth button on the Tool Shelf.
Now, if you hit AltA, things are starting to look pretty nice, don’t you think?
Using Simulation to Shape/Sculpt a Mesh
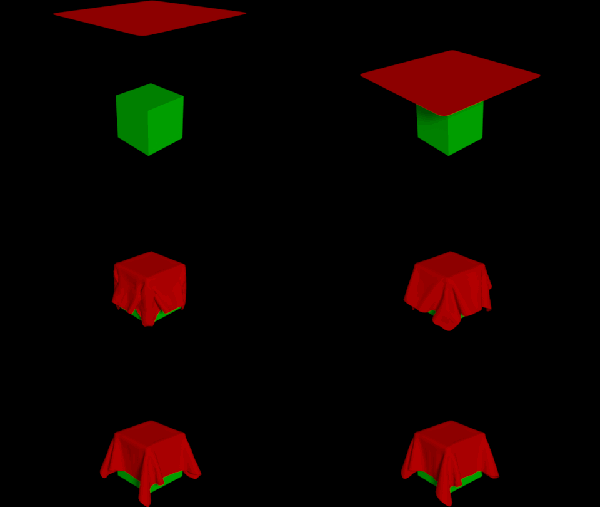
You can Apply the Cloth modifier at any point to freeze the mesh in position at that frame. You can then re-enable the cloth, setting the start and end frames from which to run the simulation forward.
Another example of aging is a flag. Define the flag as a simple grid shape and pin the edge against the flagpole. Simulate for 50 frames or so, and the flag will drop to its “rest” position. Apply the Cloth modifier. If you want the flag to flap or otherwise move in the scene, re-enable it for the frame range when it is in camera view.
Cloth on armature
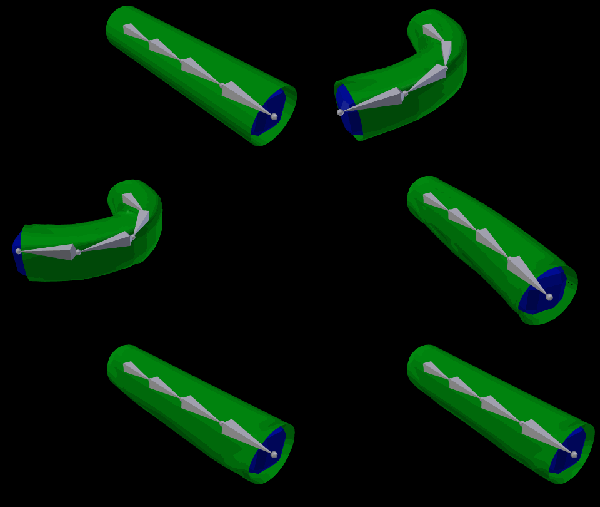
Cloth deformed by armature and also respecting an additional collision object: Regression blend file.
Cloth with animated vertex groups
Cloth with animated pinned vertices: Regression blend file.
Cloth with Dynamic Paint
Cloth with Dynamic Paint using animated vertex groups: Regression blend file.
Using Cloth for Softbodies
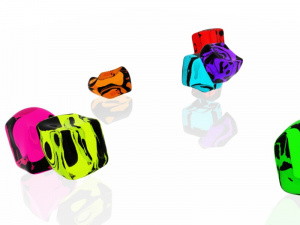
Cloth can also be used to simulate softbodies. It’s for sure not its main purpose but it works nonetheless. The example image uses standard Rubber material, no fancy settings, just AltA.
Blend file for the example image: Using Cloth for softbodies.
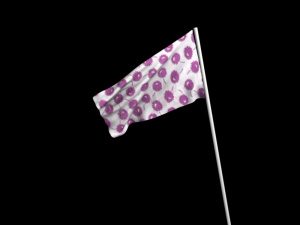
Cloth with Wind
Regression blend file for Cloth with wind and self collisions (also the blend for the image above): Cloth flag with wind and selfcollisions.
目次
- 1 Cloth Simulation
