Extensions:2.6/Py/Scripts/Add Mesh/WallFactory
目次
Block Wall
Create a "wall" with rows of "blocks"; options include: edging, openings. This is part of a package/collection of scripts that together create general architectural items. See add_mesh_building_basics or Building Basics for additional details.
The default wall is not suitable for more than basic results; some modifications are required. Defaults are intended for "simple use" and "ease of viewing", not a final product.
Code:
Stable, some re-work pending.
Documentation:
UI changes still not completed.
Build a Wall
Options, when disabled, will collapse to simplify the user interface. You will need to "select" some options in order to modify the properties. Turning off an option will preserve any changes made, displaying last input if enabled again.
Variance and Minimum are common options available for many properties. The variance value applies a "random (+-)" difference to create an uneven appearance to the blocks; hopefully creating a more realistic result. Minimum is a lower limit that the variation can result in. You may want to "try again" until you get the desired results; any parameter change will rebuild. Set to 0 if you want something more consistent like bricks.
Block Sizing: Defines the [block] columns (width), rows (height), and thickness (depth) of the wall.
Merge will create "larger" blocks (converge) when the blocks are "very close"; does not apply if Variance is zero (0) for Block Sizing.
Gap: The "space" between blocks.
Extended Settings
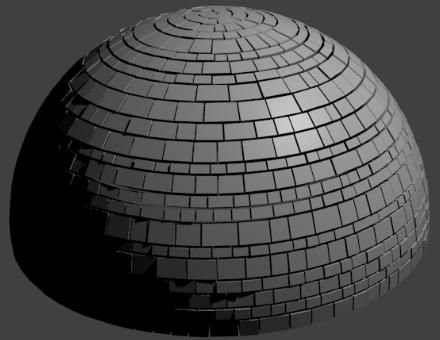
Wall Shape: The wall may be directly modified as a circle (Radial, bottom is center, a disc) or sloped (Curved along y-axis with top as origin). If both options are used a "dome" is created (bottom becomes top).
Openings: Create gaps in the blocks that can be used as doors or windows. The width (X+), height (Z+), indent (X), and Bottom (Z) define the area for the "hole". Arches "extend" the hole based on curve; if curve is less than half of width it will be smooth, else pointed.
Slots: Narrow openings, additional gaps, vertical (pointed) and/or horizontal.
Crenelation: Gaps on top of wall.
Shelf: Protrusion in defined area. Uses block sizing values for rows and block widths.
Steps: Extruded decremental levels (steps) in defined area; left or right oriented.
Making use of the properties available for the wall.
Use the Tab ⇆ Tab key to confirm an entry and move to next property for modification.
Wall Area
The "Wall Area" values define the limits of the wall, they are relative to the current 3D cursor. If you move the 3D cursor the [next] wall will generate at the selected location.
Color - Set material RGB/color. Width and Height are self explanatory.
Edging: Stagger blocks [alternately] on sides of wall. Stagger alternates to "mesh" rows when joined with copies of wall object (turret too), set to 0 for "flat" sides.
side stagger: 0 - 100.
Advanced Wall: You can make the wall "disappear" by setting "Start and End to 0" [defaults may apply but still not display wall]. This allows viewing wall "extensions" only; such as arches (openings), steps, and shelves.
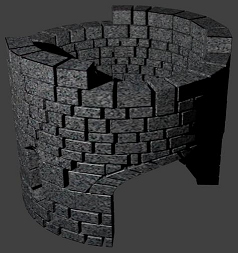
When warping wall, use 370 degrees to match overlap when edging is 1/2 of block width; if you're edging is something else, you'll need a different "circle".
Multiple wall edge matching, "corners", can be difficult to make a smooth "interconnection" when duplicating. Use 0 for "Edging" or "Block Size Height Variance" so rows/edges/ends match. Except when "openings" affect row sizing, this should work.
Duplicate the wall, relocate new wall horizontal or perpendicular (rotate -90) to original wall and match at edge/corner to connect. Locate at inner stagger for extruded corners; best if Block Width is more than Edging (so blocks don't look like they'll fall off).
Set Edging greater than "Block Depth" for extruded corners
Block Sizing
Defines the the [block] columns (width), rows (height), and thickness (depth), of the wall for distribution of blocks in the wall area.
If Variance is 0 blocks will be consistent (same size) over area. Except: top and bottom rows are usually taller by design; openings may "force" some rows to be a different size.
Merge Blocks will create "larger" blocks (converge) when the blocks are "very close"; as a modifier to general wall block sizing. Does not apply if Variance is zero (0) for Block Sizing.
"Width" (X): Horizontal block size
horizontal division (column) over wall area: 0.01 - 100.
"Height" (Z): Vertical block size.
vertical division (row) over wall area, 0.01 - 100.
"Depth" (Y): Thickness of wall blocks.
Block depth, 0.01 - 100.
Each "size" setting has a Variance (randomization) and a Minimum (lower limit randomization).
"Variance": Variable block size, blocks are centered for Depth.
randomize block size in direction: 0 - 100.
"Minimum": Minimal [least variation] of block size.
lower limit of variance, 0.01 - 100.
Advanced Blocks:
Change the block size - even if you plan to scale it later - yes, you should make them smaller to add "detail" to the general appearance, but big blocks, randomized, make a great result too.
Set Variance to more than main property value, interesting effects, especially with Depth; "Big Blocks" effect for all directions.
Extensions to the wall, steps or shelves, use block sizing to fill the area; though steps fix height to "riser" setting. Extensions may be obscured by wall blocks if the depth is greater than extension sizing.
Grout
Spacing between blocks.
"Thickness": The "space" between blocks.
Distance between blocks: +-10.
Variance (randomization) changes [affects] the sizing of blocks based on grout and affects "Merge Blocks" operation.
"Depth": Indent from the block "face". Currently does not create vertexes, so only Thickness is applicable.
Gouge for grout from face of blocks: +-10.
Wall Shape
Make the wall circular (a disc), or curved (sloped).
"Radial": Make wall circular, flat, a disc. The bottom is used as the center of the circle, with the top as the outer edge.
"Curved": Curve wall along y-axis, with top as origin; bottom will be offset from cursor.
| Create a tunnel | |
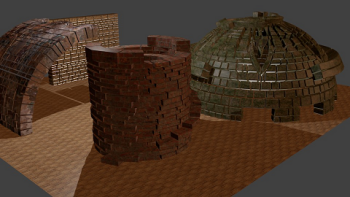
| By duplicating a curved wall it is easy to create a "tunnel" using the following steps: Top view 7 NumPad, duplicate the wall ⇧ ShiftD, rotate 180 R; you now have a tunnel. |
When both options are enabled a dome shape is created (bottom becomes top as per "Radial" operation). Using default settings, de-select (turn off) "Openings(s)", To create a simple, block (rough) dome.
Openings
When enabled openings/gaps are created, simple open spaces that may be "filled" with doors or windows.
"Width" (X+): Horizontal size of opening, centered from Indent.
Horizontal size of opening: 0.01 - 100.
"Height" (Z+): Vertical size of opening, center offset from Bottom.
Vertical size of opening: 0.01 - 100.
"Indent" (X): Horizontal center of opening, works with repeat to space openings over wall area.
Horizontal center of opening: +-100.
"Bottom" (Z): Vertical center of opening. Set to Wall Area Bottom plus half of Opening Height for a door (no blocks across lower part of opening).
Vertical center of opening: +-100.
"Bevel": Taper blocks surrounding opening, use negative values to taper "back side" of blocks. Bevel will create a "tapered" stone effect by reducing the interior edge according to setting. If Bevel exceeds block size (height, width, or arch thickness) odd results may occur.
Taper blocks surrounding opening: +-10;
"Repeat": Distribute openings across the Wall Area, centered to wall area, based on Opening Width and Indent. Set Indent greater than Width to separate openings when using repeat.
"Arches": Leave arches off for square openings, or set Curve to 0. Use Top or Bottom arch to set the curvature of the opening.
"Curve": Set the curvature for the opening. A Curve under half the opening Width will be smooth/flattened, otherwise it is "pointed".
Curve the opening: 0 - 100.
"Thickness": Set the "girth" of the arch stones, works with Bevel.
Sets the "girth" of the arch stones: 0 - 100;
Advanced Openings:
Create circular openings by setting the "curve" for top and bottom arches to half the width and set height to 0.
Slots
Narrow slits (default settings); meant for view/arrow ports. However, properties can be modified to replicate similar results to standard "Openings".
"Indent" (X): Works with repeat to space openings over wall area. Horizontal center of opening: +-100;
"Opening": Set sizing for slots, Width (X+) for Vertical, Height (Z+) for Horizontal slots.
Size slot, 0.01 - 100.
"Repeat": Distribute openings across the Wall Area, centered to wall area, based on Opening Width and Indent. Set Indent greater than "Opening" to separate slots when using repeat.
"Vertical": Vertical slots are arched, based on the "Opening" (X+) and Height (Z+). Arches are (extended) outside of opening.
"Height" (Z+): Vertical size of opening.
Vertical size of opening: 0.10 - 100.
"Bottom" (Z): Base for vertical opening: +-100.
"Horizontal": Square openings.
"Width" (X+): Horizontal size of opening
Horizontal size of opening: 0.10 - 100.
"Bottom" (Z): Vertical position for horizontal opening.
Vertical position for horizontal opening: +-100.
Advanced Slots:
Bug/feature: overlapping openings create "blocks" in common (overlapped) area. For slots this appears to be a problem, when using both Vertical and Horizontal, but, when you match (overlap) slots to "standard openings" you get an inverse block creation that you may like.
Crenels
Crenelation, gaps along top of wall, are openings based on a percentage of the wall area (nominal) height and width. Sizing is a "ratio" of wall area, 1 = 100%.
"Width %" (X distribution): Create repeated openings across top of wall area. Minimal block size area will be created, so Crenelation cannot actually be 100%, and thereby clip top of wall.
Horizontal size of opening: 0.10 - 1;
"Height %" (Z size): Offset from top of wall area; 100% will create "columns".
Vertical size of opening: 0.10 - 1;
Shelf
Add blocks to wall to make a platform, protrusion, in defined area. Uses block sizing values for rows and block widths.
Shelf will be obscured [not visible] if [half] block "Depth" is more than Depth of shelf.
"Left" (X):
Horizontal origin: +-100.
"Bottom" (Z):
Vertical origin: +-100.
"Height" (Z+):
Vertical size of shelf: 0.01 - 100.
"Width" (X+): Horizontal size of shelf: 0.01 - 100.
"Depth" (Y):
Thickness of shelf: 0.01 - 100;
"Backside":
Reverse Y so shelf is "behind" wall.
Steps
Add extruded decremental levels in defined area to create steps. Uses block sizing values for block widths; does not vary grout.
Steps will be obscured [not visible] if [half] block "Depth" is more than Depth of steps.
The "Riser" and "Tread" determine the step sizing. If the values do not fit within the "area" the steps may not reach the top.
"Left" (X):
Horizontal origin: +-100.
"Bottom" (Z):
Vertical origin: +-100.
"Height" (Z+): Offset from "Bottom".
Vertical area of steps: 0.01 - 100;
"Width" (X+): Offset from "Left".
Horizontal area of steps: 0.01 - 100.
"Depth" (Y):
Thickness of steps: 0.01 - 100.
"Riser": Determines the row height for each step.
Height of steps: 0.01 - 100.
"Tread": Determines the block width for each step. Blocks used to "fill" the row are based on wall block width settings.
Width of steps: 0.01 - 100.
"High Left": Reverse "start" to be on right of area; Lower Left to Upper Right is default construction.
"No Blocks": Creates "cantilevered" steps, that do not have supporting blocks under steps.
"Backside": Reverse Y so steps are "behind" wall.
Blender Tools
Modifications you may want to apply to an object using built-in Blender capabilities.
Bevel
Square blocks minimize the number of vertex points and faces but look artificial; put a bevel on the blocks to improve the general appearance.
Warning: Adding bevel will [at least] double the time it takes to render object - use this modifier sparingly; and it's best to wait until you're "almost done" before using it.
Properties>>Tools
Add Modifier - Select Bevel Scale: 0.10 works just fine... :)
Texture
Put a "finish" on your stone-work: This example describes using an image texture for simplicity. A "good" image, in this use case, will be large and have a lot of detail. The texture is applied to the object, not individual block elements.
The following is basic, and standard procedure for applying a texture to an object.
Select the object Properties>>Material
Add a new material. Name it Wall-Material.
Properties>>Texture Add a new texture. Name it Wall-Texture.
Set "Type" to Image.
Under Mapping tab, select Cube for projection.
Under Image tab, "Open" and select texture image.
Warp
Create a tower/curved wall. Use smaller block sizes so the warped wall is smoother.
Switch to edit mode.
Set top view, ortho.
Place the 3D cursor near center of wall and approximately 1/2 the wall width away.
Shift-W to enable warp. Move cursor to curve the wall. LMB to confirm. You can manually adjust the curve to fine tune the edge position in the toolbox.
Try different cursor locations and repeated warps for various effects.


