利用者:ValterVB/3D Audio
目次
3D Audio
Speaker Object
A Speaker is an object that provides a .....
Add a new speaker
Mode: Object mode
Hotkey: ⇧ ShiftA to add new.
Menu: Add » Speaker
Speaker Settings
Mode: Object mode
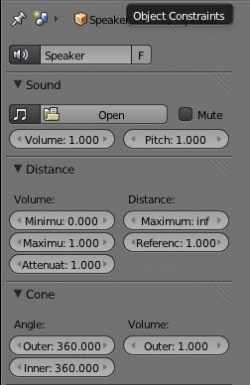
Panel: Speaker
Sound
- Open
- Load a sound file. There are two properties you can check when loading a sound (see Sound Load).:
- Cache: This means the whole sound will be decoded on load and the raw audio data will be buffered in memory, which results in faster playback, but uses quite a lot of memory. So this should be used for short sound effects that get played more often, but not for longer audio files such as music.
- Mono: For any 3D Audio or Panning effects the sound source has to be single channel, otherwise it's assumed that the 3D audio and panning information is already present in the multichannel file. So if you want to use those effects for a file with multiple channels, check this!
- Load a sound file. There are two properties you can check when loading a sound (see Sound Load).:
- Mute
- Mute the speaker.
- Volume
- Animatable with I key on the button. How loud the sound is.
- Pitch
- Animatable with I key on the button. Playback pitch of the sound.
Distance
Volume
- Minimum
- No matter how far the object is away, the distance based volume won't be lower than this value.
- Maximum
- No matter how close the object is, the distance based volume won't be higher than this value.
- Attenuation
- This factor changes the strength of the distance based volume change, depending on the chosen distance model (See Scene Sound).
Distance
- Maximum
- If the object is farther away than this distance, this distance is used to calculate the distance based volume. Influence of this value also depends on the distance model.
- Reference
- The distance at which the volume is 100 % (1.0). Set this value to the distance used for recording the sound. Usually sound effects recordings should be made exactly 1 m away from sound to get an accurate volume.
Cone
Imagine a cone with the top at the original of the speaker object and the main axis of it facing in the same direction as the speaker. There are two cones an inner and an outer cone. The angles represent their opening angles, so 360 ° mean the cone is fully open and there's no directionality anymore. Inside the inner cone the volume is 100 % (1.0), outside the outer cone the volume is whatever one sets for the outer cone volume and the volume between those two cones is linearly interpolated between this two volumes.
Angle
- Outer
- Angle of the outer cone, in degrees, outside this cone the volume is the outer cone volume, between inner and outer cone the volume is interpolated
- Inner
- Angolo interno del cono in gradi, dentro il cono il volume è al 100%
Volume
- Outer
- Volume outside the outer cone
Scene Sound
Audio
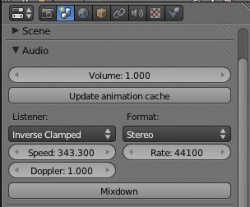
Those are in the Properties editor -> Scene -> Audio
- Volume
- Animatable with I key on the button. Overall scene volume that applies for sequencer strips and speaker objects. See Sequencer Audio Strips for details
- Update animation cache
- The audio system has an internal cache for the animated values that has to be kept up to date with blender. Normally this is done during every frame change, so if you fully play back the scene once, the cache should be up to date. Sometimes you want this to happen quicker, so just press this button to get an up to date cache.
Listener
These settings are relevant for the 3D Audio calculation of speaker objects as well as in the Game Engine.
- Distance Model
- Changes how the distance based attenuation is calculated, physically correct would be the Inverse model, but it's also possible to choose a linear and an exponential falloff. The clamped modes mean that the volume can't be louder than 100 % (1.0), that means if the distance is smaller than the reference distance, the volume is always 100 % (1.0).
- Exponent Clamped: Exponent distance model with clamping
- Exponent: Exponent distance model
- Linear CLamped: Linear distance model with clamping
- Linear: Linear distance model
- Inverse Clamped: Inverse distance model with clamping
- Inverse: Inverse distance model
- None: No distance attenuation
- Changes how the distance based attenuation is calculated, physically correct would be the Inverse model, but it's also possible to choose a linear and an exponential falloff. The clamped modes mean that the volume can't be louder than 100 % (1.0), that means if the distance is smaller than the reference distance, the volume is always 100 % (1.0).
- Speed
- Speed of sound. Important for the doppler effect calculation. The typical value is 343.3 m/s in air, in water for example this value is around 1560 m/s. Physically the value depends on the medium, temperature. (Speed of sound)
- Doppler
- Controls how strong the Doppler effect is. This is no physically based value, it's only there so you can exaggerate (> 1.0) or attenuate (< 1.0) the effect, physically correct is a factor of 1.0
Format
- Audio Channels
- Basically states how many speakers are there for playback later. Typical value is stereo. For home theatres there are often 5.1 or 7.1 sound systems.
- 7.1 Surround: Set audio channels to 7.1 surround sound
- 5.1 Surround: Set audio channels to 5.1 surround sound
- 4 Channels: Set audio channels to 4 channels
- Stereo: Set audio channels to stereo
- Mono: Set audio channels to mono
- Basically states how many speakers are there for playback later. Typical value is stereo. For home theatres there are often 5.1 or 7.1 sound systems.
- Rate
- Audio samplerate (samples/sec.). Tells how many audio samples per second there are. Typical values are 8000 and 11025 Hz and multiples of them. Values lower than 40000 Hz cannot contain all hearable frequencies. So common used values are: 44100 Hz (Music files, Audio CDs), 48000 Hz (recommended for Video files, DAT, DVD, BluRay), 96000 or 192000 (considered very high fidelity, DVD and BluRay).
- Mixdown
- Mixes the scene's audio to a sound file. For mixdown you can first set channel count and sample rate for the scene. Then when clicking mixdown you have some more options to set:
- Accuracy: Size of the mixdown buffer that also decides how often the animation relevant data is recalculated. A size of 1 gives 100 % accuracy, but will take a very long time to calculate. 1024 is a good basic value, that you might decrease by a factor of two only if you notice problems in the output.
- Container: File format for the mixdown. Recommended: matroska/mkv: Can save any Codec, or use the fitting Container for the Codec you want to use (eg Ogg for Vorbis), see next point.
- Container: Available when ogg is selected. If the container supports multiple codecs (like matroska/mkv or ogg), you can choose the audio codec. Examples: PCM (Uncompressed RAW data, no quality loss, but huge), FLAC (Free Lossless Audio Codec, Compressed and lossless, recomended for high fidelity), Vorbis (similar to mp3, but free!), AC3 (Attrac-3, Dolby Digital, used on DVD and BluRay).
- Bitrate: Available when ogg is selected. Bitrate in kbit/s.
- Container: Available when wav is selected. Depending on the Codec, Tells how many bits and which format are used for a single sample. Common used standard in audio is S16 (Signed integer, 16 bit), meanings of the letters: S = Signed, U = Unsigned, F = Floating Point. Internally blender uses F32, so this should be your choice for high fidelity, otherwise S16 is fine (and used for all Codecs where you don't have a choice).
Timeline Settings
Sync Mode
In the timeline window you can set playback settings.
- Sync Mode
- How to sync playback.
- AV-sync: Audio plays back realtime and tells video it's playback time resulting in synchronised playback (video drops frames if necessary). If Jack is used as output device, this enables Jack Transport support
- Frame Dropping: Again sound plays back realtime, but video plays clocked by an external timer and drops frames if necessary, this should be more precise, but if the audio playback and the external timer are out of sync, playback will also be.
- No Sync: Means that audio plays back realtime and video displays every frame, no matter how fast, resulting in a non synchronised playback, if the video is too slow.
- How to sync playback.
Game Engine
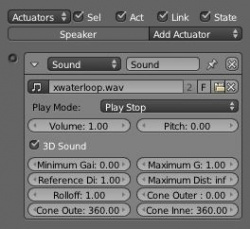
Sound Actuator
The Sound Actuator basically has the same properties as the speaker objects have, so check above. Moreover it has a playback mode.
- Play Mode
- Playback mode.
- Loop Bidirectional Stop: Stops immediately when the positive signal is gone. Play the sample forward, then backward and loop this process endlessly, in case of End this stops as soon as the backward playing is over.
- Loop Bidirectional End: The sound play until the end of the sample. Play the sample forward, then backward and loop this process endlessly, in case of End this stops as soon as the backward playing is over.
- Loop End: The sound play until the end of the sample. Loop endlessly.
- Loop Stop: Stops immediately when the positive signal is gone. Loop endlessly.
- Play End: The sound play until the end of the sample. Play once.
- Play Stop: Stops immediately when the positive signal is gone. Play once.
- Playback mode.
Graph Editor
To be wikify
F-Curve Editor
This operator is available in the Graph/F-Curve Editor: Key -> Bake Sound to F-Curves. It bakes the audio wave hull curve onto an F-Curve. Settings.
- Lowest frequency: Cutoff frequency of a highpass that is applied to the audio data.
- Highest frequency: Cutoff frequency of a lowpass that is applied to the audio data.
- Attack time: Value for the hull curve calculation that tells how fast the hull curve can rise (the lower the value the steeper it can rise).
- Release time: Value for the hull curve calculation that tells how fast the hull curve can fall (the lower the value the steeper it can fall).
- Threshold: Threshold for the hull curve calculation, that thresholds the minimum amplitude value needed to influence the hull curve.
- Accumulate: In case this is on, only the positive differences of the hull curve amplitudes are summarized to produce the output.
- Additive: The amplitudes of the hull curve are summarized or when Accumulate is checked the differences (also negative) are additionally added.
- Square: The output is squared which means the signum function is applied to the hull curve, resulting in a graph with only -1, 0 or 1 as value.
- Square Threshold: Threshold for squaring, all values with an absolute amplitude lower as this value result in 0 as value.
User Preferences
To be wikify
System
In the User Preferences window under System you find the Sound settings.
- Audio output device: None (obvious), SDL (Simple direct media layer, should work everywhere, but bad quality), OpenAL (Standard, supports Hardware mixing with correct drivers), Jack (Audio Server for professional audio)
- Channels: Output channels, ie how many speakers do you have? (Only really works for Jack, SDL is buggy and OpenAL autodetects and uses this or some external user configuration)
- Mixing Buffer: Size of the mixing buffer, always has an influence on the latency, so for this the lower the better, but if you have clicks or other problems, try rising the size.
- Sample rate: See Mixdown.
- Sample format: also see Mixdown.
Sequencer
To be wikify
Audio strip
There are several settings in the properties panel of the Video Sequence Editor:
- Caching: See Cache option on file loading.
- Draw Waveform: This draws the outline of the waveform in the audio strip which is a particularly useful feature for lip synching.
- Volume: Animatable! Controls the volume of the strip. Typically values should be between 0 and 1! If you use higher values it's possible that clipping (samples with an resulting amplitude out of this range get clipped to it) happens, which drastically influences sound quality.
- Pitch: Animatable! This basically changes the playback speed of the sound which also results in a pitch change. Unfortunately this leads to possible seeking errors and the length of the strip isn't updated as well.
- Pan: Animatable! Only works for Mono sources. Values can be between -2 and 2, where 0 means front/center, -1 means to the left and 1 to the right. In case of multichannel audio/rear speakers you can pan to those with the higher values: -2, 2 is back. So this value basically represents the angle at which it's played, to get it in degrees: angle = pan * 90°.


