利用者:Psy-Fi/UV Tools
目次
GSOC 2011 - Onion branch
This page features the tools and design of uv tools for the onion branch of blender GSOC 2011
16 bit float textures
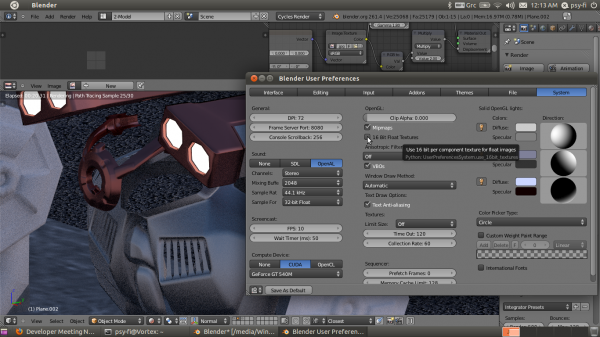
This feature allows users to load 16 bit per component textures for editing into the 3D display when working with float images. This feature is mostly notable when working with the new bump map painting capabilities of blender. To enable the feature, check 16 Bit Float Textures under User Preferences -> System
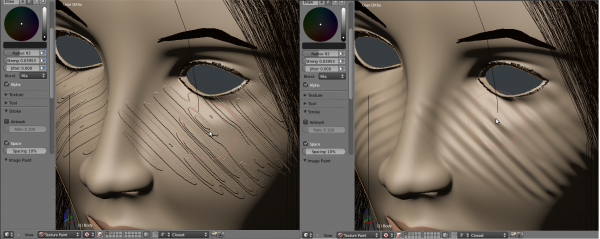
And this image shows a comparison when painting with a high size cloud texture
implementation details
Modifications were needed basically in two functions: GPU_paint_update_image, where I plugged a new function, IMB_partial_rect_from_float, which basically ensured that only part of the float image was converted to byte format for internal use when painting(As optimization for texture painting) and the changed part was kept in a buffer and uploaded separately on the GPU. OpenGL takes care of conversion of float images automatically to the internal format.
So we need to ensure that our texture is initialized with the correct internal format. This is done in GPU_verify_image. The function now checks if user has enabled high resolution textures, and if he has it makes sure that an appropriate internal format is used. Initially float OpenGL internal formats were considered but I have settled to RGBA16 because they have a better support from older hardware, do not require extra initialization checks and they exist since OpenGL 1.1, making this the most compatible choice. : Unfortunately it is possible for the driver to choose an 8-bit format without warning if no 16-bit format is supported (For instance on an intel card of mine).Nothing breaks this way though, it's just that the visual result stays the same. Some extra modifications were needed in blending functions of smudge in do_projectpaint_thread to make sure that float, rather than byte operations were performed.
Color correction for float image painting
Float images can handle the extra precision needed for conversion between sRGB-RGB so now when painting on float images with linear color profile (such as loaded exr images) the user gets correct color result.
implementation details
Color correction is a hot topic, after discussion in irc with mentor decided to convert only float images from/to sRGB. This actually made sure that conversion always took place when processing float image. Changes were needed in the color mix functions of paint_image.c like do_projectpaint_draw_f and brush_painter_paint, making sure brush colors were converted appropriately.
- accepted to trunk
Subsurf-aware unwrapping
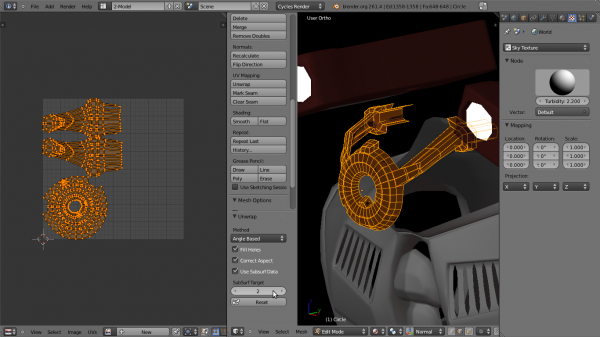
Unwrapping now accounts for area and position of vertices after subsurfing, which will give more correct results on subsurfed meshes with high area deformation. To use select unwrap (U key in 3D editor, E key in UV editor) and now you can use new operator options in the toolbar to change the behavior of the unwrapper. Check 'Use subsurf data' and select the level of subdivision to calculate below, in the 'Subsurf Target' field.
implementation details
The idea is simple: Subdivide the mesh and then feed the subdivided vertices into the unwrapper. This works but requires a few hacks: First we need to determine if the subdivided vertex corresponds to a pre-existing vertex. If it does, we feed the pointer of the initial MTFace uv to the unwrapper so that, on unwrap flush time, the results get written to the original uv. To do the detection, we request a DerivedMesh with CD_ORIG_VERTEX data. When querying a vertex for its initial index, the index returned is -1 if there is no original vertex that produced the derived vertex directly. If the vertex was produced by the subsurfer, we feed the uv from the CD_MT_FACE layer into the unwrapper, so that there is actual memory for flushing to operate on. The actual implementation is in uvedit_unwrap_ops.c function construct_param_handle_subsurfed. A few modifications were also needed so that live unwrap remembers your subsurf preference as a variable in toolsettings.
Improved stitch operator
Stitching refers to joining the UVs corresponding to the same vertex in 3D space.
To use the new stitch operator, use the old key, V, while in the UV editor. You will enter a modal mode of operation. A lot more options are available now when stitching:
Most new options and keys are listed in the area header when you enter stitch mode. Active options are marked by an asterisk on their left.
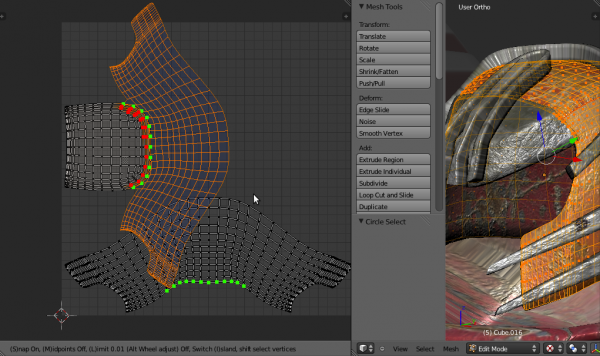
- Key to the operation of stitching is the notion of the static island(highlighted in light blue when pressing V). Attempting to stitch UV's that cannot be stitched with a UV of the static island will fail. There are also extra modes of stitching. "Midpoint" stitching and "Snap". The tool, when "Midpoint" is on, will stitch UVs halfway through their distance, while when it is off, will stitch them on the corresponding UV of static island. If more than one UV corresponding to each vertex is present on the static island, the solution is to use the "Limit" option. Attempting to stitch two UVs belonging to the static island will fail, unless the mode is "Midpoints" On and "Snap" Off. You may toggle "Midpoint" mode by pressing M and you may change the static island by pressing I. By pressing I, the static island alternates between islands that contain possible uvs for stitching.
- The operator acts on current selection. To select/deselect additional uvs to stitch, press ⇧ ShiftRMB
 (for users using right mouse to select, use that instead). UVs that can be stitched together are marked green, and you can see a preview of the modified final result. UV's that, even though selected can't be stitched(due to stitch limit or not stitchable with a static island UV) will be marked red.
- There is the old option of limiting stichable UVs by their distance. To enable this feature press L and change the limit distance by pressing Alt+ NumPad and Alt- NumPad or AltWheelUp
 and AltWheelDown
  .
.
- There is the option to snap islands that have stitchable uvs together. By pressing S, you activate this option.
- Note that when deselecting/selecting, all corresponding stitchable/unstitchable edges/UVs that belong to the same vertex are deselected/selected. This way you can deselect the opposite stitchable UV and the initial selection gets deselected too. However, each UV is checked separately if its eligible for stitching. So options like Limit will apply to each UV separately.
- All GUI colors are configurable under themes->Uv Editor, having 'stitch preview' names
implementation details
This was a hard to do operator because it required so much inter-dependent
functionality and also required a preview that got updated separately from the final result. Implementation of the operator can be found in uvedit_ops and it spans a whooping 1500 lines of code. Most of the operation is based on UvVertMaps, structures that contain information about uvs shared by a single vertex and their proximity. However I needed more information, such as island for each uv, total number of uvs and direct storage of EditFace pointers to avoid initializing EditFace arrays, as was the case with UvVertMaps. this resulted in a similar data structure called UvElement and UvElementMap, respectively.
A separate preview structure was implemented that was my first try with the
way I visualize OpenGL drawing in blender: count quads and triangles separately and draw them with a single draw call, instead of multiple glBegin/glEnd calls. Drawing code is at uvedit_draw.c at the end of function draw_uvs. I implemented geometry containers for edge/uv indicators and preview result separately.
The internals are more or less as described in the operation description
above but it was hard to keep track of all uvs. Internally, the uvs are flagged as stitchable, previewable or simply processed(unstitchable) by detecting if there are any uvs that are not adjacent to it.
Selection is detected by tagging the MTFace selection flag. This looked like a good choice then, and dealt with automatic stitching of selection before starting the operator but it has issues with redo,
I think, in hindsight that an approach like the one used in uv paint
brushes, where I operated on only one of the coincident uvs and propagating if necessary might, as in not necessarily, be cleaner. There were a few bugs where selection/operation flags were not cleaned up properly and currently there is no way to redo with different options based on the selection made during the operator(I hope to rectify this before the end of GSOC though). Also noticed that in uv synch mode the tool is broken. Addressing the former issue though will solve the latter. i plan to do this by using a dynamic RNA container to store the selection.
This also marked my first attempt at GUI color configuration.
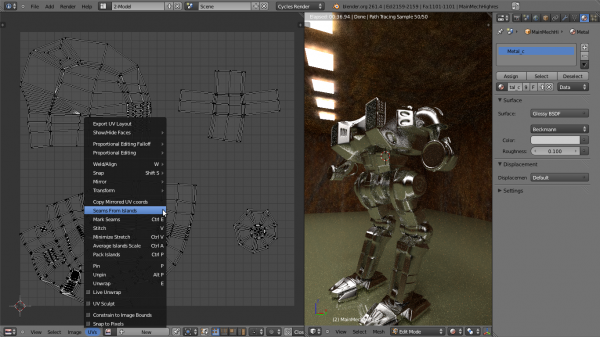
Calculate Seams from Islands
This operator, accessible from the UV menu recalculates the mesh seams from the current layout of uv's in the uv editor. You can use it to tag edges as seams or sharp(useful for bump mapping where you need normals calculated correctly when baking), based on operator options.
implementation details
Another operator that might have been done easily after the methodology I developed for UV brushes. It uses a per-edge iteration scheme, looking for separated uvs belonging to the same vertex by using UvVertMaps. This was non trivial using this methodology because I had to store a lot of temporary variables to track state of separated uvs. Comparing with edge adjacency information stored for UV brushes this would have been a lot cleaner.
Tag Seams in UV editor
This operator tags edges as seams from the uv editor and re-unwraps if live unwrap is on. To use press CtrlE to tag selected edges.
implementation details
Hardly any magic to it, it just iterates and tags seam to selected or finds nearest edge and tags it.
Brushes for UVs
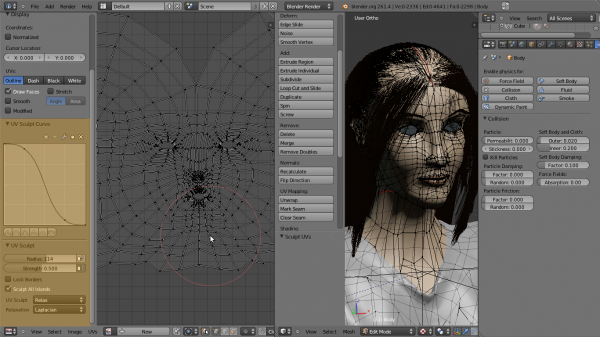
Activated by ticking "UV Sculpt" in the UV menu or pressing Q, they allow you to grab, pinch and smooth UVs, just like sculpt mode. When UV sculpting is activated, the properties panel shows brush tool selection items and options.
There are three brushes that operate on uvs: grab brush activated by pressing G, relax brush, activated by pressing S, also by ⇧ ShiftLMB ![]() and pinch brush, activated by pressing P.
To use the brushes simply use LMB
and pinch brush, activated by pressing P.
To use the brushes simply use LMB ![]() . The pinch brush can be inverted by pressing CtrlLMB
. The pinch brush can be inverted by pressing CtrlLMB ![]() Using standard convention, you can scale the brush with F and change its strength with ⇧ ShiftF
Using standard convention, you can scale the brush with F and change its strength with ⇧ ShiftF
- The Pinch brush draws uvs toward its center, making the texture take up less space on the model locally. Pressing CtrlLMB
 produces the inverse result, making the texture take up more space.
 - The Relax brush makes uvs more evenly distributed. The algorithm relies on space, not stretch minimization, so most probably a minimize stretch will have to be run for optimal results. However it is great when stitching islands to or when unwrap produces cluttered results to make the distribution of Uvs more even. There are two relax algorithms: HC relaxation and laplacian relaxation. You can choose between the two using the listbox that appears under the tool listbox when Relax is selected as brush (See picture below)
Options for uv sculpting:
- Lock Borders: when this is checked, the boundary uvs of uv islands will not be affected by the brush. This is very useful to preserve the shape of a uv island and it's almost always used with relax brushes or islands tend to shrink.
- Sculpt All UV islands: when this is checked, the brush will operate on all UVs, else it will only operate on the island nearest to the brush center when the sculpt stroke begins. This can save some performance because only the uvs of that island are registered for processing.
implementation details
The biggest challenges when programming the brushes were:
- Make the keymap register so the sculpt operator can run
- Create adjacency information in the form of uv edges (There are no uv edges in current blender architecture, all Uvs are represented as "vertices" internally). These were necessary for the "Lock Boundaries" option, as well as for the operation of relax brushes. The relax brushes are based on code made by Raul Fernandez or farsthary, provided through his blog at http://farsthary.wordpress.com/2011/02/16/relaxation-patch/
Connectivity data is produced as follows: we make a UvElement map and register only the first of every coincident uv for processing(to reduce workload). Then we make edges from these UvElements, storing them in a hash and tagging the edge as internal if any hash collisions occur(meaning that the same coincident uvs are shared by two faces). Then we tag the UvElements of non internal edges as boundary.
This all happens at operator invoke time, Grab brush additionally stores the affected Uvs and the amount of influence of the brush on them at invoke time. Then at modal time, each tool calls its own code and operates on the registered first coincident uvs who then propagate the changes, if any, to their adjacent uvs.
This is not the most optimal setup: connectivity is calculated every time the user starts a stroke. Ideally I would make a "uv sculpt" mode, where the model would be forced out of edit mode and the uv information and connectivity would stay valid. Since uv editing only happens in edit mode though, where changes to topology of both mesh and uv islands is allowed, I have settled for this solution. It works well on my machine and by unticking the Paint All Islands option, connectivity is generated only for one island, saving some performance.
featurettes
- enable partial update in UV/image editor image painting
- Uvs are now drawn in image editor when in texture paint mode.
For more info on features visit my blog: http://psy-fidelity.blogspot.com/
midterm progress video at:
final video:
TODOs:
Support tiled texturing for high res texturesSupport Island snapping for smart stitchBug in smart stitch: Shared vert of two edges not stitching one of it's counterparts correctly. has to do with order of processing. Solution is to do a second stitch pass on UVs. May use this to lift restriction on one selection on vertex stitching. Note: this may be unnecessary due to a different behaviour of the tool. Will need gather more opinions.Re-implemented from scratch, should not be an issue.Support 'tag seam' in uv synch mode- Add save unsaved images on exit
Preview colors configurable in user preferences
