利用者:Pepribal/Ref/3DView/Sidebars/Properties/GreasePencil
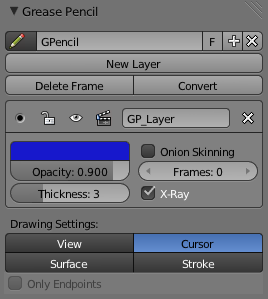
Grease Pencil panel
This panel lets you manipulate the grease pencil datablock linked to a particular scene or object.
The first control in the panel is the datablock selector, used to link/unlink grease pencil datablocks to the current scene or active object.
With New Layer a new sketch layer can be added to the datablock.
Delete Frame deletes the current sketch ("onion paper"), that is, the one that shows on screen.
Convert converts the visible sketch of the active grease pencil layer into a nurbs path or bezier curve (a select popup menu prompts for those options). The center of the object will be the global origin, or the 3D cursor in case that is selected as pivot center.
Under those, the layer boxes appear. Those sketches belonging to boxes that appear upper in the panel will be drawn below other sketches belonging to other boxes. Each layer box has the following controls:
- The active layer button lets you define which layer is the active. When you change any setting from any of the layers, that layer becomes active.
- The lock button prevents the sketches of the layer from being modified. In addition, it locks the current "onion paper" on screen, regardless of further active frame changes.
- The visibility button lets you hide or show the layer sketches.
- The lock current frame button locks the current "onion paper" on screen, regardless of further active frame changes.
- Next you have a text control so that you can give the layer a name.
Regarding the layer settings, you can find the following buttons:
- Sketch color holder.
- Opacity lets you choose the transparency of the sketches.
- Thickness defines the thickness of the sketches, in pixels.
- Onion Skinning lets you see more than one "onion papers" of the specific layer, besides the current one.
- Frames lets you define how many "onion papers" will be seen, in case Onion Skinning is ticked. If you set it to 0, you will only see the former and next "onion papers", in a more transparent colour, besides the current one. Otherwise you define the number of timeline frames that will make up a range of visible sketches. The further from the current frame, the more transparent will the rest of sketches be drawn. Beyond that range, no sketches will be shown.
- X-Ray ticked will cause the sketches to be drawn over every object and viewport elements like the grid. Otherwise they will be drawn according to their 3D position.
As sketches are drawn onto 2D views, there are several ways to define their depth. The following option buttons define which one will be used when drawing:
- View draws without depth; like painting on the monitor itself.
- Cursor draws on the XY plane of the current view, with its depth defined by the 3D cursor.
- Surface adjusts the depth to the surface of the objects over which strokes move.
- Stroke adjusts the depth to other existing grease pencil strokes, even from other layers.
In Surface and Stroke, depth is being adjusted all the time while drawing, unless Only Endpoints is ticked, in which case only the initial and final points of the stroke will be used to define depth.
