Meta:Sanbox/Doc:2.6/Manual/Sequencer/Strips/Add-Modify
目次
Adding Strips
Add a strip
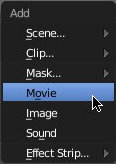
The Add menu is the main menu you will be using to add content to the VSE. In general, you load up your strips, create strips of special transition effects, and then animate out your sequence by selecting "Do Sequence" and clicking the Anim button. You can use the Add menu in the header, or hover your mouse cursor over the Sequence workspace and press ⇧ ShiftA.
Clips can be Huge
A three minute quicktime .mov file can be 140Megs. Loading it, even over a high-speed LAN can take some time. Don't assume your computer or Blender has locked up if nothing happens for awhile.
|
The strips types you can add are described in the Strips definition and types page. When you choose to add one of these, the VSE window will switch to a file browser for you to select what you want to add.
When you click the Add <whatever> strip button, the window pane will switch back to VSE, and the strips will be added to the sequencer, at the time cursor position, one after the other.
Add Movies
To add a single movie (with or without sound), LMB ![]() LEFT CLICK on it to select, and click on the Add video strip at the top of the browser.
LEFT CLICK on it to select, and click on the Add video strip at the top of the browser.
You can add several movies as well (see Add Images section below).
Error: The selected file is not a movie or FFMPEG support not compiled in!
means that the file is not a movie that Blender can recognize, because you don't have a codec that can decode the movie file. If so, find a codec so you can play the file outside of Blender, and then you will be able to load it.
|
Add Images
When you add a single image, Blender makes it into a 50-frame strip, which means that image will be in your video for two seconds (at 25 fps – PAL). Aside from re-positioning it, you will want to scale it by RMB ![]() right-clicking on either the start or end arrow, and dragging left or right. As you move, the frame number updates to say where the arrow is. Click LMB
right-clicking on either the start or end arrow, and dragging left or right. As you move, the frame number updates to say where the arrow is. Click LMB ![]() to validate, or RMB
to validate, or RMB ![]() to cancel the modification.
to cancel the modification.
In the case of (numbered) images sequence, you have a choice: Range: Navigate into the directory and left-click and drag over a range of names to highlight multiple files. You can page down and continue left-click-dragging to add more to the selection. Batch: Shift-left-click selected non-related stills for batch processing; each image will be one frame, in sort order, and can be a mix of file types (jpg, png, exr, etc.) All: Press A to select/deselect All files in the directory.
| Dealing with Different Sizes | |
| Dealing with different sized images and different sized outputs is tricky. Think like a pixel. If you have a mis-match between the size of the input image and the render output size, the VSE does try to auto-scale the image to fit it entirely in the output. If you do not want that, use Image Offset in the properties panel (N) to move the image within the output. When you use Image Offset, the auto-scaling will be disabled. |
Add Scene
You can add the virtual image output of a Scene in your current .blend file as well. Select the scene from the popup list, and a strip will be added and rubberbanded to your mouse just like a movie or image. The strip length will be determined based on the animation settings in that scene (not the current scene, unless the VSE is operating in the same scene).
When adding a Scene strip, please note that, in order to show you the strip in the VSE Image preview mode, Blender must render the scene. This may take awhile if the scene is complex, so there may be a delay between the time you select the scene and the time the strip appears. To reduce the delay, simplify the scene rendering by selecting fewer layers to render.
Add Audio
The VSE can incorporate as many Audio strips as you wish and the result will be the mixing of all of them. You can add any audio format that your system can read.
Overlapping strips are automatically mixed down during Render Animation processing. For example, you can have the announcer on channel 5, background music on channel 6, and foley sound effects on channel 7.
| Audio playback and video synchronization | |
|
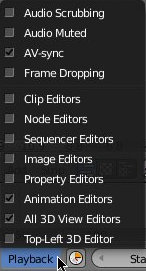
In the Playback menu of the Timeline window pane (at the bottom of the screen), you'll find some options concerning audio playback behavior:
|
Add Clips
Add Masks
To add a Mask, you'll need to create one (or more) before, within the Image (or movie) Editors window. (see Blender 2.64: Mask Editor release notes page for more infos).
Once you have a mask, you'll be able to choose it in the sub-menu and use it same way as other strips.

