Doc:2.6/Manual/Modeling/Meshes/Vertex Groups/Weight Paint
目次
Weight Paint in a nutshell
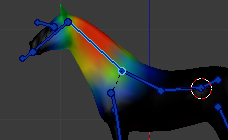
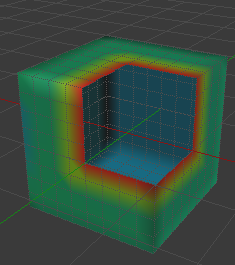
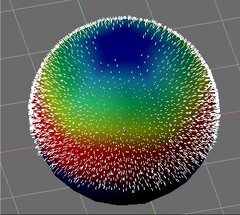
- You enter Weight Paint mode from the Mode Menu (hotkey=Ctrl⇆ Tab). The selected Mesh Object is displayed slightly shaded with a rainbow color spectrum.
- The color visualizes the weights associated to each vertex in the active Vertex Group. Blue means unweighted; Red means fully weighted.
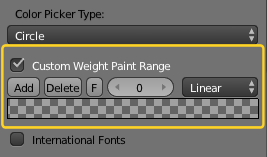
- You can customize the colors in the weight gradient by enabling Custom Weight Paint Range in the System tab of the User Preferences.
- You assign weights to the vertices of the Object by painting on it with weight brushes. Starting to paint on a mesh automatically adds weights to the active Vertex Group (a new Vertex Group is created if needed).
Weight Paint Mode
Vertex Groups can potentially have a very large number of associated vertices and thus a large number of weights (one weight per assigned vertex). Weight Painting is a method to maintain large amounts of weight information in a very intuitive way. It is primarily used for rigging meshes, where the vertex groups are used to define the relative bone influences on the mesh. But we use it also for controlling particle emission, hair density, many modifiers, shape keys, etc.
The basic principle of the method is: the weight information is literally painted on top of the Mesh body by using a set of Weight brushes. And since painting is always associated with color, we also need to define ...
The weighting Color Code
Weights are visualized by using a cold/hot color system, such that areas of low influence (with weights close to 0.0) are drawn in blue (cold) and areas of high influence (with weights close to 1.0) are drawn in red (hot). And all in-between influences are drawn in rainbow colors, depending on their value (blue, green, yellow, orange, red)
In addition to the above described color code, Blender has added (as an option) a special visual notation for unreferenced vertices: They are drawn in black. Thus you can see the referenced areas (drawn in cold/hot colors) and the unreferenced areas (in black) at the same time. This is most practical when you look for weighting errors (we will get back to this later).
Brushes
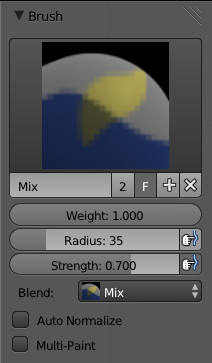
Painting needs paint brushes and Blender provides a Brush Panel within the Tool Shelf when it operates in Weight Paint Mode. You find predefined Brush Presets when you click on the large Brush Icon at the top of the brush Panel. And you can make your own presets as needed. See below for the available brush presets and to create custom presets.
The main brush properties
The most important and frequently modified properties are:
- Weight
- The weight (color) to be used by the brush. However, the weight value is applied to the Vertex Group in different ways depending on the selected Brush Blending mode (see below).
- Strength
- This is the amount of paint to be applied per brush stroke. What that means exactly also depends on the Brush Blending mode.
- Radius
- The radius defines the area of influence of the brush. Note: You can also change the Brush radius with a keyboard shortcut while painting. Just press F at any time, then drag the mouse to increase/reduce the brush radius. Finally click LMB
 to use the new setting. Or press the Esc key at any time to return to the current settings.
 - Blend mode
- The brush Blending mode defines in which way the weight value is applied to the Vertex Group while painting. Blender provides 7 different Blending modes:
- Mix: In this Blend mode the Weight value defines the target weight that will eventually be reached when you paint long enough on the same location of the mesh. And the strength determines how many strokes you need to arrive at the target weight. Note that for strength = 1.0 the target weight is painted immediately, and for Weight = 0.0 the brush just does nothing.
- Add: In this blend mode the specified weight value is added to the vertex weights. The strength determines which fraction of the weight gets added per stroke. However, the brush will not paint weight values above 1.0.
- Subtract: In this blend mode the specified weight is subtracted from the vertex weights. The strength determines which fraction of the weight gets removed per stroke. However the brush will not paint weight values below 0.0.
- Lighten: In this blend mode the specified weight value is interpreted as the target weight very similar to the Mix Blend mode. But only weights below the target weight are affected. Weights above the target weight remain unchanged.
- Darken: This Blend mode is very similar to the Lighten Blend mode. But only weights above the target weight are affected. Weights below the target weight remain unchanged.
- Multiply: Multiplies the vertex weights with the specified weight value. This is somewhat like subtract, but the amount of removed weight is now dependent on the Weight value itself.
- Blur: tries to smooth out the weighting of adjacent vertices. In this mode the Weight Value is ignored. The strength defines how effectively the blur is applied.
Normalize Options
Blender also provides Options regarding the automatic normalizing of all affected Vertex groups:
- Auto Normalize
- Ensures that all deforming vertex groups add up to 1 while painting. When this option is turned off, then all weights of a vertex can have any value between 0.0 and 1.0. However, when Vertex Groups are used as Deform Groups for character animation then Blender always interprets the weight values relative to each other. That is, Blender always does a normalization over all deform bones. Hence in practice it is not necessary to maintain a strict normalization and further normalizing weights should not affect animation at all.
- Multi-Paint
- Paint on all selected Vertex Groups simultaneously. This option is only useful in the context of Armatures, where you can select multiple Vertex Groups by selecting multiple Pose bones.
The Brush stroke definition
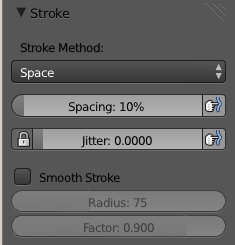
- Stroke Method
- Airbrush: Keep applying paint effect while holding mouse down (spray)
- Space: Limit brush application to the distance specified by spacing (see below)
- Dots: Apply paint on each mouse move step
- Rate (only for Airbrush)
- Interval between paints for airbrush
- Spacing (only for Space)
- Limit brush application to the distance specified by spacing
- Jitter
- Jitter the position of the brush while painting
- Smooth Stroke
- Brush lags behind mouse and follows a smoother path
- Radius
- Minimum distance from last point before stroke continues
- Factor
- Higher values give a smoother stroke
The brush Falloff curve
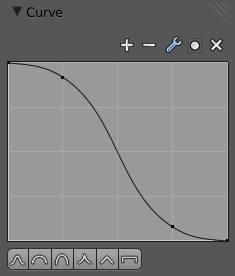
The brush falloff editor allows you to speciy the characteristics of your brushes to a large extent. The usage should be obvious and intuitive.
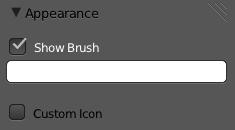
The brush appearance
- Show Brush
- makes the brush visible as a circle (on by default)
- Color setter
- To define the color of the brush circle
- Custom icon
- Allows definition of a custom brush icon
Brush presets
Blender provides several Brush presets:
- Mix, Draw, Brush: uses the Mix Blending mode to draw the brush weight with varying strength and brush falloff
- Add: uses the Add Blending mode
- Subtract: uses the Subtract Blending mode
- Lighten: uses the Lighten Blending mode
- Darken: uses the Darken Blending mode
- Multiply:uses the Multiply Blending mode
- Blur: uses the Blur Blending mode
Customizing brush color space
Blender allows customization of the color range used for the Weight Paint colors. You can define the color band as you like; for example, you can make it purely black/white (similar to maya Weight painting), and you can even use Alpha values here.
You find the customizer in the User Properties section, in the System Tab.
Selection Masking
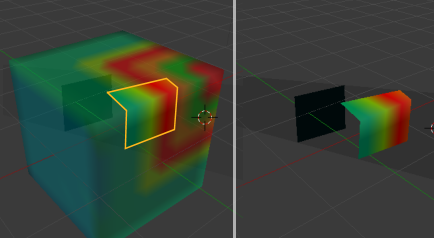
If you have a complex mesh, it is sometimes not easy to paint on all vertices in Weight Paint mode. Suppose you only want to paint on a small area of the Mesh and keep the rest untouched. This is where selection masking comes into play. When this mode is enabled, a brush will only paint on the selected verts or faces. The option is available from the footer menu bar of the 3D viewport (see icons surrounded by the yellow frame):
You can choose between Face Selection masking (left icon) and Vertex selection masking (right icon).
Select mode has some advantages over the default Weight Paint mode:
- The original mesh edges are drawn, even when modifiers are active.
- You can select faces to restrict painting to the vertices of the selected faces.
- Selecting tools include:
Details about selecting
The following standard selection operations are supported:
- RMB
 – Single faces. Use ⇧ ShiftRMB
  to select multiple.
 - A – All faces, also to de-select.
- B – Block/Box selection.
- C – Select with brush.
- L – Pick linked (under the mouse cursor).
- CtrlL – Select linked.
- CtrlI - Invert selection (Inverse).
| Selecting Deform Groups | |
| When you are doing weight painting for deform bones (with an Armature), you can select a deform group by selecting the corresponding bone. However, this Vertex Group selection mode is disabled when Selection Masking is active! |
Vertex Selection Masking
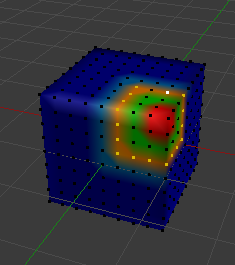
In this mode you can select one or more vertices and then paint only on the selection. All unselected vertices are protected from unintentional changes.
Note: This option can also be toggled with the V key:
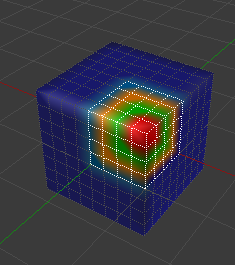
Face Selection Masking
The Face Selection masking allows you to select faces and limit the weight paint tool to those faces, very similar to Vertex selection masking.
Hide/Unhide Faces
You also can hide selected faces as in Edit Mode with the keyboard Shortcut H, then paint on the remaining visible faces and finally unhide the hidden faces again by using AltH
Hide/Unhide Vertices
You cannot directly hide selected faces in vertex mask selection mode. However you can use a trick:
- First go to Face selection mask mode
- Select the areas you want to hide and then hide the faces (as explained above)
- Switch back to Vertex Selection mask mode
Now the verts belonging to the hidden Faces will remain hidden.
The Clipping Border
To constrain the paint area further you can use the Clipping Border. Press AltB and LMB ![]() -drag a rectangular area. The selected area will be "cut out" as the area of interest. The rest of the 3D window gets hidden.
-drag a rectangular area. The selected area will be "cut out" as the area of interest. The rest of the 3D window gets hidden.
You make the entire mesh visible again by pressing AltB a second time.
All weight paint tools that use the view respect this clipping, including border select, weight gradient and of course brush strokes.
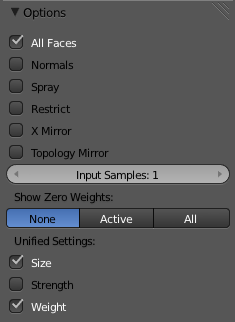
Weight Paint Options
The Weight Paint Options modify the overall brush behavior:
- All faces
- If this is turned off, you will only paint vertices which belong to a face on which the cursor is located. This is useful if you have a complicated mesh and you might paint on visually near faces that are actually quite distant in the mesh.
- Normals
- The vertex normal (helps) determine the extent of painting. This causes an effect as if painting with light.
- Spray
- The Spray option accumulates weights on every mouse move.
- Restrict
- The Restrict option limits the influence of painting to vertices belonging (even with weight 0) to the selected vertex group.
- X-mirror
- Use the X-mirror option for mirrored painting on groups that have symmetrical names, like with extension
.R/.L, or_R/_L. If a group has no mirrored counterpart, it will paint symmetrically on the active group itself. You can read more about the naming convention in Editing Armatures: Naming conventions. The convention for armatures/bones apply here as well. - Topology Mirror
- Use topology-based mirroring, for when both side of a mesh have matching mirrored topology.
- Input Samples
- ...
- Show Zero Weights
- None
- Active
- All
Unified Settings: The Size, Strength and Weight of the brush can be set to be shared across different brushes, as opposed to per-brush.
- Spray: to constantly draw (opposed to drawing one stroke per mouse click).
- Restrict: to only paint on vertices which already are weighted in the active weight group. (No new weights are created; only existing weights are modified.)
- x-mirror: to draw symmetrically. Note the this only works when the character symmetry plane is z-y (character looks into y direction).
- Show Zero weights: To display unreferenced and zero weighted areas in black (by default).
Weight Paint Tools
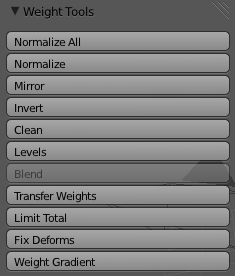
Blender provides a set of helper tools for Weight Painting. The tools are located in the weight tools panel.
The weight paint tools are full described in the Weight Paint Tools page
Weight Painting for Bones
This is probably the most often used application of weight painting. When a bone moves, vertices around the joint should move as well, but just a little, to mimic the stretching of the skin around the joint. Use a “light” weight (10-40%) paint on the vertices around the joint so that they move a little when the bone rotates. While there are ways to automatically assign weights to an armature (see the Armature section), you can do this manually. To do this from scratch, refer to the process below. To modify automatically assigned weights, jump into the middle of the process where noted:
- Create an armature.
- Create a mesh that will be deformed when the armature’s bone(s) move.
- With the mesh selected, create an Armature modifier for your mesh (located in the Editing context, Modifiers panel). Enter the name of the armature.
Pick up here for modifying automatically assigned weights.
- Select the armature in 3D View, and bring the armature to Pose mode (Ctrl⇆ Tab, or the 3D View window header mode selector).
- Select a desired bone in the armature.
- Select your mesh (using RMB
 ) and change immediately to Weight Paint mode. The mesh will be colored according to the weight (degree) that the selected bone movement affects the mesh. Initially, it will be all blue (no effect).
 - Weight paint to your heart’s content. The mesh around the bone itself should be red (generally) and fade out through the rainbow to blue for vertices farther away from the bone.
You may select a different bone with RMB ![]() while weight painting, provided the armature was left in Pose mode as described above. This will activate the vertex group sharing the name with the selected bone, and display related weights. If the mesh skins the bones, you will not be able to see the bones because the mesh is painted. If so, turn on X-Ray view (Buttons window, Editing context, Armature panel). While there on that panel, you can also change how the bones are displayed (Octahedron, Stick, B-Bone, or Envelope) and enable Draw Names to ensure the name of the selected bone matches up to the vertex group.
while weight painting, provided the armature was left in Pose mode as described above. This will activate the vertex group sharing the name with the selected bone, and display related weights. If the mesh skins the bones, you will not be able to see the bones because the mesh is painted. If so, turn on X-Ray view (Buttons window, Editing context, Armature panel). While there on that panel, you can also change how the bones are displayed (Octahedron, Stick, B-Bone, or Envelope) and enable Draw Names to ensure the name of the selected bone matches up to the vertex group.
If you paint on the mesh, a vertex group is created for the bone. If you paint on vertices outside the group, the painted vertices are automatically added to the vertex group.
If you have a symmetrical mesh and a symmetrical armature you can use the option X-Mirror. Then the mirrored groups with the mirrored weights are automatically created.
Weight Painting for Particles
Faces or vertices with zero weight generate no particles. A weight of 0.1 will result in 10% of the amounts of particles. This option “conserves” the total indicated number of particles, adjusting the distributions so that the proper weights are achieved while using the actual number of particles called for. Use this to make portions of your mesh hairier than others by weight painting a vertex group, and then calling out the name of the vertex group in the VGroup: field (Particles panel, Object context).
