Attic:Manual.de/PartII/ObjectMode
Objektmodus (Object Mode)
Eine Blender-Szene setzt sich aus einem oder mehreren Objekten zusammen: Lampen, Kurven, Oberflächen (Surfaces), Kameras, Drahtgitter (Meshes) und Grundobjekten, die in mesh_modelling_basic_objects näher beschrieben sind. Jedes Objekt kann im Objektmodus bewegt, rotiert und skaliert werden. Für detaillierte Änderungen der Geometrie eines Objektes wird der Editiermodus (Edit Mode) verwendet (siehe mesh_modelling_editmode). Wenn Sie mittels Space>>Add ein Grundobjekt erzeugt haben, wechselt Blender automatisch in den Editiermodus, sofern es sich bei dem Objekt um ein Mesh, eine Kurve oder eine Surface handelt. Per ⇆ Tab wechseln Sie zurück in den Objektmodus. Das Objekt wird nun pink dargestellt, was zeigt, dass es ausgewählt und aktiv ist.
Objekte auswählen
Um ein Objekt auszuwählen, klicken Sie mit der rechten Maustaste (RMB ![]() ) darauf. Wenn Sie mehrere Objekte selektieren möchten, halten Sie zusätzlich ⇧ Shift gedrückt.
Das zuletzt gewählte Objekt ist aktiv und wird in pink dargestellt, inaktive gewählte Objekte erscheinen lila.
Welches Objekt aktiv ist, spielt durchaus eine Rolle, z.B. wenn Sie Objektabhängigkeiten erstellen (parenting).
Wenn Sie einzelne Objekte aus bereits gewählten Objekten wieder deselektieren möchten, klicken Sie erneut mit ⇧ Shift und RMB
) darauf. Wenn Sie mehrere Objekte selektieren möchten, halten Sie zusätzlich ⇧ Shift gedrückt.
Das zuletzt gewählte Objekt ist aktiv und wird in pink dargestellt, inaktive gewählte Objekte erscheinen lila.
Welches Objekt aktiv ist, spielt durchaus eine Rolle, z.B. wenn Sie Objektabhängigkeiten erstellen (parenting).
Wenn Sie einzelne Objekte aus bereits gewählten Objekten wieder deselektieren möchten, klicken Sie erneut mit ⇧ Shift und RMB ![]() auf das Objekt. Durch das Halten von ⇧ Shift bleiben die anderen Objekte in der Auswahl enthalten.
auf das Objekt. Durch das Halten von ⇧ Shift bleiben die anderen Objekte in der Auswahl enthalten.
Drücken Sie A, um alle Objekte der Szene zu wählen (sofern keins gewählt ist), bzw. um die Auswahl aufzuheben (wenn Objekte gewählt sind).
Durch drücken der Taste B wird die Rahmenauswahl (Border Select) aktiviert, mit deren Hilfe Sie ein Rechteck über die zu wählenden Objekte ziehen können. Erneuter Druck auf B erzeugt einen Auswahlkreis, dessen Größe Sie mit dem Mausrad verändern können.
Note
|
Moving (translating) objects
To move a selected object or group of selected objects, press G to activate
Grab mode. The selected objects will be displayed
as white wireframes and can be moved with the mouse (without
pressing any mouse buttons). To confirm the new position, click
LMB ![]() or press ↵ Enter; to cancel
Grab mode, click RMB
or press ↵ Enter; to cancel
Grab mode, click RMB ![]() or press Esc.
The header of the 3D Window displays the distance you are moving.
To lock movement to an axis of the global coordinate system, enter Grab
mode, move the object roughly along the
desired axis, then press MMB
or press Esc.
The header of the 3D Window displays the distance you are moving.
To lock movement to an axis of the global coordinate system, enter Grab
mode, move the object roughly along the
desired axis, then press MMB ![]() . To deactivate locking
press MMB
. To deactivate locking
press MMB ![]() again.
As a new 2.3 feature you can constrain movement to a given axis by pressing
X, Y or Z. A single key constrains movement to the
corresponding global axis, as MMB
again.
As a new 2.3 feature you can constrain movement to a given axis by pressing
X, Y or Z. A single key constrains movement to the
corresponding global axis, as MMB ![]() does.
A second keypress of the same key constrains
movement to the corresponding Object local
axis.
A third keypress of the same key removes constraints. Lines
are drawn to let you better visualize the constraint.
Once grabbing is activated you can enter the Object
translation numerically by simply typing in a number. This will
let you enter the first co-ordinate shown in the 3D Window header.
You can change co-ordinate with ⇆ Tab use N to exit/re-start numeric
input mode, ↵ Enter to finalize and Esc to exit. ← Backspace
will return to original values. Please note that you must use the keyboard .
not the . NumPad for decimals.
If you keep Ctrl pressed while moving the object
you will activate snap mode, and the object
will move by a whole number of Blender units (grid squares).
Snap mode ends when you release Ctrl so be sure
to confirm the position before releasing it.
The location of selected
objects can be reset to the default value by pressing
AltG.
does.
A second keypress of the same key constrains
movement to the corresponding Object local
axis.
A third keypress of the same key removes constraints. Lines
are drawn to let you better visualize the constraint.
Once grabbing is activated you can enter the Object
translation numerically by simply typing in a number. This will
let you enter the first co-ordinate shown in the 3D Window header.
You can change co-ordinate with ⇆ Tab use N to exit/re-start numeric
input mode, ↵ Enter to finalize and Esc to exit. ← Backspace
will return to original values. Please note that you must use the keyboard .
not the . NumPad for decimals.
If you keep Ctrl pressed while moving the object
you will activate snap mode, and the object
will move by a whole number of Blender units (grid squares).
Snap mode ends when you release Ctrl so be sure
to confirm the position before releasing it.
The location of selected
objects can be reset to the default value by pressing
AltG.
Note
If you are striving for a very fine and precise positioning, keep ⇧ Shift pressed as you move. This way a large mouse movement will translate to a small object movement, which allows for fine tuning. |
Blender Gesture System
|
Rotating objects
To rotate objects, activate Rotate mode by pressing
R. As in Grab mode, you can change the
rotation by moving the mouse, confirm with LMB ![]() ,
or ↵ Enter and cancel with RMB
,
or ↵ Enter and cancel with RMB ![]() or Esc.
Rotation in 3D space occurs around an axis, and there are various
ways to define this axis. Blender defines an axis by
a direction and a point that it passes through. For example, by default, the
direction of the axis is orthogonal to your screen.
If you are
viewing the scene from the front, side, or top, the
rotation axis will be parallel to one of the global coordinate
system axes. If you are viewing the scene from an angle, the rotation axis
is angled too, which can easily lead to a very odd rotation of your
object. In this case, you may want to keep the rotation axis
parallel to the coordinate system axes. You can toggle this behaviour by
pressing MMB
or Esc.
Rotation in 3D space occurs around an axis, and there are various
ways to define this axis. Blender defines an axis by
a direction and a point that it passes through. For example, by default, the
direction of the axis is orthogonal to your screen.
If you are
viewing the scene from the front, side, or top, the
rotation axis will be parallel to one of the global coordinate
system axes. If you are viewing the scene from an angle, the rotation axis
is angled too, which can easily lead to a very odd rotation of your
object. In this case, you may want to keep the rotation axis
parallel to the coordinate system axes. You can toggle this behaviour by
pressing MMB ![]() during Rotate mode and watch the
angle being updated in the window header.
Alternatively, once you are in Rotate mode, you can press
X,
Y or Z to constrain rotation
along that axis of the global reference. By
pressing X twice you can constrain rotation
around the X axis of the Object's local reference system.
The same is true for both Y and Z.
As for Grab, a third keypress removes constraints.
It is possible to have a numerical input for rotation exactly as it
was for translations.
Select the point for the rotation axis to pass through
using the pertinent menu in the header of the 3D window, as discussed below.
(The rotation point selection buttons).
during Rotate mode and watch the
angle being updated in the window header.
Alternatively, once you are in Rotate mode, you can press
X,
Y or Z to constrain rotation
along that axis of the global reference. By
pressing X twice you can constrain rotation
around the X axis of the Object's local reference system.
The same is true for both Y and Z.
As for Grab, a third keypress removes constraints.
It is possible to have a numerical input for rotation exactly as it
was for translations.
Select the point for the rotation axis to pass through
using the pertinent menu in the header of the 3D window, as discussed below.
(The rotation point selection buttons).
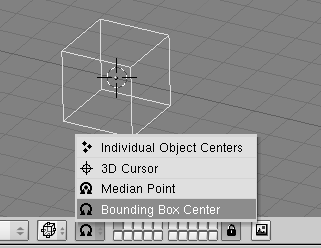
- Bounding Box Center - the axis passes through the center of the selection's bounding box. (If only one object is selected, the point used is the center point of the object, which might not necessarily be in the geometric center. In The rotation point selection buttons it is on the middle of the rightmost edge, marked by a purple dot. For more on this point, see mesh_modelling_editmode.)
- Median Point - the axis passes through the median point of the selection. This difference is only relevant in EditMode, and the 'Median' point is the barycentrum of all vertices.
- 3D Cursor - the axis passes through the 3D cursor. The cursor can be placed anywhere you wish before rotating. You can use this option to easily perform certain translations at the same time that you rotate an object.
- Individual Object Centers - each selected object receives its own rotation axis, all mutually parallel and passing through the center point of each object, respectively. If you select only one object, you will get the same effect as with the Bounding Box Center button.
If you're just getting started with rotation, don't worry too much about the foregoing details. Just play around with Blender's tools and you'll get a feeling for how to work with them. Keeping Ctrl pressed switches to Snap mode and rotations are constrained to 5 degree increments. However, keeping ⇧ Shift pressed while rotating allows for much finer degrees of rotation as presise as 1/100th of a degree. The rotation of selected objects can be reset to the default value by pressing AltR.
Blender Gesture System
|
Scaling/mirroring objects
To change the size of objects, press S. As with
Grab mode and Rotate mode, you can scale the objects by moving the mouse and
confirm with LMB ![]() or ↵ Enter, and
cancel with RMB
or ↵ Enter, and
cancel with RMB ![]() or Esc.
Scaling in 3D space requires a center point. This point is defined
with the same buttons as the axis' supporting point for rotation
(The rotation point selection buttons). If you increase the size of
the object, all points are moved away from the selected center
point; if you decrease it, all points move towards this point.
By default, the selected objects are scaled uniformly in all
directions. To change the proportions (make the object longer,
broader and so on), you can lock the scaling process to one of the
global coordinate axes, just as you would when moving objects.
To do so, enter Scale mode, move the mouse a bit in the direction of the
axis
you want to scale, then press MMB
or Esc.
Scaling in 3D space requires a center point. This point is defined
with the same buttons as the axis' supporting point for rotation
(The rotation point selection buttons). If you increase the size of
the object, all points are moved away from the selected center
point; if you decrease it, all points move towards this point.
By default, the selected objects are scaled uniformly in all
directions. To change the proportions (make the object longer,
broader and so on), you can lock the scaling process to one of the
global coordinate axes, just as you would when moving objects.
To do so, enter Scale mode, move the mouse a bit in the direction of the
axis
you want to scale, then press MMB ![]() . To return to
uniform scaling, press MMB
. To return to
uniform scaling, press MMB ![]() again. You will see the
scaling factors in the header of the 3D window.
Again all considerations on constraining to a specific axis, in respect to Grabbing,
still hold as well as those on numerical input.
Here again Ctrl switches to Snap mode, with discrete
scaling at 0.1 steps. Press ⇧ Shift for fine tuning.
The scaling of selected
objects can be reset to the default value by pressing
AltS.
Mirroring objects is a different application of the scale tool. Mirroring
is effectively nothing but scaling with a negative factor
in one direction. To mirror in the direction of the X or Y axes, press S
to go to scaling mode, then N to switch to numeric input. Select the
desired coordinates and enter '-1' as scaling factor.
again. You will see the
scaling factors in the header of the 3D window.
Again all considerations on constraining to a specific axis, in respect to Grabbing,
still hold as well as those on numerical input.
Here again Ctrl switches to Snap mode, with discrete
scaling at 0.1 steps. Press ⇧ Shift for fine tuning.
The scaling of selected
objects can be reset to the default value by pressing
AltS.
Mirroring objects is a different application of the scale tool. Mirroring
is effectively nothing but scaling with a negative factor
in one direction. To mirror in the direction of the X or Y axes, press S
to go to scaling mode, then N to switch to numeric input. Select the
desired coordinates and enter '-1' as scaling factor.
Blender Gesture System
|
Transform Properties Panel
Say you want to display the position/rotation/scaling of your object
in numbers. Or, you want to enter the location, rotation, and
scaling values for an object directly at once. To do so, select
the object you want to edit and press N.
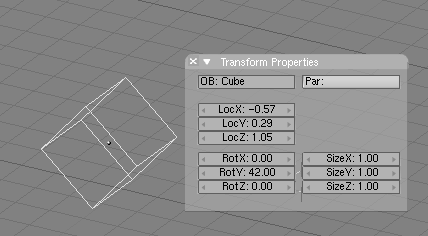
The Transform Properties Panel (The number dialog) is
displayed. Use ⇧ ShiftLMB ![]() to enter a number manually, then press 'OK' or click outside of the edit area to confirm the changes or hit Esc to cancel.
to enter a number manually, then press 'OK' or click outside of the edit area to confirm the changes or hit Esc to cancel.
The panel also displays the Object name in the OB: Button. As with any of the fields in this panel you can edit the name as well.
Duplicate
To duplicate an object, press ⇧ ShiftD to create an identical copy of the selected object(s). The copy is created at the same position as the original object and, in addition, you are place in Grab mode. This is a new object and it 'shares' any Material(s), Texture(s), and IPO(s) from the original object. These attributes are linked to both copies and changing the material of one object also changes the material of the other. (You can make separate materials for each, as described in the Materials Chapter.) You can create a Linked Duplicate rather than a real duplicate by pressing AltD. This will create a new object with all of its data linked to the original object. If you modify one of the linked objects in EditMode, all linked copies are modified.
Parenting (Grouping)
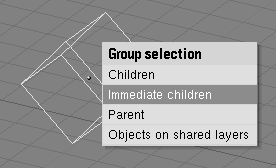
To create a group of objects, you must first make one of them the parent of the others. To do so, select at least two objects, press CtrlP, and confirm on the dialog Make Parent?. The active object will be made the parent of all the others. The center of all children is now linked to the center of the parent by a dashed line. At this point, grabbing, rotating, and scaling the parent will do the same to the children being grabbed, rotated and scaled likewise. Parenting is a very important tool with many advanced applications, as we'll see in later chapters. Press ⇧ ShiftG with an active object to see the Group Selection menu (Group Select). This contains:
- Children - Selects all the active objects' children, and the children's children, up to the last generation.
- Immediate Children - Selects all the active objects' children but not those of the selected object's parent.
- Parent - Selects the parent of the active object and deselects the active object.
- Objects on shared layers - This actually has nothing to do with parents. It selects all objects on the same layer(s) of the active object.
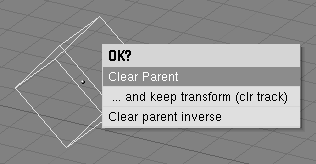
You can Move a child object to its parent by clearing its origin (select it and press AltO). You can Remove a parent relationship via AltP. You can (Freeing Children):
- Clear parent - Frees the children, of which they return to their original location, rotation, and size.
- Clear parent...and keep transform - Frees the children, and keeps the location, rotation, and size given to them by the parent.
- Clear parent inverse - Places the children with respect to the parent as if they were placed in the Global reference. This effectively clears the parent's transformation from the children.
Tracking
To make one or more objects rotate such that the object(s) face another object (the target) --even if the target object is moved-- select at least two objects and press CtrlT.
The Make Track dialog will appear with several items:
- TrackTo Constraint - The choice will be analyzed in character_constraints and is the preferred method.
- LockTrack Constraint - This restricts one axis from movement.
- Old Track Constraint - This is an older algorithm prior to version 2.30 and is similar to TrackTo Constraint in that no axis is locked.
The last selected object will become the target object that is tracked.
Here we will briefly look at the old tracking system, so, let's assume you have selected Old Track in the dialog. By default the inactive object(s) now track the active object so that their local y axis points to the tracked object.
However, this may not happen if the tracking object already has a rotation of its own. You can produce correct tracking by canceling the rotation (AltR) of the tracking object.
The orientation of the tracking object is also set such that the
z axis is pointing upward. To change this first select the tracking
object (not the target) and change the Button Window to Object Context (![]() , or
F7). Then select the tracking axis from the first row
of six radio buttons and then select the upward-pointing axis from the second row in the
Anim Setting panel.
, or
F7). Then select the tracking axis from the first row
of six radio buttons and then select the upward-pointing axis from the second row in the
Anim Setting panel.
(Setting track axis.).
To clear a track constraint, select the tracking object and press AltT. As with clearing a parent constraint, you must choose whether to lose or save the rotation imposed by the tracking.
Other Actions
Erase
Press X or Del to erase the selected objects. Using X is more practical for most people, because it can easily be reached with the left hand on the keyboard.
Join
Press CtrlJ to join all selected objects to one single object. (The objects must be of the same type.) The center point of the resulting object is obtained from the previously active object.
Select Links
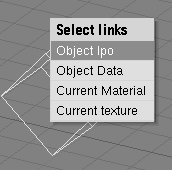
Press ⇧ ShiftL to select all objects sharing a link with the active one. You can select objects sharing an IPO, data, material, or texture link (Selecting links.).
