Doc:2.6/Manual/Textures/Mapping/UV/Layout Management
Page status (reviewing guidelines)
Copy
This page is a copy of the same page in 2.4 manual, need to be updated
Partial page
|
Managing UV Maps
After you finish editing a UV map, you may need to create additional maps on the same object, or transfer a UV map to another mesh.
Transferring UV Maps
You can copy a UV Map from one mesh to another Mesh provided both meshes have the same geometry/vertex order. This is useful for example when you want to recreate a UV map from an earlier version of your model with intact UVs.
Workflow
- RMB
 Select the target mesh (to which you want to copy the UV Map)
 - ⇧ Shift select the source mesh (that contains the intact UV map)
- Object menu » Make Links... » Transfer UV Layouts (Shortcut: CtrlL ...)
The target Mesh will now have a UV map that matches the original mesh.
Multiple UV Maps
You are not limited to one UV Map per mesh. You can have multiple UV maps for parts of the mesh by creating new UV Textures. The first UV Texture is created for you when you select a face in UV Face Select mode. You can manually create more UV Textures by clicking the New (+) button in the UV maps panel located in the object data button of the properties editor, and unwrapping a different part of the mesh. Those faces will then go with that UV Texture, while the previously unwrapped faces will still go with the previous UV Texture. Note that if you unwrap the same face twice or more times (each time to a different UV Texture), the coloring for that face will be the alpha combination of the layers of those UV Textures.
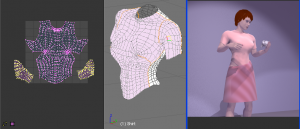
In the example to the right, we have a mesh for a blouse. The mesh has been seamed as a normal blouse would, shown in the middle in UV Face Select mode. Wishing to make a cut pattern, the front of the blouse was unwrapped and basic rotation and scaling was done to center it in the UV/Image Editor window. It was then moved off to the side, while the left and right sleeves were unwrapped, each rotated and scaled. Then, select a sample face from each cloth piece, in the 3D View Select->Linked Faces, and the UV/Image Editor will show all those pieces (as shown to the right). You can then work with all pieces for that UV Map. The example shows all three pieces moved onto the image area for painting. As you can see, the pattern nicely fits a square yard of cloth.
Another UV Map was created by clicking the New button in the UV Maps panel, and the process was repeated for the backs of the sleeves and the back of the blouse. Two images, one for the front and one for the back, are used to color the fabric. In this case, some faces map to the first texture, while other faces map to the second texture.
UV Textures List
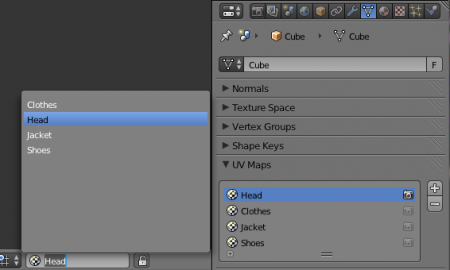
The UV Maps panel (shown to the right) lists the UV Texture maps created for this mesh, and allows you to create New ones as placeholders for future unwrapping operations.
Click the + button to add a new UV texture, and the - to delete an existing one}}. Deleting a UV Map for the mesh destroys all work done in all unwrapping associated the mesh. Click with care. You've been warned.
Each map has a selector button. Click the camera icon to enable that UV texture for rendering. You can change the name by selecting one and changing the text in the Name box. The selected map is displayed in the UV/Image Editor window. The example shows a few UV maps created for a character, and the map for Head is selected.
Note that each texture can be mapped to a specific UV texture. See the Mapping section of the texture panel.

