Extensions:2.6/Py/Scripts/Add Mesh/Castle
目次
Castle
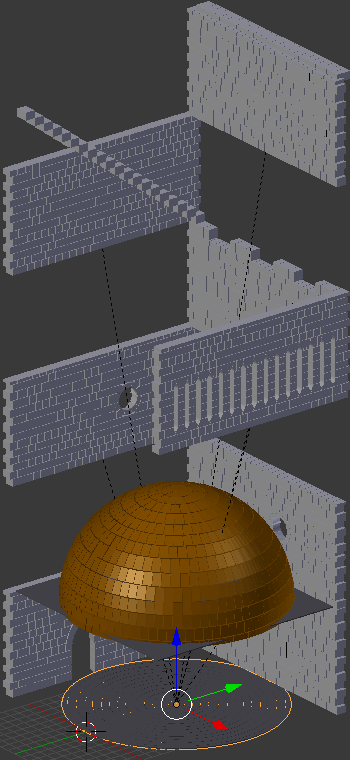
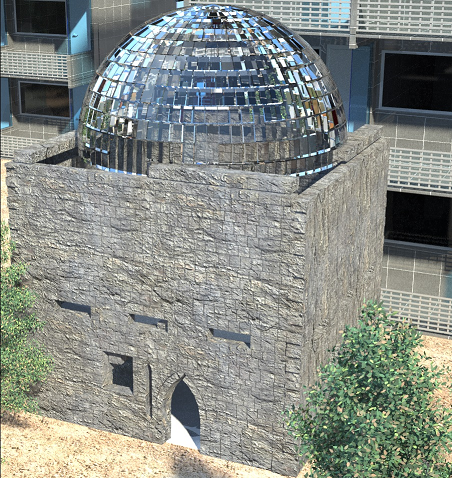
Many components are available to create a "Castle" object. A simple "3D plane" defines the "base" (foundation) which affects the walls and many other options. In combination they result in an object that represents a medieval style Castle.
The overall "space" of the castle, offset from the current 3D cursor location, is determined by the width and depth of the base, the height of the wall, levels (vertical repeat for wall), along with the sizing and location of other features such as: Dome, Steps, Shelf and Openings.
Source: Download from the Task. The source scripts are located in a sub-folder named "add_mesh_castle" in the "addons_contrib" directory. See Using Add-ons for standard procedure to access the features documented here.
Questions or comments may be posted in the Task or chat in IRC (#blenderpython).
Documentation is always in progress and seldom if ever matches the code. There are No Guarantees that the user experience for Blender, UI, features, or screen-shots are the same as this documentation.
There is only one object per "Add". Every time a property is changed it replaces the current object; no undo for individual parameters. This includes modifying the color/material value which will regenerate for each "shift" in value.
Options when disabled will collapse to simplify the user interface and exclude related selections. You will need to "select" some options in order to modify the properties. Turning off an option will preserve any changes made, displaying last setting if enabled again.
check-boxes ![]() for Front, Left, Back and Right create an optional "wall" for each side of the castle that track with the "base" dimensions. Similarly stairs, shelves, and openings can be enabled for each "wall".
for Front, Left, Back and Right create an optional "wall" for each side of the castle that track with the "base" dimensions. Similarly stairs, shelves, and openings can be enabled for each "wall".
The "color picker tool" ![]() is used to set the material (RGB/color) for many elements. Warning: each "change" to the color will regenerate the "Castle"; slow performance and affects "randomization" results.
is used to set the material (RGB/color) for many elements. Warning: each "change" to the color will regenerate the "Castle"; slow performance and affects "randomization" results.
UI (toolbox) parameters are primarily presented in a table:
| Name | Value | Description |
The "Value" setting is typically the maximum limit for a specific parameter that may be constricted by other user selections. It may also may be a check-box or "drop-down" selection. Value minimums are usually 0, sometimes forced to be "not 0" (0.01) or may allow a negative.
Default values/settings are subject to change and are intended for "simple use" and "ease of viewing", not a final product; they are a starting point, not a formal way on how to use what is available or limit what can be done other than within the intended design.
| Default values | |
| Use the "Right Mouse Button" RMB |
Construct
The "Construct" flag is provided to prevent replacing the object for each modification, when off the object will not be generated. This is for performance reasons and prevents the "disappointment" of intermediate results that won't be preserved when changing any other options.
Base
Width and Depth define the base limits. These settings affect the sizing of the walls and Dome.
Blocks
Create a "surface" with "blocks". Define the the block distribution in the area; columns (width), rows (height), and thickness (depth).
Vertical or Horizontal orientation will determine how some measures are used (i.e. floor (horizontal plane) depth = height).
Each "size" (width, height, depth) setting has a Variance (randomization) and a Minimum (size limit) - the minimum is determined programmatically. The variance value applies a "random (+-)" difference to create an uneven appearance to the blocks; hopefully creating a more realistic result. Minimum is a lower limit that the variation can result in.
| Variance | 100 | If Variance is 0 blocks will be consistent (same size) over area; something more like bricks. Except: top and bottom rows are usually taller by design; openings may "force" some rows to be a different size. |
Advanced Blocks:
Change the block size - even if you plan to scale it later - yes, you should make them smaller to add "detail" to the general appearance; big blocks randomized make a great result too.
Set Variance to more than related property value for interesting effects, especially with Depth - "Big Blocks" effect for all directions.
Extrusions may be obscured by wall blocks if the depth is greater than step or shelf sizing.
Walls
A check-box is provided for each side to create a wall, per level; works in conjunction with "Modifiers".
Wall Modifiers
Modifications to a wall include "Openings" and "Extrusions".
Openings create "holes" in the wall that may be used as doors, windows, crenelations, and other features. The "openings" are similar but individual in order to provide multiple options for the user.
Extrusions extend blocks from wall to create steps or shelf (balcony) using block sizing to fill the area.
A check-box is provided for each wall to enable an option, per level.
Openings
The width (X+), height (Z+), indent (X), and Bottom (Z) define the area and location for the "hole".
Arches "extend" the hole based on curve; if curve is less than half of width it will be smooth, else pointed.
Door
Create a "door" opening in the wall.
Window
The "Window" opening is very similar to the "Door" and other options and is provided to allow multiple "styled" apertures in the wall.
Advanced Window:
Create a circular "window" when arches are selected by setting the height to minimum.
Create a "solid wall" by setting the window "Base" above the wall height.
Slots
Narrow slits (default settings); meant for view/arrow ports. However, properties can be modified to replicate similar results to standard "Openings".
Arches are (extended) outside of opening area.
Advanced Slots:
Bug/feature: overlapping openings create "blocks" in common (overlapped) area. For slots this appears to be a problem, when using both Vertical and Horizontal, but, when you match (overlap) slots to "standard openings" you get an inverse block creation that you may like.
Crenels
Crenelation are gaps along the top of the wall. Sizing is a "ratio" of the wall area, 1 = 100%.
| Width | % | Create repeated openings across top of wall area. Minimal block size area will be created so Crenelation width cannot actually be 100% and thereby clip top of wall. |
| Height | % | Vertical size of opening offset from top of wall. 100% will result in block shaped "columns" by exclusion. |
Extrusions
If [half] block "Depth" is more than step/shelf "Depth" it will obscure the element [not visible].
Steps
Add extruded incremental levels in defined area to create steps; left or right oriented. Uses block sizing values for block widths; does not vary gap/grout. Steps fix block height to "riser".
The "Riser" and "Tread" determine the step sizing. If the "combined" values do not fit within the "area" the steps may not reach the top (Height).
Shelf
Add blocks to wall to make a platform, protrusion, in defined area. Uses block sizing values for rows and block widths.
Dome
A dome shape is created related to the castle base and block settings with minimal modifications - color, height, and the vertical location of the dome.
| Material | Set material RGB/color. | |
| Height | 100 | Dome height. |
| Base | 100 | Vertical offset from floor. |
Experimental
Curve: Curve wall along y-axis, with top as origin; bottom will be offset from cursor.
Tunnel: Curve wall along y-axis, with top as origin; bottom will be offset from cursor.
Tower: Create a (separate) curved wall, no options, rotate and place. Meant to be a tower/turret but need to work on openings and circumference; eventually roofing.
Blender Tools
Modifications you may want to apply to an object using built-in Blender capabilities.
Bevel
Square blocks minimize the number of vertex points and faces but look artificial; put a bevel on the blocks to improve the general appearance.
Warning: Adding bevel will [at least] double the time it takes to render object - use this modifier sparingly; and it's best to wait until you're "almost done" before using it.
Properties>>Tools
Add Modifier - Select Bevel Scale: 0.10 works just fine... :)
Texture
Put a "finish" on your stone-work: This example describes using an image texture for simplicity. A "good" image, in this use case, will be large and have a lot of detail. The texture is applied to the object, not individual block elements.
The following is basic, and standard procedure for applying a texture to an object.
Select the object Properties>>Material
Add a new material. Name it Wall-Material.
Properties>>Texture Add a new texture. Name it Wall-Texture.
Set "Type" to Image.
Under Mapping tab, select Cube for projection.
Under Image tab, "Open" and select texture image.
Sampler
This shows the result of the options, as presented in Blender, that may be used to generate a Castle. It is not a reasonable design.

Credits
This script is NOT original and would not be possible without the help of many others. The code was developed using examples from many scripts, along with guidance/support/suggestions from many in the Blender community.
Particular thanks to the originators and support for this project: Dudecon, Meta-Androcto, TynkaTopi, antonioya, campbellbarton, mont29. And to think it all just started with "fixing" the Column.py script for 2.7x releases.
